Last fall while practising some off road skills, I broke my radiator. I was working on power slides using two cones and riding hard in a figure eight. In a power slide, you brake slide into the corner, then at the apex crack the throttle, break the rear end loose, and slide the back end around as you accelerate out of the corner. In one attempt, I must have angled the bike too much or not cracked the throttle enough (you’re aiming for the right combination of both) because the bike just plopped down on its side. It was already at a steep angle and didn’t fall far, and onto sand, no less, so I didn’t think much of it. But a few minutes later the temperature light came on and the bike overheated. At over $600 for a new radiator and no used ones available on eBay, I decided to put the bike into storage early and deal with it in the spring.
This gave me a whole winter to think about what happened. Was it just bad luck? I decided to buy some upper crash bars to protect the faring and radiator in the future. I have lower crash bars and even some makeshift ones that I’ve had welded onto those, extending out past the pegs and which I thought would be wide enough to protect the upper part of the bike in a fall. But this happened on sand, not asphalt, so they simply sunk into the sand and didn’t stop the impact on the radiator. Ironically, if the bike had fallen on asphalt, I’d be $600 richer. So yeah, bad luck. But I also got to thinking about the Dakar riders and how they dump their bikes all the time on sand and don’t end up with busted radiators. What saves their rads on impact and not mine?
Two winters ago, I was considering a trip to Blanc Sablan, QC, which would have required riding the Trans-Labrador Highway. It’s 1,500 kilometres of gravel road, and without cell service (only satellite phones placed periodically along the highway) and logging trucks barreling past you, it’s imprudent to be without a radiator guard. One errant stone thrown or kicked up into the fragile fins of the rad and you are stranded in the middle of . . . not nowhere, but Labrador, and that’s not good. So I installed a radiator guard.
From the beginning, I wasn’t entirely happy with it. For one, it required removal of the OEM (Original Equipment Manufacturer) shrouds to install. One look at the shrouds and you can see they’re designed to funnel air into the radiator as well as offer some protection from flying stones. In addition to concerns about adequate cooling, the guards (there are two, one for each side) are also a little flimsy. They are thin aluminum, designed to be light, but because the body panels snap into grommets on the guards (or, originally, the shrouds), they serve another important purpose in supporting the structural integrity of the bike.
Looking at the guard that came off my bike, I could see that it had buckled upon impact.


And this is after some initial straightening. My guess is that the body panel bent the guard and the weight of the bike torqued the radiator. (The leak is in a bottom corner.) It might even be that the guard was shoved into the radiator upon impact because some of the fins are damaged. The OEM shrouds, although plastic, are stronger and might have prevented the damage. Ironically, it’s quite possible that my radiator guard led to my radiator breaking! The lesson here is beware of altering OEM parts on your bike. Sometimes those German engineers know what they are doing. And these bikes, all bikes today, are thoroughly tested before going on the market. Swap out OEM parts for aftermarket ones with prudence!
So I decided to go back to using the OEM shrouds. I wasn’t completely happy because my new radiator would still be vulnerable. The only other major manufacturer of guards for my bike also requires that you remove the shrouds. I therefore had no choice but to try making my own, some that would fit inside the openings of the shrouds.
When I was a kid and was working on my bicycle (or some other project) and needed something very specific, I’d just walk around in my parents’ basement until I found it. I’d have a vague idea in mind of what I needed, and since my parents’ basement was filled with stuff of all kinds, it was just a matter of time before something that would do just the trick presented itself. Walking through a home renovation warehouse is a similar experience. You don’t know exactly where to find what you envisage or even what section it might be in, but keep walking. In my case, I found my new radiator guards in the eavestroughing section.
I started with some aluminium grill that goes in your gutters to keep leaves out. It was cheap and perfect width and even pre-painted black. Most importantly, the openings were the right size—not so big as to let small stones through but big enough to allow sufficient airflow. It was also strong enough to withstand the shake, rattle, and (unfortunately) roll of off-roading. 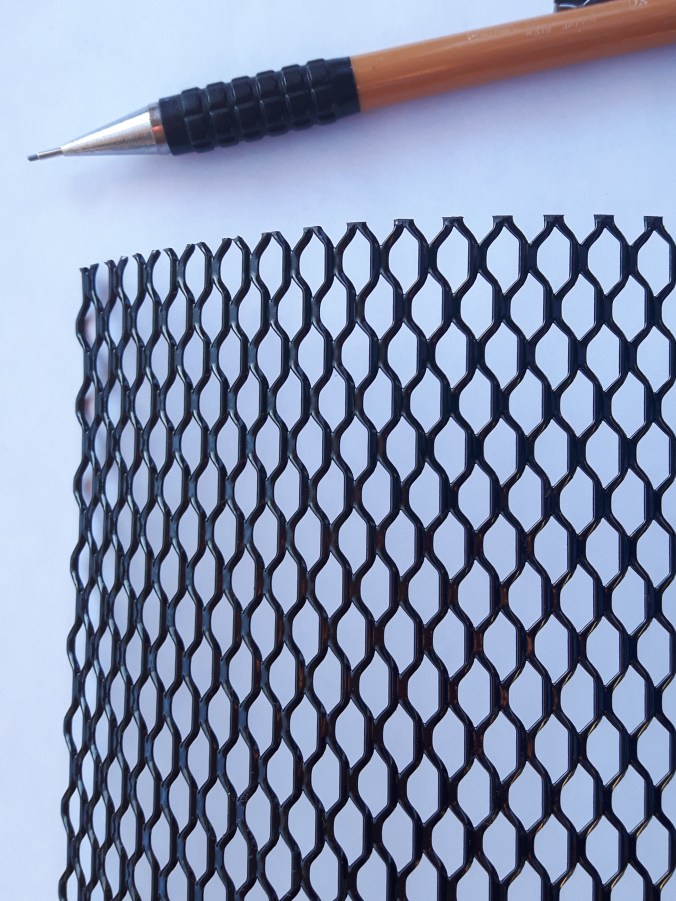
Then I carefully measured the openings of the shrouds.  I used some cardboard and created templates that I could fit into the openings. They were basically squares but with the edges folded about 1/4″. I would use those edges to fix the grill to the shroud, but more on that later. I had to cut the corners so when folded they became like a box (or half a box). One opening on each side was a little tricky because one side of the square is not straight but has a jog. Carefully measuring and fiddling is necessary, but better to do this with cardboard before cutting into your grill.
When I had the four templates, I held each up to the grill and cut using tin-snips.  This is a little messy and you have to vacuum carefully afterwards to collect all the sharp bits of discarded metal. I then held the template against the cut metal and used my Workmate, my vice, and some blunt-nosed pliers to fold and shape the guards.
 I offered each into its opening and tweaked.
  This requires patience, but if you follow your templates as a guide, which you know fit well, you’ll eventually get there. Use the tin-snips or pointed-nose pliers to trim off or bend in sharp edges that can scrape the plastic as you fit them. If you do scratch the plastic a bit, use some Back to Black or Armour All to lessen the visibility of the scratch.
Finally, I wrapped each edge with electrical tape to give it a finished look and prevent the sharp edges from scratching with vibration.  Fortunately, those clever German engineers had the foresight to drill two holes in the opposite side from the mounting points, probably with something like this in mind. When the guards are done, you can fix them into the shrouds using the mounting screws on the inside and either zip ties or 1/2″ 10-24 machine screws and washers on the outside. I decided to go with the screws just to be sure everything stays put.
Here’s the finished product. I’m happy that I’ll get the cooling effect of the OEM shrouds plus protection for my new (expensive!) rad.
These guards are particular to my bike and unless you have a 650GS you’re going to be facing a different situation. Maybe there is a good guard or any other add-on for your bike on the market. But if there isn’t, or if you’re not entirely happy with the product or the price, don’t overlook the option of making it yourself. With a little ingenuity, time, and patience, you can sometimes do better and save yourself some money in the process.
