You Can’t Get There From Here: Navigation Apps

In this final post in a series on gear, I discuss the navigation apps I use when touring.

Old-School Navigation. I still like to tour with a map on my tank bag.

“I learn by going where I have to go,” Theodore Roethke says in the refrain of his famous villanelle “The Waking.” That may be a good philosophy in life, but when motorcycle touring, it’s downright dangerous. There’s nothing worse than not knowing where you’re going and fumbling with a GPS in traffic while riding. Yeah, I’m all for exploration and adventure when you don’t have to be somewhere, but when the light is fading and you still don’t know where you are pitching camp, or when your fuel gauge is on one bar and you don’t know where the next gas station is, that’s a problem.

Charging

I learnt early in my touring experience that navigation is huge, maybe because I had so many problems keeping my phone charged. If the USB port detects moisture, the phone stops charging, and it doesn’t take long for a GPS app to drain your battery. And then there’s the cord. If your phone isn’t charging and the port isn’t wet, it’s probably the cord. They make them so cheap these days that the internal wires break. I once had to ride from the Cabot Trail over to the Best Buy in Sydney, NS, just to buy a new cord to get me home. What a pain!

So let me say at outset that if you don’t yet have wireless charging on your bike, you should. It’s a game changer. It avoids 90% of the issues you are going to face on tour. For years I worked around the charging problem by using the type of cord that has magnetic adapters. I siliconed the appropriate adapter into the port of my phone, then just attached the USB cord via the magnet to charge the battery. Rain didn’t affect the charging. The cord was still liable to break, but they are cheap and you can buy, like, a 4-pack on Amazon for $20 so can carry several.

The problem with this set-up is that the magnetic adapters are fine for charging, but most can’t transfer data, so now your phone is limited off the bike. Maybe you don’t want to silicone an adapter into your $1,100 iPhone 14. I worked around this by buying off eBay a cheap, used, military grade phone that I dedicated for bike navigation. It didn’t have a SIM card in it and was locked, but it didn’t matter: I used it in Flight Mode. That’s right, I don’t have a huge data plan and I ride in places that often don’t have cell service, so I download all my maps before leaving.

Navigation

The main app I use to navigate is OsmAnd+ because it is open source and includes free maps to be used offline. This is also great when I travel in The States because I don’t get hit with roaming charges. Last I looked, OsmAnd+ was about $20. I bought the Plus (paid) version because it imports GPX tracks, which I need for leading club rides, but the free version works perfectly well for navigation, if that’s all you need. OsmAnd also includes contour lines and hillshades layers. When I venture off-road, it’s nice to know how steep the mountain is going to be. There is also a Points of Interest (POI) layer so I can see gas stations, restaurants, healthcare, parking, and convenience stores and supermarkets on the map (configurable), and a Wikipedia layer, so I can see what significant landmarks I’m riding past or near. It’s a great little app, available for both Android and iOS.

OsmAnd Screenshots

I’ve tried maps.me, Gaia, Locus Map (Pro and Classic), Scenic, Eat Sleep Ride, and others, but I always come back to OsmAnd. It’s easy to use yet full-featured, a rare combination. It does what I need it to do and no more. Do I really need to know how far over I leaned the bike on my latest ride? Do I really need crash detection? Does my wife prefer to hear that I’ve crashed from an app or a person? But the main reason I like OsmAnd is for the free maps. I started using Locus Map Pro but maps are $1 per country. That sounds cheap—$1 for all of Canada—but for some reason they consider each state in the US a country, so that can add up fast. I still have these other apps on my phone as back-ups but I don’t really use them.

The other main app I use to navigate is Google Maps, now called just Maps. (I guess Google figures it’s so ubiquitous we no longer need the brand name.) Maps handles addresses better than any other app, thanks to Google’s AI. Need to know where a specific place is but you don’t know the address? Just Google it, then press the navigation arrow icon and it loads in Maps and guides you there. Easy peasy. As much as I like OsmAnd, you need a specific address for it to find your destination. (You can, however, press and hold on the map to choose a specific point of destination.)

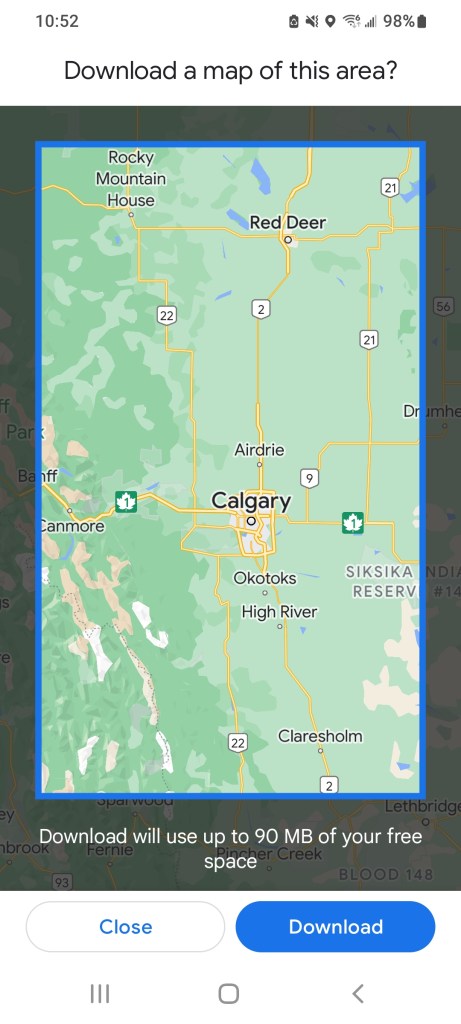
You can use Maps also offline, but like OsmAnd, you have to download offline maps before leaving home. (The search feature, however, does require cell service.) In the upper right hand corner, press your identity icon, then select Offline Maps from the menu. Press “Select Your Own Map,” zoom and position the frame using two fingers to select the area you want, then press Download. I name each map so I can keep track of them. They will expire if left unused for a certain amount of time, but you can update them all quickly and easily every once in a while when you are in a Wi-Fi zone. I downloaded maps for all the provinces I planned to tour before heading across the country. I didn’t need the northern part of most provinces, but I grabbed everything where I thought I might be riding. This was important since I was often not in a region with cell service.

The only other navigation app I use is Waze, and I only ever use it around town, frankly. That’s because it shows where the cops are. Nice! (Not that I ever speed.)

Route Planning

For route planning, I use the web-based Kurviger. Forget BaseCamp. Kurviger is intuitive and full-featured. I choose the type of route (highway, straight, curvy, very curvy; one-way or round trip), the origin and destination, and Kurviger comes up with an interesting route. I then drop in shaping and waypoints to shape the route exactly how I want it, flipping back and forth between Kurviger and Maps in street view to check the quality of the road. (Drag the little yellow man, ur, person, icon onto the map to see a street view.) When I’ve got the route exactly how I want it, I export it to a gpx file. Kurviger can generate a QR code for the file or hyperlink to share, or send it directly to Scenic, if that’s your preferred navigation app. I usually email the gpx file to myself then open it on my phone, which knows to open gpx files in OsmAnd.

Screenshot of the web-based Kurviger route planning app.

I have Kurviger Pro on my phone as well, and it uses BRouter to do the routing. BRouter takes some setting up; like the offline maps in Googe Maps, you have to download in sections the areas you need first, but the upside is that you can use Kurviger Pro in the field. For example, say you’re riding with some friends and you’re looking for a good route to a specific place but nobody wants to pour over a map to make those decisions. Just open Kurviger Pro on your phone (it will load a map at your current location), press and hold on your destination, and it will generate a route—again, to the degree of curviness you want. You can even share the route with your friends.

Screenshot of Kurviger Pro. All roads lead to Lachute.

Non-Navigation Apps

There are some other apps I use, not for navigation, strictly speaking, although they can be used for that. If you’ve followed Itchy Boots as she makes her way across the Americas, you will have heard of iOverlander. Noraly uses it to find her accommodations. I’m rarely sleeping with a roof over my head when I tour, but iOverlander is equally useful for finding campgrounds and even wild camping locations (i.e. places on crown land where you can camp for free). The app is user-based, and users submit descriptions and photos of the sites they’ve stayed at. This is helpful because there are a lot of people boondocking with campers and vans, and their needs are different than those who are tenting. So a safe gravel parking lot might be good if you have an RV, but not so nice if you are tenting. I wish iOverlander made this distinction, perhaps using a different symbol for each type of wild camping.

iOverlander screenshot. Tent icons are campgrounds; crescent moon icons are wild camping spots. Clicking on the icon brings up a window with user-based descriptions and photos.

Last spring, a friend and I planned to camp at a state campground in Vermont, only when we got there it was closed. In fact, we were too early and all the state campgrounds were still closed for the off-season. (Doh!) So I opened iOverlander and it showed a wild camping spot a short distance away. We ended up at lovely site next to a river with a few other campers nearby for security and even a drop toilet to boot!

I also use weather and radar apps, of course, to monitor the weather. They are pretty straightforward so I won’t spend any time on them. But for the record, my preferred apps in this department are WeatherCAN and MyRadar. I like WeatherCAN because it’s generated by Environment Canada. I reluctantly open Weather Network only when I need a 14-day forecast, steeling myself for the clickbait.

The Best Riding App on my Phone

I’ve saved the best for last. There is one app that I have come to love, to love I say, so much so that it’s become almost indispensable. It’s an app like no other since it is an overlay on the Android system and replaces the usual interface. It’s called Drive Mode Dashboard, by Thork Racing.

This is what I see when I launch DMD. (This is Version 2.0.) Instead of my usual desktop and app icons and widgets, I see this. It’s fully configurable but this is how I’ve set mine up—with a set of most-commonly-used apps on the left and a compass, digital speedometer, and odometer on the right. There’s more info along the top, as you can see. Along the bottom are icons for a map, my full list of apps, settings, even a digital rally book. Pretty cool.

Rally Book Mode. Ready for the Dakar.

But where this app really comes to life is in conjunction with Carpe Iter Controller, a bluetooth controller that mounts to my handlebar. With this controller and DMD, I can navigate throughout my phone—open any app, open and control media in Spotify, change the volume in my helmet, the brightness of my screen, and more. Where I use it most is to zoom in and out and pan around in maps. I think I could even tune my ECU while riding if I wanted to. About the only thing it can’t do is stop Microsoft Office Update from reminding me to check for updates every time I open Word! (Can Bill Gates avoid this?)

I see Thork Racing have a new unit out now with three buttons and a toggle and it can connect directly to 12V. My 1st generation controller has a rechargeable battery that lasts about a week with full-time use. There wasn’t room on the Beemer’s handlebar to mount it vertically so I made up a bracket and mounted it horizontally on the mirror stem. I have it mounted vertically on the Tiger, and yes, you configure the orientation in the driver software so the toggle switch pans your maps accordingly. Needless to say, with this set-up, if my eyes are not always on the road, at least my hands are on the handlebars. The controller is a little pricey but it’s a very nice modification.

Final Words

Despite finally getting my phone set up to be my primary means of navigation, I ended up buying a used Garmin Montana 600 for the big trip. I was nervous after having so many tours tainted by navigation issues and wanted a reliable back-up. The Montana has a WAAS-enabled GPS receiver and HotFix® satellite prediction. No, that’s not a dating service but the latest technology to ensure your connection to satellites is never dropped. The Rugged Mount is waterproof and robust enough for off-roading, and while I’m not positive, I think the Montana has a more comprehensive off-road mapping system than the phone apps. The Google Car made all the way up to Tuktoyaktuk, apparently, but it can’t go on single track or some of the ATV trails I do.

When all electronic devices fail, I rely on that thing called a paper map. No batteries needed! My Wolfman tank bag has a nice big clear plastic sleeve on top for them. It’s easy to lose sight of the big picture, so to speak, after staring into a 6″ x 3″ screen all day. I’ve recently discovered Butler maps, made for motorcyclists, and they are not only water resistant but also contain routes suggested by other motorcyclists and a ton of other information on the flip-side. I bought the one for The Maritimes and it currently hangs in my upstairs hallway outside my study, as did the one of North America I used to plan my cross-Canada trip. So a paper map serves multiple purposes: it’s great in the field, but it also serves to navigate me through the dark winter months of the off-season.

Ready for my sticky dots.

What are your preferred navigation apps and devices? Are there some I haven’t mentioned? Drop a comment below. I always like to hear from readers.

Ready for Anything

In the penultimate post in a series on gear, I discuss what I carry when touring.

The Container of Last Resorts

The first major tour I did was to Cape Breton to ride the Cabot Trail. As you cross the border from New Brunswick to Nova Scotia, heading east, you see at the side of the highway a mini-lighthouse advertising Tourist Information. I naturally pulled off for maps and a rest. In the parking lot, I noticed a burley, bearded, rider on his back beneath his Harley, trying to tighten an oil filter with a pair of pliers.

“Hey, can I help in some way?,” I offered. None of his fellow riders seemed either able or willing.

“Not unless you have a 14mm socket,” was the reply that emanated from beneath the bike.

I rummaged to the bottom of a pannier and emerged with the requested item.

“Here you go,” I said, and handed it down to him.


Every touring group should include at least one ADV rider. Because we venture into remote areas, we have to be self-sufficient, and that means being prepared for anything. Anything. Mechanical problems, medical emergencies, security issues—we need to carry on the bike into the bush the tools, spare parts, first-aid materials, and safety items required to get us back out of the bush.

The basis of my touring kit is my tool roll. I use the Kriega roll because I like the little pouch at the side for all the odds and ends that don’t fit anywhere else.

Kriega Tool Roll

That includes an assortment of hardware and fuses, pipe cleaners, emery paper, safety wire, thread lock, a valve stem tool, picks, and a tool for removing pins from electrical connectors (viewed far right above). The latter contains two tubes of different diameters, one on each end; hopefully one is the perfect diameter to slide over the pin but inside the hole in the connector. The tool pushes the barbs of the pin in so the wire can be extracted out the back of the connector.

I once had a flasher that had a break in the wire inside the connector plug, so I couldn’t simply splice the wire. Every time I put on the flasher, I’d blow the fuse to the circuit that included my dash, so no speedometer, tachometer, and other instrumentation. The only way to fix it, other than getting a new connector and splicing wires, was to remove the pin from the connector using a tool like this. Since then, it’s become part of my toolkit.

Left to right above in my roll is a telescopic magnet, zip ties, various Allen keys particular to my bike, needle-nose pliers, slip-joint pliers, a 1/4″ T-handle, reversible screwdriver (standard/Phillips), 3/8″ ratchet, socket extensions, various wrenches. I like the stubby wrenches from Home Depot because they are lighter—not as light as titanium wrenches, but my wallet is heavier for it. I indulge myself with a ratcheting 10mm wrench.

Why the 1/4″ T-handle? Some of those sockets are 1/4″, but with the Motion Pro T6 adapter, I can use all my 3/8″ sockets on the T-handle.

Where are the vice-grips, you ask? They are in my other tool kit since they don’t fit in this one. As I’ve said elsewhere, I don’t use vice-grips very often when working, but they are handy in a pinch, so to speak (sorry).

Sockets, etc.

In a Dollar Store pencil case, I have my sockets, some hex bit sockets (3/8″ and 1/4″ stubbies), an elbow socket, spark plug socket, a couple of crowfoot sockets (again, particular to my bike), a spoke wrench, and said vice grips (aka locking pliers). I used to carry torx bits with the BMW, but since switching to Triumph, I now carry hex bits.

There’s some redundancy here, for sure. I probably don’t need both Allen keys and Allen sockets, but the keys don’t take up much space, and sometimes one tool is better than the other for a particular purpose.

I also carry:

  • Tubes. I know you can get by with one, the front, and cram it into the rear if needed, but I carry both a front and rear tube.
  • A chain breaker, spare links, and a master clip. I like the Motion Pro Chain breaker for on the road. It doesn’t do rivets like the DID one does, so I have both. I use the DID at home when changing my chain, but take the smaller Motion Pro one on the road with a clip master link.
  • A digital multimeter for troubleshooting electrical problems. Don’t ask me how to use it beyond the basics because I’m still learning The Dark Arts, but I take one nonetheless. I have the Neoteck NT8233D Pro, which is cheap enough to get wrecked while ADV riding but still decent enough quality and reasonable in size. I’ve considered getting a smart meter, but wondered if it would be reliable enough. Anyone have any experience with these?
  • An Arteck battery jumper.
Arteck battery jumper

Tools, sockets, tubes, multimeter, and chain tool all go in Giant Loop Possibles Pouches that attach to my crash bars at the front, helping to keep the bike balanced front to back.

In one of my panniers, I carry a plastic box that contains other items and spare parts (see image at top). The spare parts have gone with the sold BMW so need to be replenished, but they were a spare clutch cable, spare levers, and a spare water pump. If I were doing a RTW tour, I’d carry more spare parts than this, but so far my tours have been in North America, where parts are readily available.

Also in that container:

  • JB Weld Steel Stick, for fixing engine casing.
  • JB Weld Plastic bonder. I’ve use this to fix body panels and broken mirrors.
  • Self-sealing tape. This stuff is amazing and can seal a high-pressure hose.
  • High-temperature electrical tape for wrapping electrical wires.
  • An assortment of electrical connectors, including Posi-Lock, and heat shrink.
  • More hardware, more fuses, assorted copper crush washers, cotter pins, O-rings, velcro.
  • Various gauge wire
  • Gasket maker
  • An extra buckle for my Wolfman tank bag.

Finally, to round out my emergency preparedness, I carry a first-aid kit and bear spray. The kit I put together myself. I took a look at what you get in those prepared kits and it didn’t look like much for the cost, so I bought another trusty Dollar Store pencil case and filled it myself. I won’t go through all that I have in there, but will say the few things you won’t get in those commercial kits:

  • Carbon capsules. Eaten something that doesn’t agree with you? Take two, wait half an hour, take a dump, job done.
  • Arnica Montana. Homeopathy for any trauma to the body.
  • Robax. I have a vulnerable back, which tends to go at the most unexpected times.
  • Antihistamines. These are great for any inflammation from bee stings or allergic reactions.
  • Triple Action Polysporin

These items, along with the essentials I always carry on the bike, round out my touring kit. They say an ounce of prevention is worth a pound of cure, and all this stuff adds up to a quite a few pounds, so I think I’m covered. The challenge is always to find the right balance between taking what you need while keeping the weight down. I’d rather sacrifice some creature comforts like a camp chair, but I rarely sacrifice when it comes to tools and other items needed to keep the bike running (although the camp chair would come in handy if stranded in the middle of nowhere).

I’ll add one more item this winter to my tools: a satellite communicator. I’ve been meaning to get one for a while, and it really is silly to travel into remote areas without one. I’ve considered them all and almost bought a Garmin inReach Mini, but I’m leaning toward getting a Zoleo at half the price. Any thoughts, anyone? I don’t see what the Garmin does that the Zoleo cannot. Am I missing something?

Have I missed anything in my touring kit? As always, your kit is personal to you, so let me know in a comment if there’s something you carry that I do not. Like I said, I’m a self-confessed gear weanie, so I’m always interested in learning about a tool I have to buy. Buying gear is one of the ways we riders in the North get through the off-season, and yesterday I put the Tiger into storage, so I’m all ears.

I’ll wrap up this series in my next post on the navigation apps I use. If that interests you, click Follow and you’ll be notified of it and future posts when they are published.

End of an Era

After 8 years and almost 100,000 kilometres, I pass Bigby on to new owners.

Saying good-bye to Bigby. A final chain lube and I handed over the keys.

The first night of my motorcycle training class, the teacher asked: “Okay, what do we have here? Who wants a sport bike? A cruiser? A tourer? An adventure bike?” Students put up their hands accordingly. I didn’t even know what an adventure bike was yet, but I knew I wanted something that would allow me to explore, and I didn’t want to be limited by pavement. The places I wanted to explore likely wouldn’t have any pavement.

At the end of the evening, I approached the teacher to ask about helmets. What would he recommend, full face or modular? At some point, I must have mentioned that my dream was to travel across Canada by bike. “You’re going to get a BMW, aren’t you?” he said. I guess he knew enough about ADV culture to know that is the most popular ADV brand, thanks to Ewen and Charlie, and KTM’s big mistake in doubting them. And in the end, he was right. After a little research online, I zeroed in on the f650GS as a perfect starting bike—low seat height, not too much power, well balanced, reliable, and easy to ride and maintain.

A quick search on Kijiji turned up one for sale near me on the West Island. It even had hard luggage and a touring screen, all set for cross-country touring. It seemed destined to be mine, and within a few days, it was. Getting that bike has been one of the best decisions of my adult life. It has connected me to friends, to readers, to a country, and to aspects of myself I didn’t know existed.

The first photo of me on the bike, June 2015. Lots of comments on Facebook about my lack of gear, but little did they know I didn’t yet have my licence.

It almost didn’t happen. The bike doesn’t have ABS, and I’ve grown accustomed to ABS in the car during winter when the roads are icy. I thought it would be essential for a new rider and not having ABS was almost a deal-breaker for me. But fortunately, the few people I consulted about my decision were not fans. One distinctly said, “You have to learn how to brake properly without it.”

So I did. I’ve heard of people who use only rear brake. Apparently, Honda mechanics discovered that the rear brake pads of Gold Wings were wearing out faster, much faster, than the front pads, which doesn’t make sense since most of the braking happens with the front. They concluded that Gold Wing riders weren’t using the front brakes, so they developed integrated braking—both front and rear come on, even if you only apply the rear. Smart. Honda engineers outsmarted the riders for their own safety.

My bike didn’t have integrated braking or ABS, so I had to learn how to brake properly. Mostly this meant squeezing the front lever, not grabbing, to load the front contact patch before pulling harder, and using just a little rear to stabilize the bike. I did this every time I stopped, even when cruising along the Lakeshore, at every stop sign and every light, front and rear in correct proportion, so it became muscle memory. Then in emergency situations, which I had, I didn’t have to think about it; the technique came “naturally” and I thankfully never tucked the front end, even once at speed in heavy rain on Heidenau tires in Northern Ontario when I rounded a corner to find someone backing up on the two lane Highway 101.

My first adventure bike rally, Dirt Daze in Lake Luzerne, NY. June 2017.

I knew I also needed to develop my off-road skills to become an ADV rider. I took a course at SMART Riding Adventures in Barrie, and another with Jimmy Lewis at the Dirt Daze adventure bike rally in New York. I joined Moto Trail Aventure mostly for the Rémise en Forme with a certified GS instructor, and the BMW Club of Québec for the same reason. (I actually planned to do rides with both clubs too but that never materialized.) This instruction set the perfect foundation for off-roading, and then it was just a matter of practice.

You don’t even need any dirt to practice off-road skills. I go up to my local church parking lot and do slow speed maneuvers. As Jimmy said, off-roading is all about balance and traction control, so I practiced the balance stuff on Bigby regularly. I also practiced the traction when I could, getting out of the city up onto the dirt roads and ATV trails in the Hawkesbury area. Bigby is a GS, which means Gelände/Straße (off-road/on-road), but I soon learned the limits of the bike. I never learned it street limits; I could lean that bike over and scrape the pedals, even with knobbies on, but I discovered its limits on the trails. The clearance was the biggest limitation, and the front suspension with the 19″ front wheel. It took some superficial damage for these lessons, but I also learnt not to lament the scratches. A fellow rider at my first Dirt Daze rally saw me brooding on my first scratch and said, “You can’t worry about that. It’s a bike.” The matter-of-fact way he put it set me straight.

I also had to learn my way around the engine. Knowing I would be riding into remote areas, I had to know the basics and how to fix problems. As I had with car mechanics, I started with an oil change, then coolant, brake pads, and brake fluid. I bought the bike with 35,000 kilometres on it, so it wasn’t long before I had to do the valves. That service was $1000 at the dealer, just to check them, so necessity was the mother of invention and with my trusty Haynes service manual, I did the valves myself in the shed. (I don’t have a garage, and my poor workspace has been the biggest obstacle to overcome. I’ve lost and found a lot of hardware on the driveway and in the grass!)

Problems at the 2018 Dirt Daze rally. A broken water pump left me stranded for much of the rally. MaxBMW shipped a new pump “overnight” which, due to the remote location, took most of the weekend to arrive, but I got home okay.

The Achilles heel on this bike is the water pump, and I’ve changed that a few times, including once at a rally because I hadn’t done it correctly the first time. (A plastic impeller gear wasn’t installed properly and rattled loose while off-roading.) That was the only time I considered selling the bike early, until I discovered the error was mine and not a fault of the bike. Once done correctly, the pump lasted another 40,000 K until I preemptively changed it before going across Canada.

The other big job was changing the swingarm bearings. That required removing the gas tank and subframe, so basically the entire back half of the bike. The pivot bolt was badly corroded and stuck, and it took two days of troubleshooting and, in the end, two hammers—a ball pane as punch, and a sledge hammer to drive—one on top the other, to get it out. But it eventually surrendered. Yes, I have cursed and praised this bike in equal measure over the years.

Success! Pivot bolt and swingarm removed for servicing. September 2019. Under the tarp at right is the gas tank and subframe. Headphones are for all the whacking needed to get it out.

I changed those bearings as well as all wheel bearings, clutch plates, the shock, rebuilt the forks, re-lubed the steering head bearings (which were in surprisingly good shape so didn’t need to be changed), and have had the dash assembly apart. And in the end, I restored those scratched body panels to make the bike look good as new.

My first trip on this bike was back to Ontario to show it to my dad, who used to ride. I left the day after getting my full licence. The next month I did my first moto-camp down at Loon Mountain in New Hampshire for their highland games. The following year, my first year with full licence, I went to Nova Scotia to ride the Cabot Trail, passing through Maine, Deer Island, and New Brunswick en route. I’ve also toured Northern Ontario, and these tours have led to some paid writing for northernontario.travel. So the bike has become for me more than a past-time. It has taken my writing in a new direction, and that of course refers to this blog too. I’ve made connections and friendships with people online, and met some of them in person during my travels. I hope to meet more of you in the future.

Off-Roading in Cape Breton, July 2017.

I have also met new friends locally in club riding. When I began, learners couldn’t ride without an experienced rider accompanying them, so I joined The West Island Moto Club, and some of these members have become my closest friends. I’ve done some touring with the club, but mostly I do day rides with them, and it wasn’t long before, with the right mentorship, I was leading rides.

One of the first club rides that I led. This was to Ottawa via Gatineau for the Tulip Festival. May 2018.

Some of my favourite riding on this bike has been in the northeastern states like Vermont, New York, and New Hampshire. I’ve ridden the Puppy Dog Ride on it a few times, and some of the Hamster Ride in New Hampshire, and Bayley-Hazen military road. The 650 GS is perfect for this type of light off-roading. I had a 15-tooth counter-sprocket on it for years, which gave it more low-end torque, and there’s nothing like feeling the pull of the big thumper as you climb a steep hill, or sliding out the back end as you round a corner.

Finally crossing Canada, July 2021.

Finally, after developing these riding and mechanical skills, modifying the bike to what was perfect for me, and waiting for Covid generally to be over, I completed my dream of crossing the country, and this bike, 15 years old and with over 100,000 kilometres on it, got me there and back. Ironically, the only issue I had was with a new battery I’d just installed for the trip. But the bike, fully loaded, pulled my wife and me over The Rocky Mountains, and took me up north of the Arctic Circle into some truly remote territory. The bike fulfilled its purpose for me—to learn about motorcycling, develop the skills necessary for adventure touring, and get me over the dangerous first few years of riding. It has been the best first bike I could have had, and now it’s time to pass it on to another new rider. Like me, the new owner has bought the bike before obtaining her licence. I’m sure it will be as good a beginner bike for her as it was for me. The engine is still strong, and I wish them both many safe and happy adventures in the future.

At the Arctic Circle, August 2021

My new bike is a 2013 Triumph Tiger 800XC. The XC stands for cross country, so it’s also capable of light off-roading, and I’ll be taking it on BDRs and other adventure tours. It does has ABS, but being a 2013, it doesn’t have any rider aids, and as I read about the new bikes with throttle control, wheelie control, slipper clutches, and other traction aids, I can’t help thinking about what riders of those bikes aren’t learning. I’m happy to be learning how to control the power of this 94 HP engine properly, just as I learnt to brake properly on the GS. It’s going to take my riding skills to the next level. The blog will be keeping its URL and name in tribute to the bike that got me started and to which I owe so much.

Next season I will complete my cross-country tour by riding the East Coast. I plan to visit Gaspé, New Brunswick, Prince Edward Island, Nova Scotia and Cape Breton, Newfoundland, Labrador, and the north shore of Quebec including the Saguenay. I might try to ride solo up to Fort George on James Bay “on my way home.” This would allow me at least to set foot in Nunavut. I also plan to ride the Mid-Atlantic and North-East BDRs next summer, if I can get it all to fit. So stay tuned, my friends. The journey continues.

At the Awesome Players sandpit, Hawkesbury 2020