Paired with an OBD-II reader, this app is an essential tool for DIY’ers.

When I had my BMW GS, there was only one OBD diagnostic tool and it was called GS-911. At over $800 for just the Enthusiast (WIFI) version, it was always a little too much for me to swallow, even though I knew you really shouldn’t be riding anywhere remote without one; there are just some issues that require you to be able to communicate with the ECU to solve.
Now that I have the Tiger, there are more options available, and a popular one is an app called TuneECU. I recently used it to balance my throttle body, but it can be used to do so much more.
Background
TuneECU began because of a fuel mapping problem on some Triumph bikes. One owner was so annoyed at Triumph’s unwillingness to fix a gap in the rev range, he took matters into his own hands and created an app that can read and write fuel maps to the ECU. I’m happy with the mapping on my 2013 TigerXC, but I had noticed a little buzz in the right hand-grip and a forum post advised to check the balance of the throttle body.
For those who might not know what that means (I didn’t, having come from a thumper), as I understand it, it’s basically getting all your cylinders to fire with the same force. If one is more powerful than the others, it destabilizes the engine and creates vibration up into the handlebars. Sure enough, when I checked mine, the third cylinder was a little out of sync with the other two.
Tools Required
- an Android phone
- a WIFI OBD-II reader (OBDLink LX recommended)
- TuneECU (Doh!)
The hardest part of this job is getting down to the throttle body. On my Tiger, I have to lift the tank and remove the airbox, and that requires removing a lot of body panels first. I won’t go into that because it’s bike specific, but just follow your service manual (you have one, right?), photograph everything before it comes off, and lay parts and hardware out methodically in the order they came off. And because you might have to unplug a sensor—at least temporarily—it’s probably a good idea to remove the cable from the negative terminal of your battery.
You’ll be required to run the engine to do this, so be sure to keep all sensors plugged in or you’ll get an error code. (You can clear codes in TuneECU too, but more on that later.) On the Tiger, that meant unscrewing the sensors from the airbox and throttle housing and laying them out of the way. You also have to ensure that hoses essential to the correct running of the engine are plugged, for the same reason. This may require some creative solutions since you have to find things with just the right diameter. (No bad jokes here.)

Connect your scanner
Once you are ready to go, replace the ground on the battery but don’t start the engine just yet. First, plug in your OBD-II reader. There are lots of them available, some for as little as $25 on Amazon, but you take your chances with the cheap ones. You might find that it can’t read your bike or communicate with TuneECU. I’d heard that the one to get is OBDLink LX. It’s a little more expensive, but it works without issues.
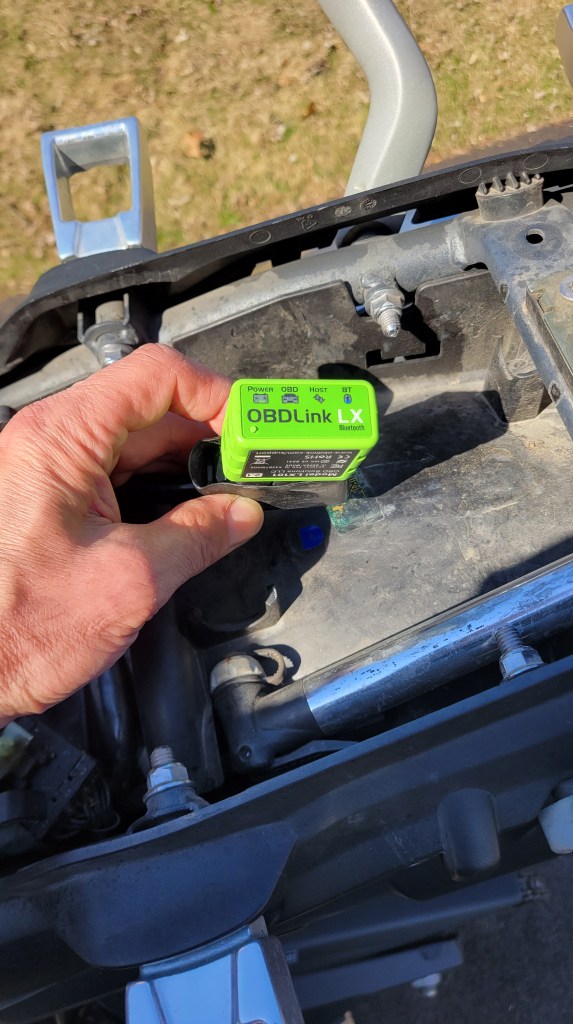

You need to know where your OBD-II connector is. On the Tiger, it’s under the passenger seat. When you plug in the scanner, you’ll see its power light go on, indicating that it’s already getting power from the battery. Now get your phone and open TuneECU and select Select from the ECU menu. You’ll see a long list of motorcycles and hopefully yours is there. If not, select Other.
By the way, for Triumph bikes, there are two ECUs: Sagem and Keihin. You’ll see both options under the ECU menu. I wasn’t sure which ECU my bike has, but I figured 50/50 odds were pretty good, guessed Keihin and got lucky. I’m not positive, but I think TuneECU can autodetect if you choose the wrong one.
Once you’ve selected your bike, click Connect. (Later, you can simply choose Connect from the ECU menu.) You’ll see some flickering, both on the scanner and in the bottom right corner of the TuneECU screen, and when it turns green, you are connected.
Make your adjustments
Now start the bike and let it warm up to running temperature. You’ll see the three cylinders listed in the Adjustments screen. Cylinder 1 is the left-most cylinder on the bike (facing front, when seated on the bike), and Cylinder 3 is right-most. Cylinder 2 is not adjustable but is the baseline to which you adjust the other two. In the photo below, the adjustment screws are circled in red. Triumph have thoughtfully added a stripe of yellow paint to each screw so you can keep track of where you are.

Go slowly! Do small adjustments one at a time, blipping the throttle and waiting for the engine to settle back into idle after each adjustment to see what it has done. It didn’t take me long before I had all three relatively the same. They should be within 10 hPa of each other.

Run tests
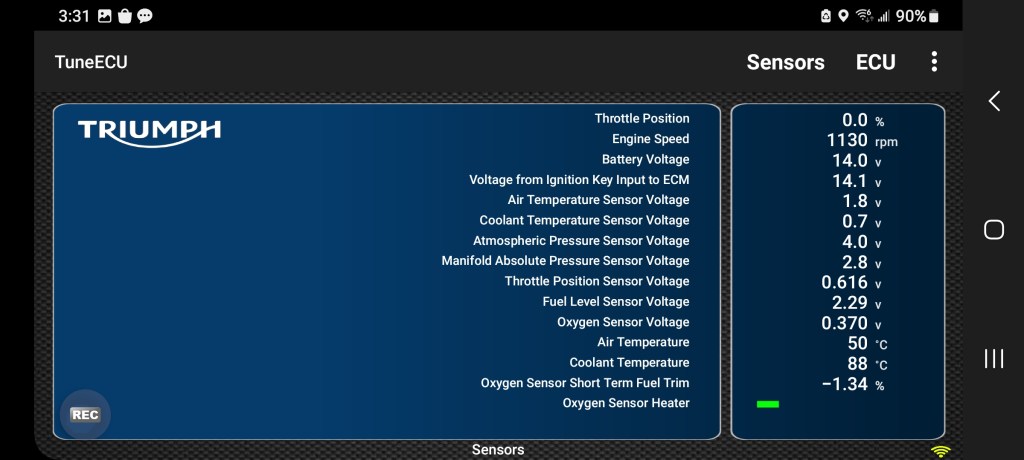
When you’re satisfied you’ve got it as close as you can, slide the screen right to left to get to the Sensors screen. Under the List menu, select which sensors you want to test. This is where TuneECU becomes an excellent diagnostic tool! You’ll see what voltage is getting to each sensor. You can also see and clear error codes, run specific tests, reset the ECU adaptations, and reset the service reminder. Normally the latter can only be done at a dealer, but TuneECU can also clear it. If you do your own maintenance, you no longer have to see that annoying little reminder (wrench symbol) every time you start your bike.

While I had the airbox off, I added a Uni Filter pre-filter to my bike. It replaces the snorkel and apparently removes 95% of the dirt, and since I have to remove my fuel tank to service my main air filter, I was all over that. The pre-filter sits under the seat so access is a lot easier, and I think it will keep my engine cleaner too. Some people swear by K&N filters; others say they’re not trustworthy (I’ve written about this earlier), but with two filters in there, I think I’m good.
Final adjustments
Because I added the pre-filter, I decided to reset the ECU adaptations so it would learn the new parameters. When you do this, just beware that the bike may act a bit weird at first afterwards. For example, my idle was low, and the bike in fact stalled once. But after a short ride, it was back to normal.

I had another small issue that will be of interest to other Tiger owners and perhaps others. Once I put everything back on the bike and went for a test ride, my fuel gauge was showing empty and my gas light was on. I thought I hadn’t plugged in the fuel level sensor correctly so off came all the plastics again and up came the fuel tank. But I had, and a little Google research reminded me that you have to ride the bike a few kilometres for the level to be updated. I’d noticed this after filling the bike—how it seems to take a long time before the display adjusts—but forgot in this context. Every job requires at least one “mistake,” but I’ve come to look upon mistakes as “opportunities to learn.”
TuneECU is a powerful tool, so just a word of caution and a disclaimer to use at your own risk. Writing to the ECU is no small thing, and I don’t like second-guessing Triumph engineers, so be careful. I have a minimalist approach to this stuff, and now that the throttle body is adjusted, I’ll be using it primarily as a diagnostic tool.
TuneECU is €24.99 and OBDLink LX is about $100, depending on where you live. That’s a price I’ll gladly pay to have the silky smooth Triumph triple running even smoother, and for the peace of mind of having an excellent diagnostic tool with me while on tour. It’s small enough to fit easily in my kit and can give me a ton of information about all the mysterious electrics of the bike. As motorcycles become increasingly complex and computerized, it’s nice that there are tools like TuneECU and OBDLink LX at an affordable price for DIY mechanics.
