
The riding season is just around the corner, and remembering those cold early- and late-season rides last year, I decided to get some heated gear during the off season. But a heated jacket can easily run over $200, so I decided to try making my own.
I started by buying the heating pads on eBay for a grand total of $7.39 (all amounts mentioned are Canadian), including shipping and handling. I don’t know how a company can make something, anything, and ship it halfway around the world for that cost, and I probably don’t want to know. The shipping is slow, by boat, so allow several weeks. Still, at that price, I’m not going to hold it against the seller.
You can get them in configurations of 7 small pads or 3 large pads. For the sake of simplicity, I went with the latter.  I figured I’d place one pad horizontally across my upper back to heat my lungs (similar to a chamois in quality winter coats), and two lower, vertically over my kidneys. I’m no biologist, but I remember my Grade 6 teacher saying that if you protect the essential organs, the extremities will be fine.
These pads are 5V and draw 8.5 W—enough to keep me warm but not so much as to tax my electrical system. (I can power this from a battery pack in the inner pocket or plug into my bike using an Optimate USB adapter.) 
This plugs directly into an SAE lead from the battery (for my battery tender) and will handle the conversion from 12V to 5. I’m not including this in the cost of the jacket because I already had it to charge my phone.
I then bought an inexpensive jacket from Mark’s Work Sweatshop (here in Quebec, called L’Équipeur). I was fortunate to find the one pictured above on the liquidation rack for $35. You want it fairly snug since it’s going under your riding jacket and close to your body without dead air space—a known insulator (Grade 6 Physics). Wallfart and Wieners are other good places to try for a cheap vest or jacket. If you get one with a quilted back, your sewing won’t show as much.
The final item was some material to cover the pads once sewn in. I didn’t want to open up the jacket and sew the pads inside the lining for two reasons. First, that would have been a lot of work, and second, I wanted all the quilted insulating material on the “outside” of the pads. So I decided to sew them on the inside of the jacket and cover them with material, and the cheapest material I could think of is a section of a thin, athletic T-shirt I bought from Goodwill for $5.

I started by pinning the pads in the jacket where I want them.

I then dug out the sewing machine my mother gave me (God rest her soul) and threaded it with black thread. I can’t help you with the sewing part of this job except to say two contradictory things: a) it’s not as difficult as you may think, and b) read the manual and struggle through your first project; it gets easier. I think of sewing like typing: an essential skill that will pay dividends many times over in the future.
Anyway, you have to be careful when sewing because you don’t want to hit any of the thin wire in or connecting the pads and break it, ruining your pads. Fortunately, the company provides a good inch of sewing material as border.
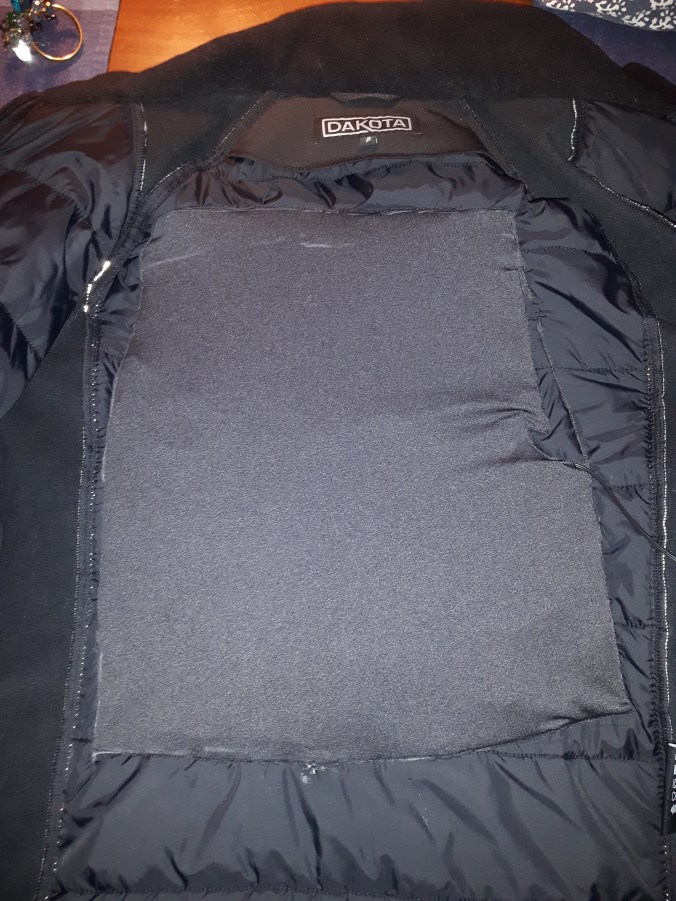
Once the pads were sewn in, I cut the shirt, pinned it over top, and chalked my sewing line so, again, I wouldn’t accidentally hit any wires. Make sure all wires are tucked inside. You have to leave a gap in sewing the new lining for the cord to exit the lining.

You can see on the right where I’ve placed two pins horizontally. That’s my marker to stop sewing, and where the cord exits. All was going well until I sewed one of the sleeves to the jacket (Doh!). How to use a stitch-ripper is another essential skill.
After sewing all the way around (minus the port), I cut the excess material away. This is the finished product.
My jacket has the added feature of an inside pocket with a headphone port. I threaded the USB plug through so I can use a battery pack in the pocket when I’m off the bike. The pads have three settings: high, medium, and low. There’s also a timer setting to shut off automatically after 30 minutes.

I’ve tested the jacket using a battery pack and it works great! I might not be quite ready to mass produce these, but I’m ready for those cold April rides.
Total cost: Jacket $35 + pads $7 + T-shirt $5 = $47

Nice. How well has your heated vest turned out? I am thinking of making the same. Does it keep you warm enough on the cold bike days ?
LikeLike
Mine is working well. It’s probably not the same as a commercial jacket that has wires throughout the back and arms, but it keeps me warm enough on the coldest days in late autumn. I’ve had it a few years now and it’s still going strong.
LikeLike