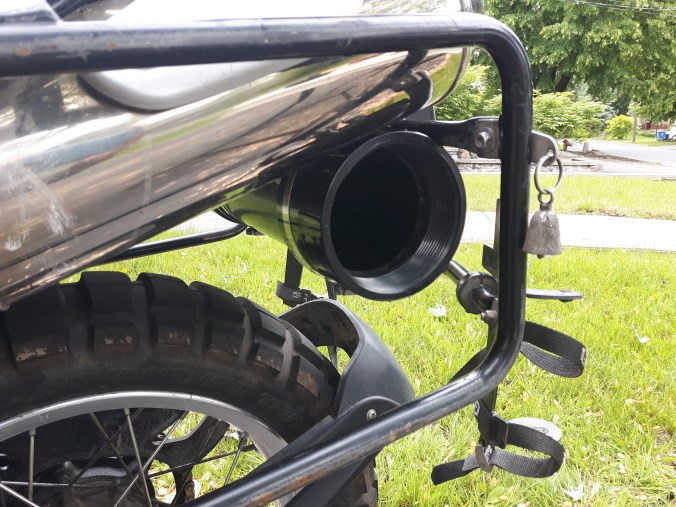
Make Your Own Tool Tube

20190614_133846

I’ve become wary of riding without my full set of tools. I have the little BMW set that resides in the tail compartment, but I can’t do much with it. I bought a Kriega tool roll last year to house all the tools I need to do most anything on the bike, but I had nowhere to carry it. It tucked nicely into my tank bag, but I didn’t like having all that weight up high on the bike and knocking hell out of my plastics. A tank bag is like a day bag—for a few incidentals you want to keep close at hand, not your full set of tools. Then I bought a plastic Stanley tool case and used it as a tail box, securing it with Rok Straps, but it starting rubbing the powder coating off my rack and was not a permanent fixture on the bike. Looking for the perfect solution, I decided I’d have to make it myself.

Some guys use the plastic rolls that come with tractor manuals, but I had no idea where to buy such a thing, and then I still had the question of how to attach it to the bike. Some use the white PVC pipe with an orange cap, but I wanted something more discrete since Bigby is an all-black kind of bike. So I decided to use 4″ ABS pipe—that’s right, the kind of pipe that carries last night’s dinner to the sewer. If it’s good enough for that substance, it can carry my tools.

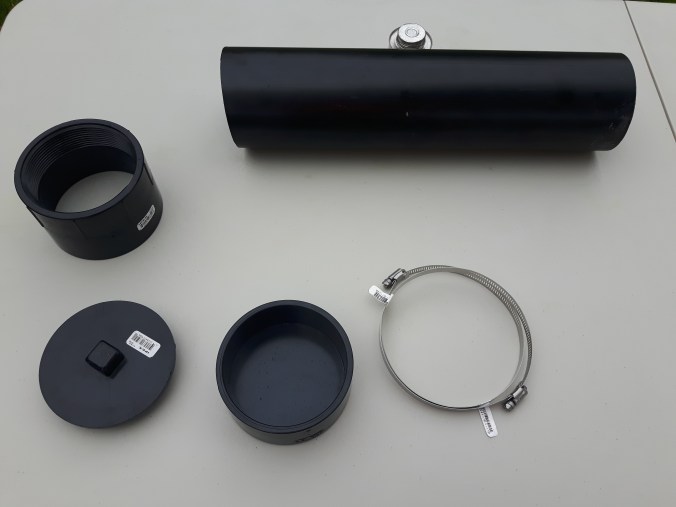
I started where all DIY projects start: at the local big box hardware store. Some fiddling and fitting together in the plumbing isle and I had figured out the basics of my tube.
20190614_125823

All materials were under $30

I had a piece of pipe hanging around from the last time I changed the crapper, so all I had to get was an end cap, a converter, and a screw cap. Because I was attaching it to my pannier rack, 4″ ring clamps were not enough, so I had to go with 5″—a little long, but the end can be cut off after the install. Then I needed some cement to glue it all together.

20190615_001917

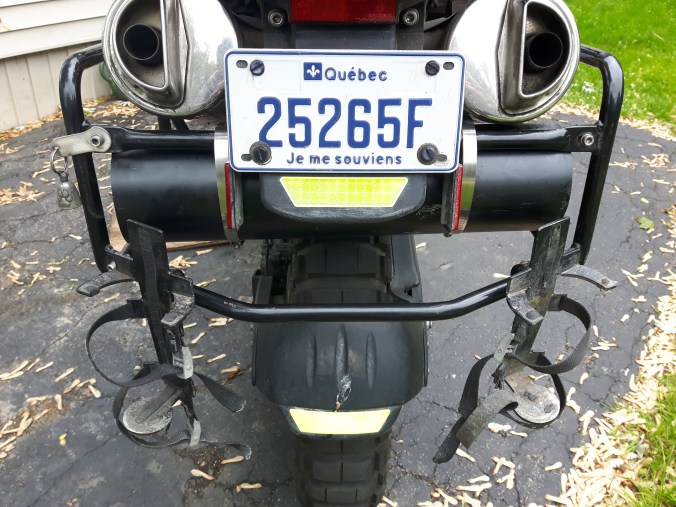
Most guys mount the roll lengthwise on the inside of their pannier rack, but because I’m an original, I decided to do it differently. (Actually, it was because my large canister muffler prevented the standard location.) I searched around and found a spot behind the licence plate, crossways. It’s more discrete there, and the bonus is that the bike stays balanced. I just had to be sure it was going to be safe; you don’t want anything locking up the rear wheel unexpectedly. And in fact, this would prove to be the wrong location. (Right idea, wrong in reality. See warning below.) It did rub and I ended up moving it. You’ll have to find the best place to mount it on your bike. 
20190614_130939

Offering it up, as my dad used to say. Je me souviens. 

The pipe was a little long so I cut off a few inches with my reciprocating saw, then cleaned the burr with a file. The roll ended up being 16″ long, enough for my Kriega, some extra tire tubes, and a few spare parts. There might even be room in there for a first aid kit—all the essentials, so I’m never guessing when I’ll need something. 

The nice thing about ABS is that you can assemble everything and offer it up again, just to be sure, before you start cementing pieces together. Just beware that it may not be easy to take it apart, especially if it’s been sitting in some heat. Fortunately, my MotoMaster Strap Wrench came to the rescue again. I love that tool!

The trickiest part of the job was figuring out how to lock the tool roll. I’d recently read on a user forum of someone having a sentimental tool lifted from his, and I guess they can be targets for anyone who knows what’s inside. My first thought was to drill a hole in the top of the cap and the side of the tube and to pass a long-arm lock through both. Unfortunately, I should have waited for my second thought before drilling because once I had, I realized I was never going to get a lock though both. Fortunately, the third thought was to put eyelets in the holes and pass a small length of looped cable though both and lock the cable. Okay, it’s not super secure, but you basically just want a mild deterrent, something to stop the quick grab and run. I use a 6′ length of similar gauge plasticized wire to secure my big tail bag to the rack when I’m leaving it unattended for a length of time. Anyone with wire cutters can get through this pretty quickly, but anyone seen using wire cutters on a bike parked on the street will hopefully raise some suspicion.

20190614_184729

A small vinyl-covered lock will prevent vibration damage. Just loop the ends and crimp. Not pretty but functional.

The ring clamps secure it firmly against the rack. I’m glad there’s no movement because any vibration would quickly cause significant damage to the tube and my rack.
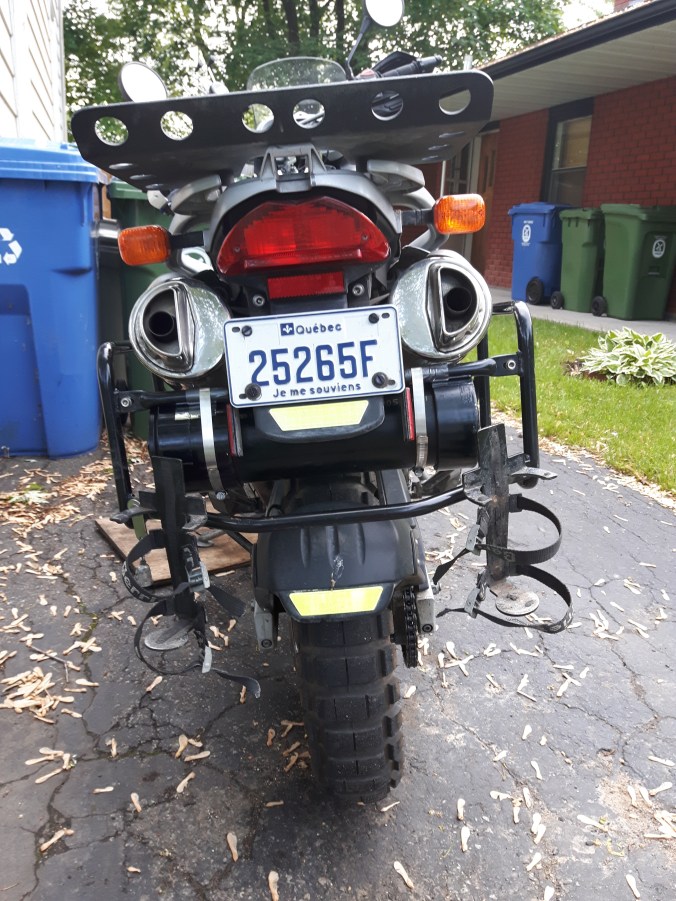
20190614_191244

The finished product.

The Harley boys who polish their bikes at each rest stop would probably be aghast at this mod, but adventure riding puts utility ahead of aesthetics every day. And the next time they need a tool, I’ll be happy to oblige. When I stopped at the Nova Scotia tourism office en route to Cape Breton, I noticed a Harley rider on his back struggling to tighten an oil filter with a pair of pliers.

“Can I help you?” I asked.

“I don’t think so,” was his reply. “Not unless you happen to have a 14 mm socket.”

“As a matter of fact . . .” and I started rummaging to the bottom of my pannier.

As Hamlet says, “The readiness is all.”

Warning: The tube mounted in this location rubbed on my rear tire. It’s surprising how much movement there is in the suspension. It should be mounted lengthwise on the inside of one of the pannier racks or on the outside of the horizontal crossbar between the fuel racks. Any mods you do to your bike are at your own risk. I offer this merely as a suggestion. 

Remise en Forme

20190525_104322

Google translates it as “fitness.” Literally, it might be “put back in shape.” I’ve seen it translated more liberally as “Spring Refresher.” The Remise en Forme is a day of exercises to regain muscle memory of the technical elements of riding. Watching street riders, you may not easily see that riding a motorcycle is a skill, let alone athletic, but off-road riding involves a whole set of skills as well as a certain level of physical fitness. After a winter of watching Dakar reruns on the couch, it’s a good idea to remind the body by targeting specific skills with specific exercises of what it knew how to do last fall.

I belong to two clubs that offer a Remise, so I had the pleasure of refreshing myself twice, so to speak, in May—once with MotoTrail Aventure, and once with the BMW Moto Club of Quebec. I had the same BMW-certified instructor for both, and he was incredible. He has represented Canada twice in the GS Trophy contest. Say no more. He demonstrated all the exercises flawlessly without even a dab (i.e. touching a foot down), and he did it on Michelin Anakee (street) tires when we were all struggling on knobbies.

Here are some of the exercises we did, roughly in the order done:

  1. The Walk-Around. (Engines off.) Have a partner assist you by being ready to catch your bike should it begin to fall. Start by standing beside your bike and find its balance point. Now let go and move to another part of the bike. At no time should you hold the bike with more than the fingers of one hand. Move entirely around the bike, 360 degrees, releasing and catching different parts (windscreen, tail-rack, etc.), ending up back beside the bike where you started. This exercise helps remind you that all of those 500 lbs can be zero when the bike is perfectly balanced. Also to breathe when you are nervous.
  2. The Friction Point. Sit with your bike idling in first gear, clutch in. Gently ease out the lever until the bike inches slowly forward. Now stop using the rear brake while pulling in the clutch lever no more than 1/8″. Ease out again and repeat. This exercise helps you discover the friction point. Much of off-road riding occurs at the friction point with the clutch lever moving no more than 1/8″. If you pull the clutch lever in all the way when you want to slow down, you will not be ready to recover quickly enough if you need to accelerate.
  3. Circus Riding. Okay, he didn’t call this one that, but that’s what it reminded me of. We played follow the leader in a wide circle, doing what the lead rider, the instructor, did. All riding was done standing up except where indicated. He rode with one hand (throttle hand, obviously); he rode with one foot on the peg, then the other foot. Then he sat down, swung his right leg over the bike and put the right foot on the left peg and stood up again. Then he sat down, swung his legs over the seat, and stood up with his left foot on the right peg. Then he sat down and swung his left leg over the seat to straddle the bike again. Then he hopped off the bike and walked beside it a few paces. Then he hopped back on, Roy Rodgers style, like mounting a horse. All this was done at slow speed without stopping, the bikes in 1st gear. This exercise teaches you that you and the bike are independent but together you have to remain in balance. I was reminded of this exercise later in the day when we got into slippery terrain and I had to allow the bike to move around beneath me. It’s all about balance, balance, balance!
  4. Peg-Weighting. A lot of turning in off-roading is done “with the boots,” not the handlebars. You weight the peg on the side of the direction you want to turn. You have to bend your knees and stick your butt to the outside of the corner to counterbalance the bike. We slalomed through a series of cones, then looped around to start again. I was doing this okay but the assistant instructor told me to brace my outside knee against the bike and to use the knee to straighten the bike if needed. This little tip was ground-breaking for me. It gave me more control over the balance of the bike when hanging off it in tight low-speed turns. This exercise reminded us that you don’t steer in low-traction zones with the handlebars but the pegs, and you keep your weight out over the contact patch or the bike might low-side on you.
  5. Parallel Lines. A variation of the above exercise is to add a straight section where you have to ride between two lines (straps or string) about 6″ apart. This is to simulate when you have to ride between two fallen logs, or across a bridge with only 2 x 6’s running lengthwise, or along a ledge. Vision is everything. You look at your entry point but once you enter you look up at your destination. Don’t look down! Look straight ahead. This exercise teaches you how to ride along a narrow path. 
  6. The Full-Lock Turn. Place four cones about 10 meters apart in a square. You have to ride into the square and turn full lock within the cones one full circle before exiting. Again, body positioning and vision here are the keys. You have to stand up, brace your outside knee against the bike for leverage, get your butt well out to the side, and swivel your head and especially look where you want to turn. You should be looking toward the centre of your riding circle at all times except for the very end when you look toward the exit before leaving. Practice clockwise and counter-clockwise turns. It’s pretty obvious, but this exercise practices sharp turns on the trail or U-turns on single-lane gravel roads.
  7. Hill climbs and descents. The secret to both is body positioning. In one version, we had to move our weight back because it was a sandy hill and the bike needed traction to get up. In the other, it was a grassy hill and we were told to lean forward or the bike might flip going up. So it really depends on the type of terrain. For both, you coast to the top because you don’t know what is over the crest. It could be your fallen buddy or, as was the case with me in Cape Breton, a cliff! A variation is to stop halfway up the hill if your buddy in front has fallen before cresting. Then you stall the bike using the rear brake, release the clutch, let the engine hold the bike on the hill and, bit-by-bit, roll the bike back down by feathering the clutch. Don’t panic and pull in the clutch or you’ll end up on your back! Don’t forget to look behind you in case there are trees or logs to avoid. For descents, weight is always at the back and we were advised to use the rear brake.
  8. Water Crossings. Our instructor said water crossings are mostly psychological because you can’t see what you are riding over. The same principles of riding apply: look up toward your destination, feather the clutch at the friction point, and don’t squeeze the bike with your knees. The latter is important because if you hit a hidden rock the bike might be thrown sideways and you have to be ready to counterbalance.
  9. Emergency Braking. Ride about 40 km/hr into a small square of cones and brake as quickly as possible. It’s all about body positioning. Weight and butt back, arms outstretched, then stomp on rear brake, and gently squeeze the front brake lever. Contrary to what I had been taught elsewhere, this instructor said to pull in the front brake lever fully, not all at once, but gradually. Yes, the front might lock up, but with your butt back and your arms outstretched, you can “wrestle” the front end to keep the bike up and you modulate braking as needed (back off slightly when it locks). You want to be right at the point of static friction, when the tire begins to skid. Because most braking occurs with the front brake, this technique will result in faster stopping.

Finally it was time to put all these skills together on some trail riding. We played follow the leader and there was a mixture of sand, mud, rocky terrain, some rock ledges, ruts from rainfall runoff, water crossings, and single-track. It was a ton of fun! By the end of the day we were tired but ready for the season.

The take-aways for me:

  • Vision is everything. He said vision is 90% of riding. Always look to where you want to go. It sounds so obvious but when you come upon an obstacle, like even some rocky terrain, your natural reaction will be to look down at the front wheel. You must resist the urge, trust the bike will roll over anything, and look up, further down the trail.
  • Contrary to dirt-bike riding, don’t squeeze the bike with your knees. With these big bikes, you aren’t going to hold them up with your knees. Instead, bow your legs and create space between the inside of your thighs and the bike. This space allows the bike to move around beneath you as it slips and slides over low-traction terrain or is bounced over rocky terrain. Thinking of the circus act balancing practice, you will be fine if you and the bike together remain balanced over the centre-line of gravity.
  • On the same topic, body positioning is crucial. Contrary to street riding, in which you squeeze the tank with your knees and remain fairly static on the bike, off-roading requires a lot of movement on the bike. The first remise I was still feeling the effects of a pulled back and had difficulty reacting quickly enough to changing circumstances. The second I was fully mobile and did much better. Don’t be afraid to get up there on the pegs and move around—back, forth, to the sides.
  • Breathe and relax when you come to a challenging obstacle. As in all sport, tensing up is counterproductive, and breathing is the simplest way to get the body to relax.

One of the reasons I like off-roading is that it involves the development of skills and so has become yet another ambition to pursue. I love pushing myself, especially physically these days, and the Remise is a great way to brush up those skills at the start of a new season. A big thank you to Moto Trail Aventure and the BMW Club Québec, and especially the instructors who have volunteered their time and expertise.