
In this third post in a series on gear, I talk about the camping gear that works for me.
There are many reasons to do moto camping. The obvious one is that you save on accommodation costs. Most campgrounds will charge a fraction of the cost of even the cheapest hotel room or AirBNB, and if you do wild camping, it’s free. But I don’t think that’s the best reason to camp. Camping gains you access to remote areas only accessible if you’re willing to tent it. Yes, you have some inconveniences, but you get to sit by a fire through the evening, hear loon call through the night, and wake up to mist on the water—priceless experiences you can’t get at even the most expensive hotels. One of those inconveniences is that you have more stuff to carry on the bike, but trust me, it can all fit quite easily if you get the right gear. Here is what has worked well for me over the years and during my cross-country trip last summer. I’m not saying these are the best options, but it’s what I’ve been using and am happy with.
Tent

The tent I use for car and canoe camping is too big for the bike, so when I moto camp, I borrow my son’s MEC Tarn 2. Yes, he lent it to me the entire summer last year when I did the big trip. I keep thinking I should buy my own but he asks why if he’s not using it. That’s very generous of him, especially because it’s a great 4-season tent.
He lived in it an entire summer when he was tree-planting. It was the smallest tent in camp, and I’ve had people comment on “my tiny tent,” but we both love it for its size because that makes it warm and cozy. And when you are only sleeping in it, why do you need anything bigger? MEC says this is a two-person tent, but the only way it could fit two people is if they slept head to toe, and even then it would be tight. I find I can sleep comfortably with room for my jacket, pants, tank bag, and even a helmet beside me. Yes, for security reasons, I normally take my tank bag and helmet into the tent.
One especially nice feature is the large vestibule. I can fit both of my 40L Touratech panniers in the vestibule if I want a day of unencumbered riding, or at night my duffle bag, boots, and other gear I want to keep dry and close . . . but not too close, if you know what I mean. With only three poles, the tent is quick and easy to set up, and it has held up great over the years. We’ve both been caught in some big storms but it has kept us dry and warm. What more could you ask?
The poles are a little long so the length when packed up is 23″ x 7″ (diameter), but it fits perfectly into the bottom of my Wolfman Duffle or strapped onto the top of a pannier. Unfortunately, this tent is no longer available but there are others with a similar low-profile design and large vestibule. Eureka make one that is similar. I normally put a cheap tarp underneath to protect the floor but I make sure it doesn’t extend out beyond the fly or it will catch rainwater running off the tent and transport it underneath. I’ve never needed to string a tarp over this tent.
Marilyn and I didn’t do any camping together while she was riding with me last year, but I think we’ll have to next summer when we tour the Maritimes and Newfoundland. I’m in the process of researching a 2-person tent, and the MSR Elixir 2 is on my short-list. If you know of a good but reasonably priced 2-person tent, please let me know. Yeah, we’d all like to have a Hilleberg; maybe in my next life.
Sleep System
Inside the tent, I use a Nemo Cosmo mattress. I’ve used various self inflating mattresses and considered the popular Sea to Summit mattresses, but in the end, I bought this for a steal when it was discontinued and I have no regrets. I know the current inflatable mattresses use a fill bag instead of a pump, but I’ve never found the built-in pump annoying. It takes a timed 90 seconds to fill.
More importantly, this mattress is very comfortable and warm. Fully inflated, it’s 2.5 inches thick, and although that doesn’t sound like a lot, it beats the self-inflating mattresses and I can sleep on my side comfortably without my hip touching the ground. I’ve recently come across some sleeping bags that do not have any fill on the underside, and that’s because most, if not all, of the insulation from below comes from your mattress, so it’s a good idea to get one that has a good R-value, especially if you are doing any camping in Canada. The Nemo is 20R rated for temperatures from 15 – 25°F (-9 – -4°C), and I’ve never been cold on it. It packs up to 11″ x 6″ (diameter) and weighs 1 lb 13 oz, or 815 grams.
Overall, I’m very happy with this mattress. The only shortcoming is that the nylon surface is slippery, as is my sleeping bag, and I’m an “active sleeper,” so I’ve woken up briefly in the middle of the night off the mattress.

For years, and for the big trip last summer, I used a synthetic sleeping bag. It was fine in terms of warmth, and being synthetic meant I could throw it in a washing machine mid-point when I got to Calgary. However, being synthetic, it doesn’t pack up very small and that meant I had to take my large Firstgear 70L duffle when I really wanted to use my Mosko 25L Scout on the tail rack. Realistically, it probably never would have worked with the Scout; when Marilyn joined me, we needed all the room of the larger duffle for all our stuff, but when I got back, I bought a compression sack so I could cinch the bag down smaller. That certainly helps, but I’ve since bought a down-filled bag from MEC and that is now my preferred bag unless I expect to be wetting it (not yet) or sleeping in dirt (not likely) or in heat (not now). I got just a 650-fill one, which was affordable and adequate for 3-season camping, and it packs up small and is very light. I now recognize that for moto camping, you really need a down bag for its reduced size and weight. And for laundering it, I bought some Nikwax Down Wash Direct.
Finally, I use a Sea to Summit silk liner inside the bag to keep it clean. How often do you launder your bed sheets? I know that’s an impolite question to ask most bachelors. But you should launder your bag as often as your sheets, and a liner is a lot easier to launder than a bag. (You can, in fact, hand-wash it easily at a campground.) The benefits of a liner aren’t just related to hygiene. It adds warmth when you need it, and can replace a bag when it’s hot. There are lots of different kinds, from fleece to synthetic, but I decided to get the silk one because it insulates and breathes, so is practical in a wide range of conditions. Sorry vegans.


Stove
The type of stove I prefer is one that runs on liquid fuel. I don’t like having to dispose of propane canisters and I find them bulky in the limited space of my panniers. Instead, I have two 1L MSR fuel bottles that fit into racks on the back of the bike. (Most pannier systems, soft and hard, have a fuel bottle holder as optional add-on.) I already have the bottles as spare fuel for the bike, so why not double-purpose them as my cooking fuel? Some people say the food can take on the odour of burnt fuel, but I haven’t found that to be the case.
There are, to my knowledge, two manufacturers of this type of stove: MSR and Optimus. I started with the Optimus but unfortunately we had some issues with it and ended up abandoning it mid-tour a few years ago. The valve got stuck closed and then the threading got stripped in trying to open it again. To be fair, I probably was at fault in turning off the stove at the valve, but I always found that system of turning the stove off by flipping the bottle over awkward and unreliable. Had I known the casing was going to shrink when cooling and fuse itself to the threading of the valve, I would have done as instructed, but I didn’t, and that’s what happens when you don’t read the 15 pages of warnings that accompany most products today.
For the replacement, we went with the MSR Dragonfly. Same idea, better design. Liquid fuel is atomized on the underside of a heated saucer. It seems complicated at first but quickly becomes easy. You open the valve briefly and allow a little fuel to soak the wick, then light it and the resulting flame will heat the underside of the metal saucer at the centre of the stove. After about 30 seconds, the metal is hot enough to instantly turn the liquid fuel to gas and the flame turns from orange to blue. It’s a very efficient design; I can get a bottle of fuel to last easily over a week of full-time use. And best of all, you can find fuel at any gas station. It will burn all grades of petrol, including diesel, as well as kerosene and white fuel. Heck, it can probably burn alcohol if you’re in a pinch, but you’d have to be pretty desperate to burn your bourbon.
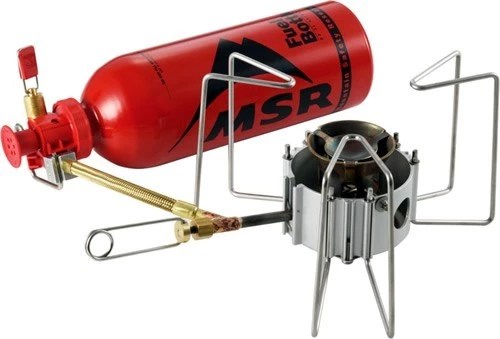
The main drawback of the Dragonfly is that it’s loud! Okay, it’s not like a jet is taking off from your campsite, as some online reviews claim, but it produces a steady roar, depending of course on how quickly you need your coffee. MSR also make the WhisperLite stove that is quieter, but we were talked into the Dragonfly by a salesman who uses it to do baking in the bush; the valve is that good. You can turn it right down to a simmer, unlike any other stove I’ve seen. Seriously, after having the Optimus crap out on us in Sudbury, Marilyn and I wanted a stove with a long history of tried-and-true reliability, and the Dragonfly has been used the world over at all altitudes by hikers, climbers, and campers. And after several years of use with only the most minimal maintenance, it’s working as well as the day we bought it.
Cookware
For years I used an old enamel pot and a steel frying pan, and they were adequate, but before the big trip, I upgraded my cookware. I went with a Zebra 3L Billy pot from Canadian Outdoor Equipment. There are four sizes but the 3L is right for me.

There are several things I like about this pot. For one, it’s stainless steel, so light and strong. There is an integrated pan that fits into the top, so I can have rice cooking underneath and a packaged curry on top, or pasta and sauce, KD and beans, etc.. I like the overhead handle so I can hang the pot over an open fire (instead of trying to balance it on rocks), and the little clips ensure that the handle doesn’t swing down when not in use and touch the side of the pot and get hot. My stove, the pan, and the lid all fit inside the pot, so it’s very space efficient.
I upgraded the frypan to the Firebox Frypan. It’s aluminum, and that might sound scary, but the aluminum is underneath a non-reactive oxide coating. Apparently it’s 30% harder than stainless steel, so scratch resistant, and—don’t worry—won’t cause Alzheimer’s. And being aluminum, it’s extremely light.
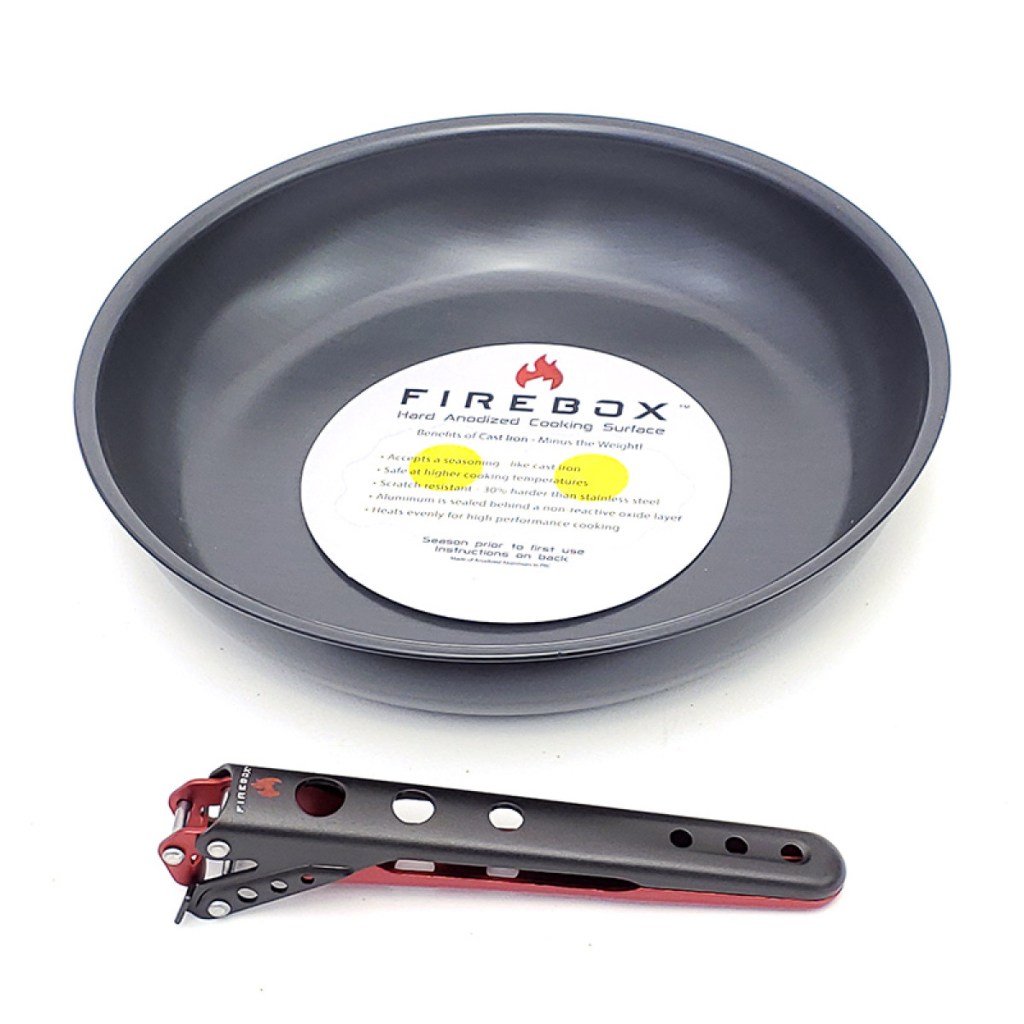
This pan requires a little prep to set it up before using, but once done, the surface is sealed and begins a seasoning process that will make your food taste better. That’s at least what Firebox says. Usually when I’m camping, I’m so hungry everything tastes great, but I’ll take their word for it. The sealing process takes a few hours but is not difficult. The handle holds the pan securely, and I’ve used it to lift the pan of my Billy pot too. I like this frypan because it has the same properties as cast iron but at a fraction of the weight.
Between these two items—the Billy pot and the Firebox frypan—I’ve never needed any other cookware.
It’s a good idea to protect your cookware with a bag. This also prevents rattling on the bike if you have hard panniers. You can buy bags, but I decided to make my own. I bought some Cordura off of Amazon and sewed some simple bags with draw-strings. I cut a circle a little larger than the circumference that I wanted, then made a tube and sewed the two together. Then I hemmed the top of the tube and pushed a length of paracord through (attach the end of the cord to a safety pin to push through). Finally, turn the whole thing inside out so the hems are on the inside, and knot the ends of the cord so they stay put. I made an even simpler one for the frypan and plates, and one for miscellaneous cutlery, the handle, tongs, and can opener.

Coffee!
Forget about freeze-dried coffee; you deserve better. When car camping, I’ve used the Melitta system with funnel and filters, but it’s impractical for moto camping. Lately, the only way I make coffee when camping is with the AeroPress.

It looks like a lot of stuff but it all fits together inside the cup. The AeroPress makes a great cup of coffee quickly and easily. The filters come in their own holder, but it’s not waterproof so you’ll want to prevent it getting wet (uh, before using). I can then fit the packed press inside one of my GSI Outdoors Glacier mugs. Again, nesting items helps keep your gear compact.

Water Sterilization
Once you get into remote areas, you will have difficulty finding potable water. You can boil your water, but that’s time- and fuel-consuming. For years, I used while canoe-camping a ceramic pump like the Katadyn Vario Filter, but the first time I went to replace the filter I choked on the price—almost as much as the original unit. The pump is also a bit bulky for moto camping. That’s when, for a little more money than a new filter, I bought a Steripen.


The Steripen uses ultraviolet light to eliminate bacteria, protozoa, and viruses. It can sterilize 1L of water in 90 seconds and has a basic display that indicates your progress. You submerge it in the water and stir, ensuring all the water gets treated. (For this reason, it’s helpful to have a wide-necked bottle.) A charge lasts for 8000 uses, apparently, but if that is not enough, it can be recharged off the bike via a USB port. Best of all, it’s super small. It doesn’t filter particles, of course, and is less effective in sediment-laden water, but I used it to treat the brown water out of the pumps at Yukon River Territorial Park and suffered only mild rectal bleeding and a slight twitch. (No, seriously, I was fine.)
If you have the space, a ceramic filter and Steripen is a good combo, and this is what my son Gabriel and I did this summer canoe camping. Of course, there are always chemicals, but I gave up on them years ago. If anyone knows of a small and effective pre-filter to replace the Katadyn while moto camping, please let me know.
Fire Prep
I’ve told Marilyn I have only two requirements for our retirement home: a heated garage and either a wood stove or a fireplace. I love fires. I was bummed about the fire ban in British Columbia last summer, but thankfully it lifted at the end of July so I could enjoy fires through northern BC and Yukon, where $12 gets you a site and unlimited firewood.
For splitting wood, I have a cheap hatchet. I can’t remember where I got it. I’ve considered upgrading, and still might, but for now this is what I use. I watched a bunch of YouTube videos on how to sharpen knives and axes and bought a sharpening stone and strop with compounds and got to work. Now it’s pretty sharp and does the job. I can’t split logs in half, but I can split off kindling. I had my local cobbler make up a sheath for it.

For years, I used the Trailblazer 18″ Take-Down Buck Saw for sectioning wood. Once assembled, it works great. But it does take some assembly, which makes it impractical for clearing trails when you are riding. I recently saw an Awesome Players video in which Riley is praising the Silky folding saw they use for that purpose. I dropped a hint to Marilyn and she gave me for my birthday this year the 210mm Folding Saw. My son and I used it to prune some branches away from the house this summer and again while canoe camping in August, and I have to say, this thing kicks butt! Nobody makes blades better than the Japanese. An unusual feature of Silky saws is that they cut on the pull stroke. As Riley says, they’ve tried imitation saws off Amazon and they are not the same. This is now my preferred camp saw.

Miscellaneous
This is getting long, so I’ll wrap it up with a few other favourites. I have two sources of light for when the sun goes down (other than my fire). One is a Spot Lite 200 headlamp by Black Diamond. A headlamp is a necessity, in my opinion, because it leaves both hands free for working around camp. This one is 200 Lumen, which is more than adequate, has settings for distance (spot), proximity (flood), is dimmable, and includes a red light, which doesn’t attract bugs. There’s apparently a way to lock it too, so it doesn’t accidentally turn on in your tank bag and drain the batteries.
For the picnic table and tent, I like the Moji Lantern, also by Black Diamond. It also has 200 Lumen max output and produces a nice soft, diffuse, light that fills the immediate area. It’s dimmable and has a strobe function as an emergency beacon, which I guess might be useful on the water but not for much else. It’s IPX 4 Stormproof, which means it can be rained on from any angle but I guess not submergible in water. The recessed switch prevents it from being turned on accidentally, and double hooks underneath allow you to hang it in the tent. All in all, it’s a very well thought-out and inexpensive small lamp (2 5/8″D x 1 3/4″). Best of all, you get your choice of four colours.


I’ve saved the best for last. My two current favourite pieces of camp gear are the Tribit Stormbox bluetooth speaker and my dad’s hunting knife.
The first time I played something through the Tribit Stormbox I was immediately impressed with the quality of sound coming out of this little speaker. It has rich, full bass, without sacrificing definition in the treble range. I don’t know how Tribit do it. The mesh on top is metal, so it’s durable, and it’s also waterproof, so you don’t have to worry about getting caught in a shower or during that river crossing. It has a built-in power bank that is rechargeable on the bike via USB-C, and it’s plenty loud enough, especially for a campground. It connects automatically to my phone when I turn it on—no need to pair each time or mess around in settings. I never thought I’d like music so much when camping, but I’ve discovered it’s very nice as a sort of companion fireside.
Finally, my favourite piece of camping gear is my dad’s old (circa 1954) Solingen hunting knife set I inherited when he downsized. Admittedly, these knives have more sentimental value than practical use, but I do use them around camp. The bowie knife is also known as a survival knife. I’m not using it in any sandbar duels, as Jim Bowie did, but I have used it to split wood by hammering on the blade with a rock or for digging a hole for poop, and a variety of other purposes that require a strong blade. If you had to survive in the bush with one knife, a bowie knife would be it. The little paring knife I use for a variety of purposes. The handles are carved antler, and the sheath is ornately stamped. It’s my prize camping possession so, sorry folks, not for sale. I see that Solingen in Germany are not selling any more hunting knives, but there’s no shortage of good quality knives available on the market. In fact, I’ve recently discovered YouTube channels devoted to reviewing knives. Who knew?


If you’ve stayed with me to the very end, congratulations; go outside for some fresh air. I didn’t realize I had so much gear until I started getting into it, and figured if I’m going to talk about it, I should say something meaningful and not simply present a list. I solemnly swear that it, plus food, a small stuff sack of personal items, and even a container of spare bike parts all fit in two 40L panniers and the small Wolfman duffle tail bag. The light stuff like sleeping bag, mattress, and clothing go high on the tail rack; the heavy stuff like all the cooking gear and food go low in the panniers.
I hope you’ve found this post helpful. I know several items are already discontinued, but that’s when I usually buy gear—on clearance—and you can find similar items based on these recommendations. If you have a favourite or newly-discovered piece of camp gear, please let us (me and my readers) know by dropping a comment below. I recently took a look at my stats and this blog is getting about 3000 views per month—not a lot by internet standards, but not bad either. And while I’m on this topic, please consider following and share with anyone you think might be interested. I am hoping to grow the blog, and with retirement and another big east coast trip planned in the not-too-distant future, I still have lots to say.
In the next post, I’ll conclude the series on gear by talking about the essential tools I always carry on the bike and the navigation apps I use to get around.
