With the growing popularity of adventure biking, it was only a matter of time before someone organized a rally for adventure bikers. June 7-10 was the second annual Dirt Daze rally, held in Lake Luzerne, NY. I heard about it through a club friend and decided to head down from Montreal.
Dirt Daze is actually the off-road component of the big Americade rally held the same weekend in nearby Lake George, and my ride down on Highway 9 took me right through that other rally in the late afternoon. I felt a little out of place as I rode through on my GS with Touratech panniers. All the Harleys were lined up gleaming on both sides of the street, and it seemed to me that it was more about the bike than the riding. Guys were sitting shirtless on plastic chairs outside their motel rooms drinking beer out of the can. It didn’t seem much fun. I scooted through apologetically for ruining their parade and was soon at “my” rally in Lake Luzerne.
No sooner was I off the bike when an organizer said to me, “Welcome. Slow race in five minutes.” Now this is more like it! I was pretty pooched from my 5 1/2 hour ride down, but he was so enthusiastic and convincing it would be fun I decided to drop my big tail bag and participate. There were ten of us, and we were paired in heats of two. The course was a straight 50 feet, lined with cones. Last over the finish line wins and moves on, the other eliminated. In watching the first couple of heats, I saw that the start was crucial; if you get ahead over the first few feet, it’s difficult to make that distance up. When it was my turn, I was pretty nervous with everyone watching and a little too tentative off the start and stalled the bike. Doh! Damn! I was mad at myself but it was all for fun.
Then I rode back to the camping area with my tailpipe between my legs and chose a spot to pitch for three nights. We were pretty packed in, but it was nice to be able to camp on site and keep costs down.

The rally is held at The Painted Pony ranch. It’s a great location with food and drink available at the saloon, showers, and lots of space for vendors and the four obstacle courses. And since it’s a ranch, there is livestock.

If you’re a light sleeper, you might want to camp at the nearby KOA campground. Between the lowing and the snoring and the 2-strokes firing up at 6 a.m. (all of which become indistinguishable after a while), you’re not going to get much sleep.
I’ve never had any off-road training, so I signed up for a two-hour beginner class on Friday morning with Jimmy Lewis. Jimmy and his wife, Heather, run an off-road school in Nevada and offer at Dirt Daze compressed versions of their full-day courses. Jimmy is an amazing rider. He was a podium finisher for the Dakar and overall winner of the Baja and Dubai rallies, among other accolades. His curriculum focuses on balance and traction. In all the exercises we did, we never got out of first gear. His exercises develop muscle memory for finding and maintaining that neutral point when the bike is in balance. He says if you come to an obstacle and you’re off balance, you’re going to get into trouble. As for traction, he says it doesn’t matter what they call your tire—60/40, 70/30, or 85/15, like mine—if you run your hand along the side of the tire and don’t feel sharp edges, you’re going to go down in the mud. More on this later. In fact, in their school in Nevada, they make 50/50 tires mandatory.
One of the nice things about Dirt Daze is the people you meet. I came alone but was never alone. A couple of us who did the morning class went for lunch together and then decided to do one of the self-guided rides in the afternoon. They had done a guided ride the day before, and when we got lost on our self-guided ride, we decided to return to a network of trails they knew of from their previous ride. I’ve never done single track trail riding, so I quickly got in over my head, especially with my “street tires,” as everyone kept referring to them. I actually did pretty well with the slow turns and descents, even the sandy hill climbs—the back end sliding all over the place—but when it came to mud, my skills and tires let me down—literally! I and the bike ended up in a deep mud puddle at the bottom of a hill, but I managed to get the bike back up and out using some of what I’d learnt in the morning class; Jimmy had showed us how to start in low-traction terrain without digging in. When I re-emerged from the woods and met up with the other guys, I must have been a sight. Someone said “I’ve got to get a photo of this.” When we got back to camp, I headed for the bike wash. “Why bother?” someone asked. “It’s just going to get dirty again.”
The next day was my planned “big ride”—a guided full-day ride through the Adirondacks with about 50% off road. It was led by veteran rider Bill Dutcher, founder of Americade (then Aspencade East) in 1983. I’d been warned about Bill: the “old man” hauls ass. There were twelve of us, and I decided to tuck in behind him so I could watch and learn. Soon after we pulled out of the ranch I found myself going 70 km/hr on a dirt road with a smattering of gravel. Shit, is it going to be like this all day? I was riding over my head but didn’t want to hold the group up. All was good for a few kilometres until we headed down a sweeping descent. Halfway down I knew I was in trouble. I knew if I braked and turned I would lowside, but fortunately I didn’t panic. I dropped my line and headed straight, gently squeezing the brake. For the first time in my short riding experience the thought that I might crash flashed through my mind, but fortunately I eased to a stop before I ran out of road. Someone behind slowed and gave me the thumbs up as a question. I nodded and looked back. No one was behind me, just empty road. I realized I needn’t have worried about holding the group up because they were all well behind. I had made the classic mistake of trying to keep up with a rider who had 49 years of riding experience on me.
I took that little incident as my warning and decided to drop back. As the day continued, the group settled into two groups, with three fast riders up front with Bill and the rest of us behind at a slower pace. They waited for us at each turn. It worked. I was still a little out of my comfort zone, but in a good way. I was able to practice the peg-weighting I’d learnt with Jimmy as we weaved through the Adirondack backroads. There were a few times when I hit sand and almost lost the bike (again, the street tires!) but at a much lower speed. At one point we hit deep gravel, what looked like 3/4 crushed stone, and that was interesting. Again, I had enough good sense or gods’ blessings to not panic but let the bike go where it wants to go and ride it out. When we got to the next rest stop, Bill asked if anyone had had trouble with that gravel, and reminded us that the technique for dealing with it is to get your weight back and, counter to what your intuition is telling you, get on the gas. It lifts the front end and the bike rides over the gravel instead of digging down in, which would be trouble. I was learning a lot.
We lunched at a classic mountain lodge with a beautiful view of the surrounding Adirondack mountains. 
Other parts of the ride brought us to picturesque vistas.
We ended up again at that network of trails and I fell victim again to mud at a small water crossing. I crossed the stream okay, but once on the other side I was so focused, quite literally, on the mud under my tires I forgot to look beyond the obstacle further down the trail. Perhaps I tightened up too. Perhaps I got too much weight over the front tire. Before I could say “another classic mistake” the bike was on its side halfway up the bank. Despite the spills, the ride was exhilarating and I told Bill afterwards that it was so far the ride of my life.
Back at camp, we were treated to a demonstration by World Freestyle Champion Chris “Teach” McNeil. His nickname is Teach because he is a Latin teacher at a private school. Now as an English teacher at a CEGEP in Montreal, I thought I had the cool factor when I pull onto campus on my bike, but I’m pretty sure this guy is more popular with his students. Freestyle or stunt riding is not my thing, and I’ve seen videos online of guys doing nose-wheelies on litre bikes. But seeing it live is another whole experience. It’s pretty damn impressive to see the way the power and weight of his BMW S1000XR is a plaything in his hands.
After such a full day, I was ready to retreat to my tent. I lit a pipe and wandered through the camping area checking out the other bikes, then struck up a conversation with the guy next to me. I was lamenting a few scratches on my bike from the falls that day when he said, “Ah, you can’t worry about that shit. It’s a bike.” It reminded me of the comment earlier about not bothering to wash it, and I thought again about the gleaming Harleys just up the highway and just how different adventure biking is from that kind of riding. Adventure biking is about the adventure of not knowing what’s going to happen in the woods. It’s about helping others lift and fix their bikes on the trail, like when Bill helped me fix my engine guard with a zip tie and duct tape. It’s about escape, and risk, and skill—a lot of skill! What impressed me the most from the rally was not any particular bike but the skill-level of many of the participants.
It seemed à propos that one of the final events of the rally was the Ugliest Bike Contest. The bike that won was the one Jimmy Lewis borrowed to win the slow race.
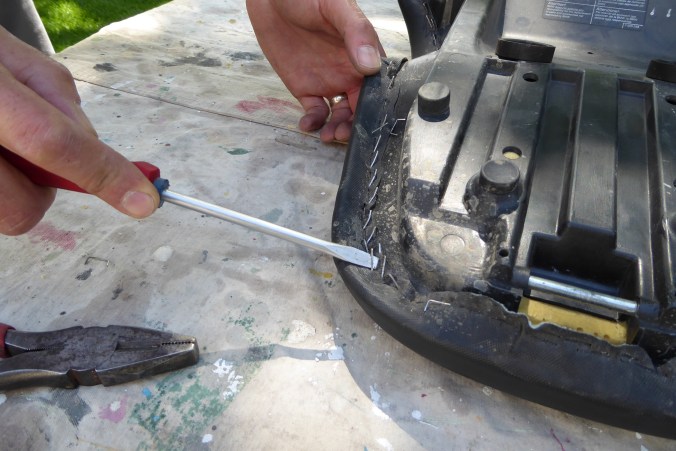
 The only problem is that both BMW’s and Touratech’s comfort seats are about $700 CAN. My butt was telling me to spend with abandon, but my mind (and my wife) was reminding me of our budget. Then I heard about