
Spend a little time and money to adjust your suspension and it will transform your ride.
In a recent interview on Adventure Rider Radio, Chris Birch talks about spring rate and preload not as factors of sag but balance. The standard thinking about sag is that it’s to keep the tire in contact with the road through potholes and over bumps, but Chris says he thinks about the preload adjuster as what keeps the bike in neutral balance front to back. Too much sag and you’re going to be light in the front and risk washing out in corners; too little sag and you will be nose-heavy and at risk of losing the rear in corners or tucking the front in sand or mud. He said when you get the bike balanced right, it’s an “aha” moment and it just feels easy to ride and right.
There are lots of videos available on YouTube on how to measure sag so I won’t go into that here. What I will say is that most adventure bikes come off the production line set up for street riding. I could be cynical and say that’s to have a comfy test ride and sell bikes, but the truth is that most adventure bikes don’t see much dirt. My Tiger 800XC was the same. The stock spring gave the bike a static sag of 18% (10% is the target) and I was well below recommended rider sag (30%) when loaded, even with preload fully wound.
I recently worked with Stadium Suspensions here in Quebec to correct this. We had tried a 13.2 kg/mm spring on the shock a few summers ago when Marilyn and I went to Newfoundland and were fully loaded with the hard cases. It got us the correct sag but was a little tough on our butts. So more recently Stadium swapped it for a 12.5 with an extra 4mm preload collar and it’s the Goldilocks set-up for me. It puts the static sag at a perfect 10% and rider at 37% but without any hydraulic preload, so I’m definitely within range.
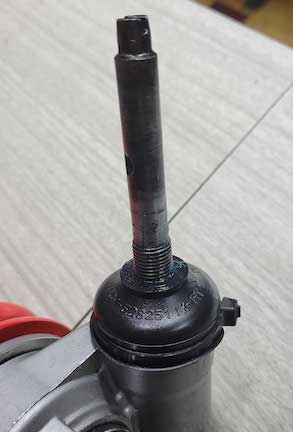
Another reason the bike was sitting low is that the preload wasn’t working very well. Over the years, dirt and water had gotten behind the black plastic collar on the chamber. The components inside had become corroded and had started to seize. Stadium tore it down and cleaned everything up, including machining the housing. The technician suggested I try protecting the now exposed seal with a tie-rod boot, so I ordered a variety pack off Amazon and luckily there was one that fit perfectly. For the Tiger’s Showa shock, you need a boot with ID 11mm top and 37mm bottom, but the latter can be stretched if needed. I put a little waterproof grease across the face of the seal inside and on the lips of the boot and used a zip tie to hold everything in place.
Since I’d stiffened up the rear, I thought I should stiffen up the front too, which was a little prone to fork dive. The OEM springs are .49 kg/mm so we went with .6 kg/mm. If you do the math (do you remember how to cross-multiply fractions to calculate x?), that’s about the same ratio as what we did at the rear. With everything back together, as soon as I pulled the bike off the centre stand, I noticed it was sitting higher. I haven’t had the chance in the late season to try the new suspension on dirt yet, but from commuting on Montreal’s notorious roads, I can tell it’s a big improvement. I had an “aha” moment.
The Tiger’s suspension doesn’t have a lot of adjustment, but there are still ways to customize. I rode both the GS and the Tiger for years before doing anything with the rebound adjustment. (On most shocks, that’s the screw at the bottom of the shock.) Thierry at Stadium said I’d probably have to slow the rebound down with a stiffer spring on now, so I took the time to watch Dave Moss’s tutorial on how to do this. It’s so easy I feel stupid for not doing it earlier. You simply push down on the tail of the bike and watch to see if it bounces upon release. You want the softest setting without even the slightest bounce; it should return to rest in only one stroke. When I did this and dialled in the rebound damping, I felt a noticeable improvement in how the bike tracks over bumps and potholes. Try it.

The forks on the Tiger don’t have any adjustment, but again, suspension guru Dave Moss says the oil height specified in your service manual is only a starting point for the average rider. If you are a light rider like me (145-150 lbs, depending on if I’ve had breakfast) or a less aggressive rider (like me), you could try a larger number. (Remember, a larger number means less oil since you are measuring from the top of the tube to the oil level.) If you are heavier than average or a more aggressive rider, use more oil and a smaller number. Just note the caveat from Dave in the video linked above about hydrolock, so test that you can bottom the fork before putting it back in the bike. And of course there’s always the option of trying different weight oils and different brands of the same weight since there’s no standardization of weight for fork oil. There are charts online showing the different viscosities of brands.
As a final thought, I’ll just add that before you go playing around with your suspension settings—and I’m suggesting you do—make a note of where everything is now so you can always return to your current set-up if necessary. There are many elements to suspension and you can get lost in the combinations, so change one thing at a time and test ride the bike on a familiar piece of road or trail before changing something else. Setting up your suspension takes a little time and patience, but when you get your bike dialled in, it will produce an “aha” moment and transform your ride.

