Spend a little time and money to adjust your suspension and it will transform your ride.
In a recent interview on Adventure Rider Radio, Chris Birch talks about spring rate and preload not as factors of sag but balance. The standard thinking about sag is that it’s to keep the tire in contact with the road through potholes and over bumps, but Chris says he thinks about the preload adjuster as what keeps the bike in neutral balance front to back. Too much sag and you’re going to be light in the front and risk washing out in corners; too little sag and you will be nose-heavy and at risk of losing the rear in corners or tucking the front in sand or mud. He said when you get the bike balanced right, it’s an “aha” moment and it just feels easy to ride and right.
There are lots of videos available on YouTube on how to measure sag so I won’t go into that here. What I will say is that most adventure bikes come off the production line set up for street riding. I could be cynical and say that’s to have a comfy test ride and sell bikes, but the truth is that most adventure bikes don’t see much dirt. My Tiger 800XC was the same. The stock spring gave the bike a static sag of 18% (10% is the target) and I was well below recommended rider sag (30%) when loaded, even with preload fully wound.
I recently worked with Stadium Suspensions here in Quebec to correct this. We had tried a 13.2 kg/mm spring on the shock a few summers ago when Marilyn and I went to Newfoundland and were fully loaded with the hard cases. It got us the correct sag but was a little tough on our butts. So more recently Stadium swapped it for a 12.5 with an extra 4mm preload collar and it’s the Goldilocks set-up for me. It puts the static sag at a perfect 10% and rider at 37% but without any hydraulic preload, so I’m definitely within range.
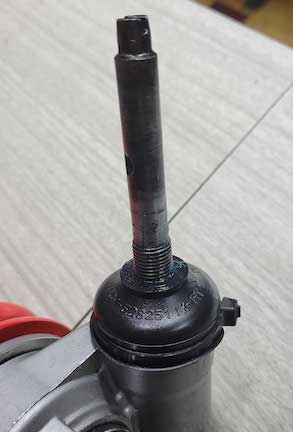
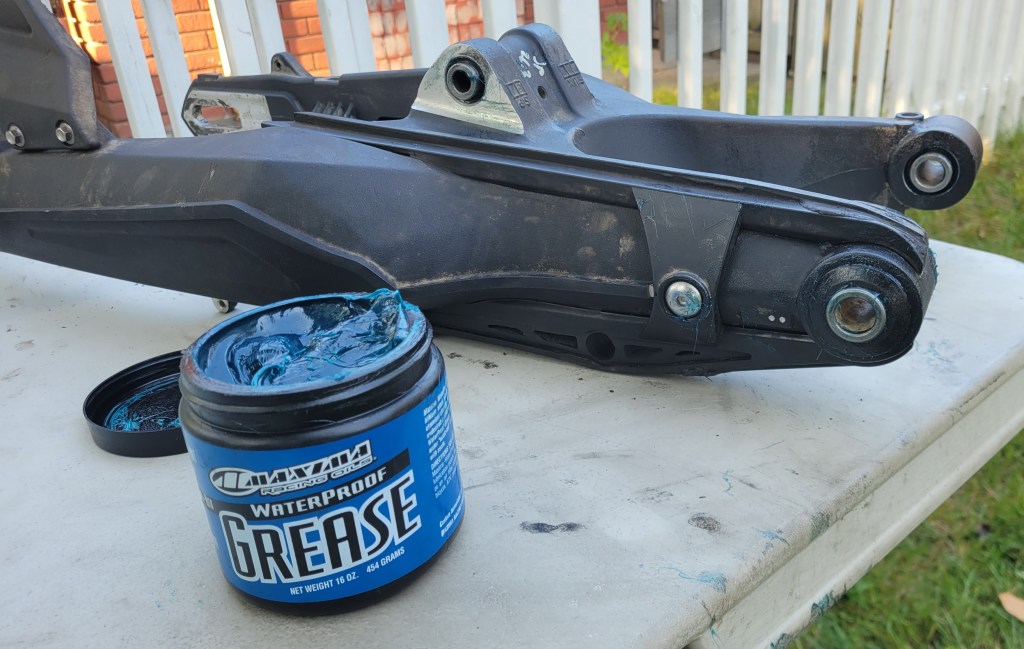
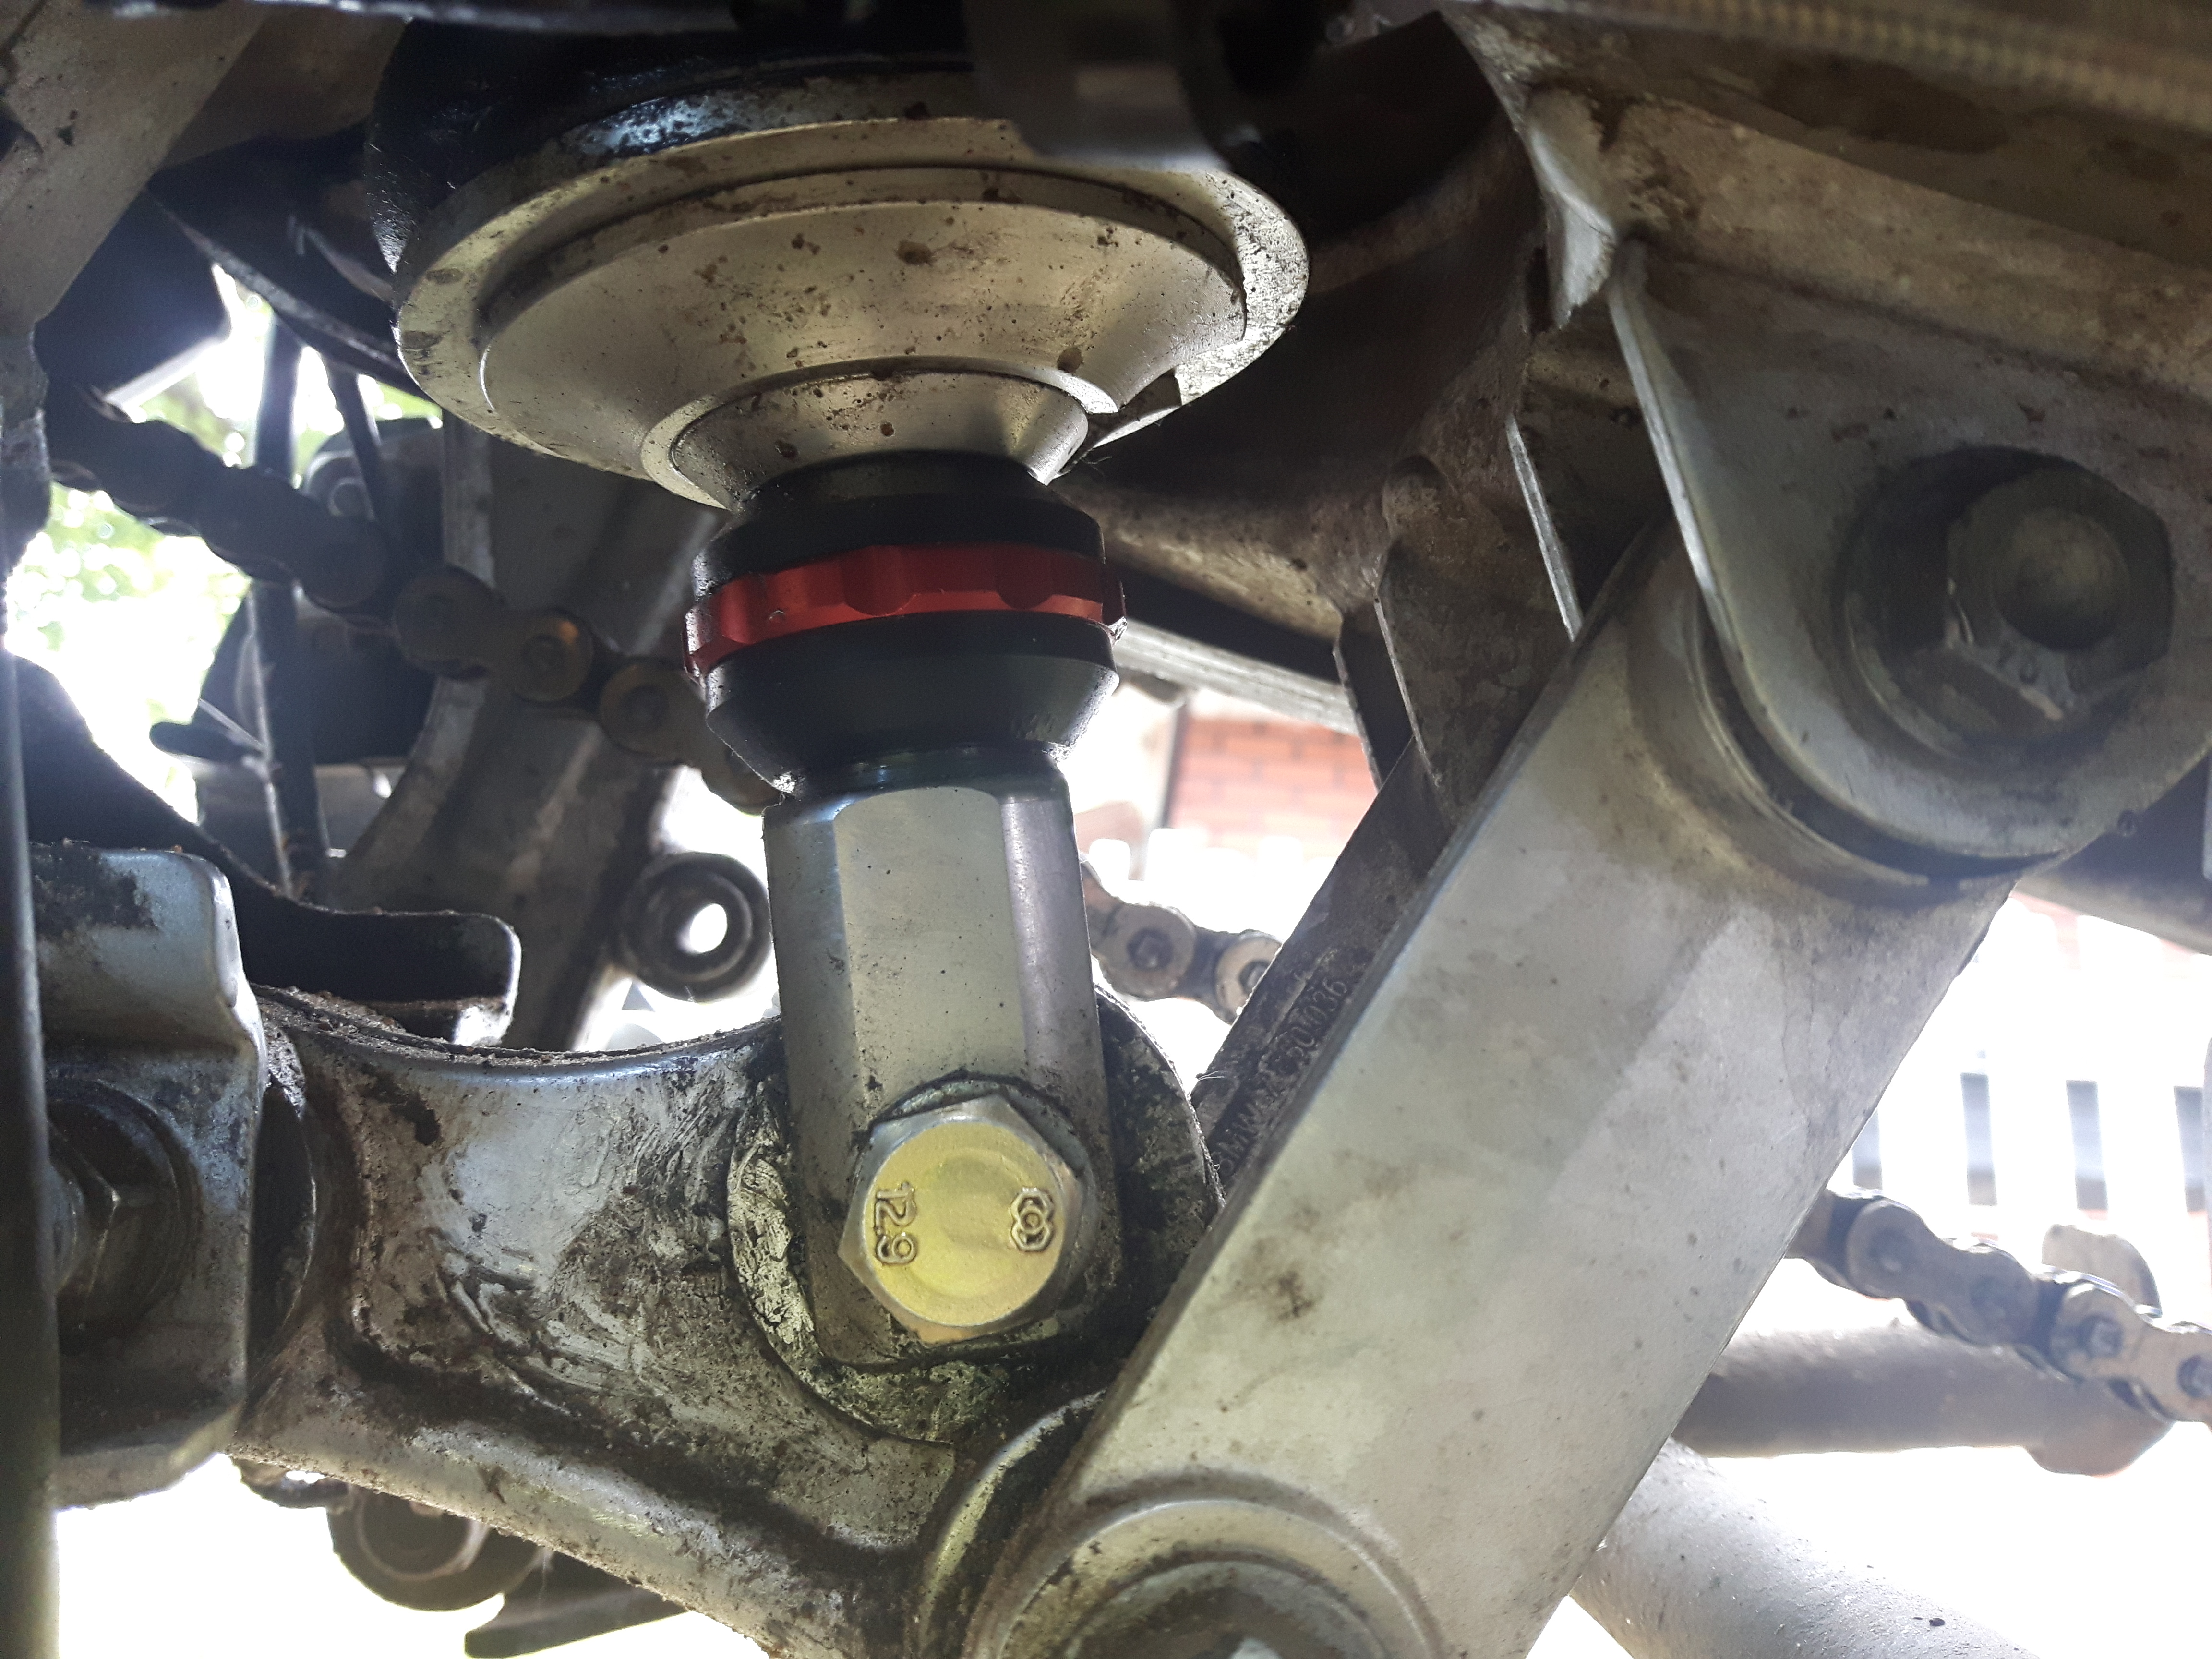
A tie-rod boot helps keep dirt and water out of the preload chamber.
Another reason the bike was sitting low is that the preload wasn’t working very well. Over the years, dirt and water had gotten behind the black plastic collar on the chamber. The components inside had become corroded and had started to seize. Stadium tore it down and cleaned everything up, including machining the housing. The technician suggested I try protecting the now exposed seal with a tie-rod boot, so I ordered a variety pack off Amazon and luckily there was one that fit perfectly. For the Tiger’s Showa shock, you need a boot with ID 11mm top and 37mm bottom, but the latter can be stretched if needed. I put a little waterproof grease across the face of the seal inside and on the lips of the boot and used a zip tie to hold everything in place.
Since I’d stiffened up the rear, I thought I should stiffen up the front too, which was a little prone to fork dive. The OEM springs are .49 kg/mm so we went with .6 kg/mm. If you do the math (do you remember how to cross-multiply fractions to calculate x?), that’s about the same ratio as what we did at the rear. With everything back together, as soon as I pulled the bike off the centre stand, I noticed it was sitting higher. I haven’t had the chance in the late season to try the new suspension on dirt yet, but from commuting on Montreal’s notorious roads, I can tell it’s a big improvement. I had an “aha” moment.
The Tiger’s suspension doesn’t have a lot of adjustment, but there are still ways to customize. I rode both the GS and the Tiger for years before doing anything with the rebound adjustment. (On most shocks, that’s the screw at the bottom of the shock.) Thierry at Stadium said I’d probably have to slow the rebound down with a stiffer spring on now, so I took the time to watch Dave Moss’s tutorial on how to do this. It’s so easy I feel stupid for not doing it earlier. You simply push down on the tail of the bike and watch to see if it bounces upon release. You want the softest setting without even the slightest bounce; it should return to rest in only one stroke. When I did this and dialled in the rebound damping, I felt a noticeable improvement in how the bike tracks over bumps and potholes. Try it.
The forks on the Tiger don’t have any adjustment, but again, suspension guru Dave Moss says the oil height specified in your service manual is only a starting point for the average rider. If you are a light rider like me (145-150 lbs, depending on if I’ve had breakfast) or a less aggressive rider (like me), you could try a larger number. (Remember, a larger number means less oil since you are measuring from the top of the tube to the oil level.) If you are heavier than average or a more aggressive rider, use more oil and a smaller number. Just note the caveat from Dave in the video linked above about hydrolock, so test that you can bottom the fork before putting it back in the bike. And of course there’s always the option of trying different weight oils and different brands of the same weight since there’s no standardization of weight for fork oil. There are charts online showing the different viscosities of brands.
As a final thought, I’ll just add that before you go playing around with your suspension settings—and I’m suggesting you do—make a note of where everything is now so you can always return to your current set-up if necessary. There are many elements to suspension and you can get lost in the combinations, so change one thing at a time and test ride the bike on a familiar piece of road or trail before changing something else. Setting up your suspension takes a little time and patience, but when you get your bike dialled in, it will produce an “aha” moment and transform your ride.
Fully loaded and ready to ride to Newfoundland. (July 1, 2023)
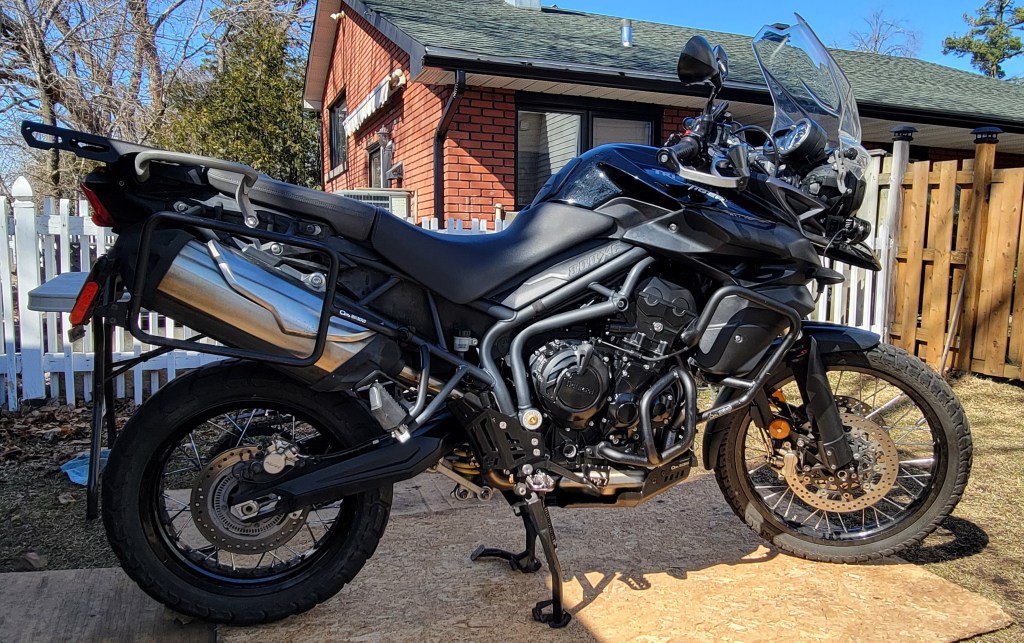
Spirited on road, capable off road, the Tiger 800XC is a great all-round middle-weight bike.
My review of the 650GS has been the most viewed page on this blog for years, so I thought I’d write one on the Tiger, which I’ve had now for three full seasons and over 45,000K. These are both old bikes, so I know most people reading the reviews already own the bike and want to see if they’ve made a mistake. You have not. Well, as always, it depends on the type of riding you do. But if you’re looking for a long-distance ADV touring bike, the Triumph Tiger 800XC is a good choice.
But I’m getting ahead of myself. As I did before, I’ll break down the review into components.
Engine
The heart of any bike is the engine and the Tiger’s is a gem. When I pulled into my driveway on the GS at the end of my 2021 cross-country trip, I knew I wanted a smoother bike. The big thumper got me to the Pacific Ocean and the Arctic Circle and back, but it wasn’t very comfortable, especially on those highway miles. When I test rode the Tiger, I knew I would buy it even before I was around the block; I couldn’t believe what I was feeling. This engine is SMOOOTH! I’d go as far as to say it’s the bike’s defining characteristic. This is the 800, so before Triumph moved to the T-plane crank and off-set firing order, so it’s about as smooth as a triple can be. If you’re coming from the nuts-numbing world of a big thumper, the inline triple with a 120 degree crank is a world apart and exactly what I was looking for.
Aside from being smooth, this engine has a ton of character. It has comparable torque to its rival, the BMW F800 GS (58 ft.lb @ 7850 rpm vs. 59 ft.lb @ 5750 respectively), but gets that torque much higher in the rev range. And it likes to rev! It spins up fast, so even pulling away from a stop light you find yourself pulled involuntarily into The Giggle Zone. Yet despite that high peak rpm, the torque on the Tiger is incredibly linear.
photo credit:// ADVMoto. 1st Gen Tiger 800 dyno results. Note the linear (flat) torque “curve” above 3000 rpm.
The gearbox is also smooth, both upshifting and downshifting. It’s so smooth, someone I swapped bikes with once asked if it has a slipper clutch. The high-revs, the smoothness of both engine and gearbox, combined with a wonderfully guttural exhaust note make the Tiger 800 a really fun bike to ride. It feels like Triumph has shoe-horned a sport bike engine into an adventure chassis, which I guess they have since the engine comes from the 660 Sport. I’m not afraid of the dirt but, to be honest, most of my adventure touring is on asphalt, and the Tiger makes crunching those miles enjoyable.
Where the engine does come up short is in slow-speed technical riding, a downside the T-plane crank of its successor, the Tiger 900, attempts to address. The 800 is happy when revved, but is prone to stalling at slow speed, especially in sticky mud or over obstacles—anything that requires careful clutch work in 1st gear. It has no tractor-factor, so if you like ATV and snowmobile trails, single-track and getting out into the woods, the Tiger is probably not for you. It can do it, but you have to keep the revs up and feather the clutch a lot, which can be tiring on your hand and the clutch.
Handling
The XC model I have has a 21″ front and a 17″ rear wheel—an unusual combination in the ADV world where an 18″ rear is the norm. Perhaps Triumph did that to compensate for the nose-heavy geometry of the big triple compared to a parallel twin. (It still has a stink bug stance.) They’ve also increased the rake on the front forks beyond the competitors’ to 23.9˚ (compare with 26˚ for the BMW 800). What this weird-ass geometry does is make the 21″ front wheel surprisingly easy to turn in yet planted through corners. For an ADV bike, the Tiger is surprisingly agile and confidence-inspiring through the twisties. That’s when it’s in its element, whether on asphalt, gravel, or dirt.
Lanark County Trail System on 70/30 tires.
The cost is a tendency for the front end to tuck in mud or sand, especially if you forget to steer with the pegs. My crash this past August was a direct result of that happening on a muddy downhill corner, although I think balance of the bike front to back was also a factor. (I was under sag.)
Front-end tuck on the Bailey-Hazen hero section.
The Tiger is also a little top heavy, despite its flat horseshoe-shaped gas tank. That’s probably a result of the tall and wide engine. (To get the 660cc Sport engine to 800, Triumph lengthened rather than widened the bore.) You don’t feel it once the bike is rolling, but again, it’s another characteristic that makes the Tiger a challenge off-roading at slow speed. What all this means is that if you want to ride hero sections on the Tiger, you’d better have skills.
Triumph says that the Tiger is for “light off-roading” and they don’t lie. The engine and balance of this bike are designed for 2nd gear and up. But the biggest indicator that this bike is not for serious off-roading is the placement of the spark plugs and air filter, both of which are under the tank. If you’re doing water crossings—and what serious off-roader isn’t—you’d better not swamp the bike or you’re going to be removing bodywork and lifting the tank trailside. Been there, done that. It’s not much fun. To lift the tank, you need first to remove the beak, radiator side panels, indicator panels, and trim. I’ve done this perhaps a dozen times now and have the whole process down to about 20 minutes. Needless to say, for an ADV bike, this is a major design flaw, or at least a serious limitation.
Suspension
The Showa suspension on the XC is a step up from the XR version. Rear travel is 215mm and front is 240mm. That’s more than what I’ll need because I’m not blasting down rocky trails as much as trying to thread my way through them. (The 650GS, for comparison, has 165mm rear and 170 front.) With the Outback Motortek skidplate, ground clearance on mine is about 9 1/4″ or 235mm. The shock has hydraulic preload and rebound adjustment. The forks are a beefy 45mm but with no adjustment. That’s a fairly basic system, but again, sufficient for ADV touring.
Like most ADV bikes off the production line, the Tiger 800 is set up for road use. The suspension is soft and cushy, making a plush ride around town (and during test rides, I should add). But if you want to use this bike for how it’s intended—ADV touring (the XC stands for cross country)—you’re going to have to stiffen the suspension.
The OEM shock has a spring rate of 9.7 kg/mm which, surprisingly, gives me a static sag of 18% (40mm). This means that under its own weight on the OEM spring, the bike is under sag. Rider sag for me is 35%, even with preload fully wound. (Note to newbies: static sag is unloaded with no rider and should be 10%; rider sag is loaded with rider and should be 30%.) At 150 lbs (177 in all my gear), I’m not a big guy, and with about 66 lbs of luggage (56 on the back, 10 on the front), I don’t think I’m overloaded, although I’ll be working over the off season to reduce that weight. Nevertheless, it’s clear to me that the OEM spring on the shock is too soft for anything but solo street riding.
I recently upgraded the suspension and will publish a separate post on that topic, so click Follow if you’re interested in what I’ve done.
Ergonomics and Comfort
The ergonomics on the Tiger are generally comfortable whether you are seated or standing. The wide handlebars are what you’d expect and want on a bike designed for the dirt, yet they don’t feel like ape-hangers when seated either. I haven’t added any bar risers because the bar mounts are already high, and when I stand the bars fall to the right place when I’m in the correct body position with hips slightly bent. (Most people who add risers are seeking comfort while standing erect.)
One unusual feature of the bike’s ergos is the distinct sensation of the fuel tank between your, uh, thighs. It was something I immediately noticed on that brief test ride and something others have commented on when we’ve swapped bikes. The tank is wide, and it forces your knees apart. (No bad jokes here). I find it actually reminds me to squeeze the bike, which is good practice whether riding on and especially off road.
The seat is generally comfortable for long days, although when touring I add a sheepskin pad to improve comfort and airflow. Triumph sell a comfort seat for this bike but I haven’t needed it. Similarly, Marilyn hasn’t complained about the seat on the back. The 1st generation Tigers do not have a heated seat option but subsequent ones do.
My knees sometimes complain over long days but I’m pretty long-legged, so they are bent slightly more than 90˚. I put my Fastway pegs in the low position and the adjustable seat in the high position and this set-up has been pretty good. With the bike now sitting even higher, I’m anticipating improved comfort for my ageing knees. In the raised position, seat height is 34.5″ or 885mm, which is comparable to its BMW competitor.
My biggest complaint about comfort is in the area of wind management. I’ll be doing a separate post on my search for a solution, but let me say here that the OEM windscreens for the Tiger suck! The stock screen is notorious, and the touring screen is little better. Maybe it’s too much to ask of a screen to allow airflow at slow speed when off-roading and a quiet ride at speed on the highway. The best solution I’ve found is the touring screen with a cheap clip-on wind deflector, which helps with the wind but ruins both the lines of the bike and video footage from my chin-mounted camera. Oh well.
Aesthetics
Canadian poet Robert Bringhurst has a collection titled The Beauty of the Weapons and I think the Tiger is a beautiful weapon, especially the all black model. I get a lot of compliments on the bike, even from other riders. You can see in the neoclassic bikes like the new Bonnevilles that Triumph pays a lot of attention to how a bike looks, and they’ve done a great job with the Tiger. Okay, you may say they’ve copied their competitor with the beak, but I think a bike without one looks weird. There are a lot of complimentary parallel angular lines on the bike that thankfully Outback Motortek has followed. Aesthetics is something not everyone is into, but I want a bike that makes me turn around and look at it as I walk away in the parking lot, and the Tiger does that.
Reliability
There are a few known issues with this bike, not surprising given that it’s a first generation model. The shifting mechanism is known to fail, and mine did, but not in the expected way of the return spring or the pin for the return spring breaking. No, it was the selector arm that failed at about 45,000K, so while I was in there behind the clutch, I decided to replace not only the selector arm but also the problematic spindle, the return spring, and the detent wheel, all of which have been redesigned. You can read about that work here. The bike also let me down once in the bush during a water crossing when somehow about 3-4L of water got in the tank. I still think the only viable theory is that water got sucked up through the tank breather tube and I’ve since redesigned the tube to avoid this happening again.
I cut the breather tube behind the airboxand added a T-joint and short length of hose
The other known issue with this bike is the starter motor. There are many accounts of it failing to restart the bike when the engine is hot. It was fine for me the first two years but then started to act up and got progressively worse. I’ll be doing a separate blog post on that too, but I’ll let the cat out of the bag here and say the problem was, at least in part, a dirty main ground on top of the engine block that was causing a voltage drop. If you have the dreaded starter motor issue on your Tiger, clean the main ground and contacts on the starter relay before changing the starter or battery.
That’s it. Clutch, stator, voltage rectifier, water pump, oil pump—all good—and no issues with any of the electronics. That’s not bad, in my opinion, for a bike with over 60,000K on it.
I adjusted the exhaust valves at 45,000K; the intakes were perfect but all the exhausts were tight. There are some reports of the engines, particularly on the 2nd gen Tigers, to start burning significant oil at about that mileage, but thankfully that has not been the case with mine. It burns a little oil now, particularly at high-revs on the highway, but nothing significant. I’ll come back from a tour of a few thousand kilometers and top up maybe 200mL. I’ve been using Castrol Power 1 4T and, more recently, Motul 7100, but when I mentioned my oil consumption to my dealer, he said they put Motul 300V in all the “high-revving bikes.” I thought it was only for racing bikes, but henceforth that’s what will be going in this bike.
I like that the 2011-14 Tigers are still relatively simple and easy to service on my own. There’s no ride-by-wire and rider modes or complicated electronics that require a computer to diagnose and repair, although I wish turning off ABS were easier than navigating menus. The 1st Gen Tigers that ran 2011-14 are at the tail end of an era before things got pretty complicated electronically. Build quality and fit-and-finish are excellent, and the bike is looking as good as new with no rust or corrosion on it anywhere, despite its age.
Summary
Pros
Fun, spirited engine
Smooth gearbox
Agile and planted through corners
Comfortable seat and ergonomics
Good looks
Aside from a few early-model issues, generally reliable
Relatively easy to service
Cons
No tractor-factor; stalls easily in 1st gear
A little top heavy
A tendency for the front end to tuck in low-traction terrain
Poor wind management
Shifting mechanism weak
Some reports of starter issues with OEM starter
Plugs and airbox under the tank
Vulnerability in water if the tank is rapidly cooled
Looking at the length of those two lists, you’d think I’m not happy with the bike, but I am. That’s because the main elements of the bike are good—the engine, the handling, the reliability. The bike has a few issues, like any bike, but they are overshadowed but just how much fun it is to ride, and isn’t that the main thing we want in a bike?
Conclusion
When I participated in La Classique Moto Fest here in Quebec a few years ago, I saw my bike in a long line of other bikes there for the rally. Maybe it was my subjective perspective, but it seemed slightly out of place. It occurred to me that most of the bikes there were set up for off-road riding whereas the Tiger, at least my Tiger, is more an adventure bike, and I was reminded of a comment made years ago on the ARR Raw podcast about this distinction. (I’ll link to the podcast but can’t remember the specific episode.) They were talking about tire choice, if I remember correctly, and one of the guests made the distinction between what they do as RTW riders and what weekend warriors do. He said he’d never attempt half the stuff some guys do off road because, when you’re touring halfway around the world, you can’t afford to break something on your bike and wait weeks, perhaps longer, for parts to arrive. In other words, they ride more conservatively, and that was reflected in his tire choice. I’ll add that it’s also reflected in your bike choice.
Off-road versus adventure bikes. An arbitrary distinction?
As we all know, the adventure bike is the ultimate compromise. It has to be good on road and off road, capable of crunching out miles on the highway as well as getting you down a logging road. It has to be quiet and comfortable for long days in the saddle, powerful enough to climb mountains and carry camping gear, maybe a pillion, yet small and light enough to pick up on your own in the middle of so-called nowhere. It has to be reliable, and simple enough to fix yourself, trailside if necessary, if something does break. With these considerations in mind, the middleweight Triumph Tiger 800XC is a great all-rounder and an excellent choice as a long-distance ADV touring bike. It has its drawbacks, for sure, and may be master of none, but it’s the best Jack of all trades I’ve been able to find.
Getting ready for the new season this year meant a little more than adding a few farkles.
When I bought my 2013 Triumph Tiger 800XC in May 2022, it had only 14,500 kilometres on it, despite being nine years old. In the following two years, I’ve put another 34,000 on it. I’ve done basic service during that time, like changing the oil, coolant, brake fluid, and cleaning the air filter. I’ve also changed the plugs. But it was time for some major service.
Last fall I did the dreaded valves, swingarm and rear suspension bearings, and cleaned the starter motor. This spring I’ve fixed a problem with the shifting mechanism, cleaned and lubed the steering head bearings, overhauled the front forks, and made a few mods to get it ready for the BDRs. It’s been a long process, but it’s finally ready for the new season.
Valves
It’s the job everyone loves to avoid, and I did too. In fact, when I bought the bike, the dealer said they no longer recommend checking the valves at the manufacturer’s recommended 20,000K because, more often than not, when they get in there at that mileage, the valves are fine. I guess if you’re paying the dealer $1000+ to check them, it’s bittersweet when they don’t find anything out of spec. I was happy to wait. My buddy who rides a Triumph Scramber 1200 XE has never checked his and he’s got I think now over 78,000K on it. “If they’re slappy, they’re happy,” he said, although I always thought you don’t want to hear the valves. At any rate, with now over 48,000 kilometres on the Tiger, it was time to get in there and see how happy they are.
All the intakes were fine, but all the exhausts were tight, some significantly. Here are my calculations. Sorry about the grease.
Highlighted is the amount out of spec. I’m using metric.
As you can see, all the intakes were spot on at 0.15 (specs are 0.10 – 0.20). The exhaust specs are 0.325 – 0.375, so ideally you want them at 0.35. Some of mine were 0.20, so .15mm out of spec. I’m glad I didn’t wait any longer or I might have started causing damage to the valve seat. Live and learn: sometimes there’s reason behind the manufacturer’s recommendations.
An egg carton works well for keeping all the buckets and shims organized.
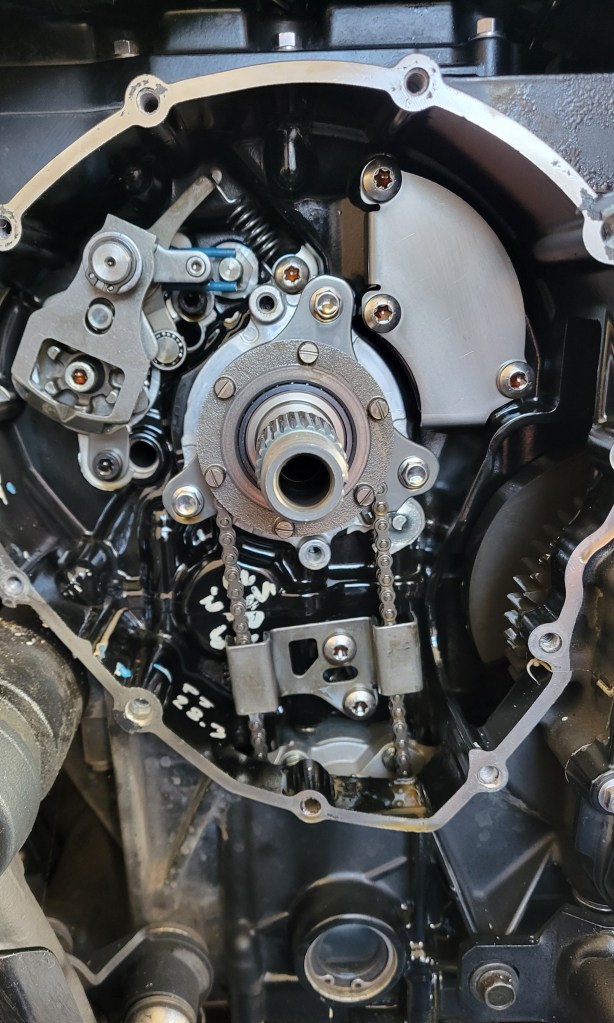
You want the same bucket to go back on the original valve, so keep any happy dogs with long tails out of your workspace. Nobody likes removing the cams, but just make sure you’ve got it locked at top dead centre and turn the engine over several times by hand once you get it back together to make sure you didn’t slip a tooth on the timing gear. I almost did because I didn’t put enough tension on the timing chain while torquing down the holder. (You have to remove the tensioner.) So you have to find a suitable wedge of some kind to manually tension the chain while tightening. The first two (2!) times I torqued down the holder the chain climbed a tooth.
Timing marks should line up parallel to the crankcase on the inside.
Thanks to MuddySump for his excellent videos. I was following my Haynes manual, but it’s always good to watch someone else do it first, especially when that person has the same bike as you and is a licensed Triumph mechanic! Once I got everything buttoned back up, I checked the valves again and they are now all spot on.
It’s always a little unnerving starting the bike back up again afterward, but it fired right up. I’m hoping the bike will run a little easier now with less tendency to stall.
Starter Motor
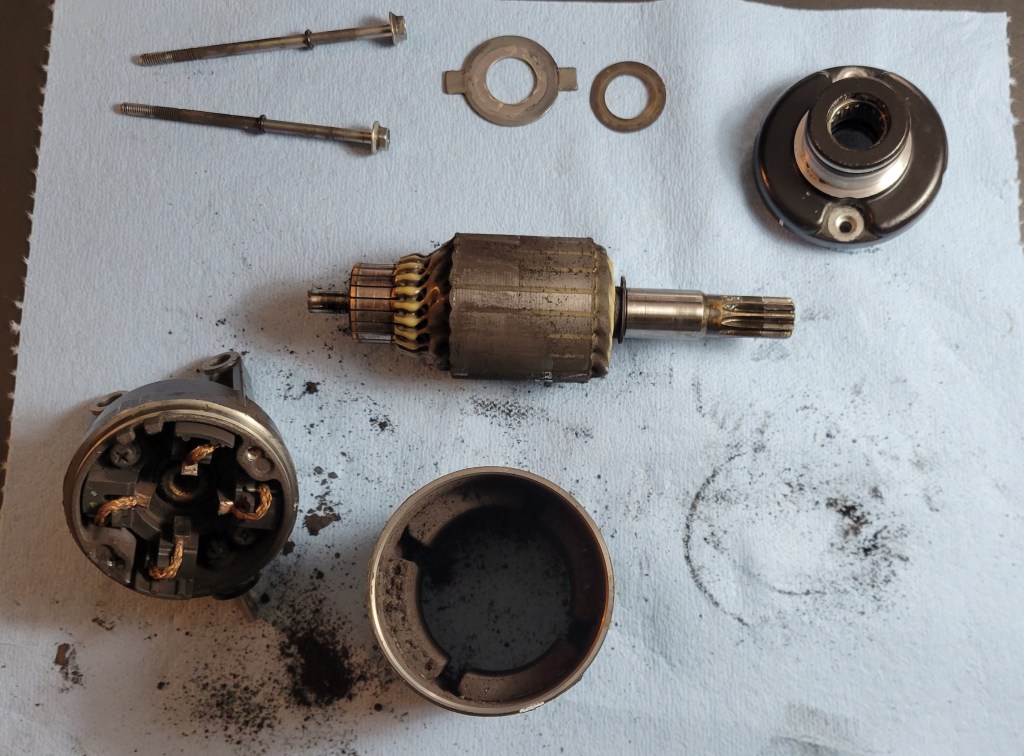
A known issue with the Tiger 800, at least the first gens, is a weak starter motor. There is a tendency when the engine is hot for the starter to fail. I’ve had it happen to me a few times. You stall the bike and the starter is reluctant. I’ve managed to fix it by keying off and on, but it was getting worse. Many guys swap out the starter with Rick’s and I considered it, but since I was already down to the throttle bodies, I figured I’d lift them to access the starter and give it a good clean.
I took it apart and there was a lot of carbon dust in there, and some discolouration on the armature. Some 1000 grit emery paper cleaned everything up, including the shoes. The bearing was fine, and I’m hoping I’ve breathed another few years at least of life back into the OEM starter.
Swingarm and Suspension Linkage
The swingarm bearings take a lot of abuse down there right in front of the rear wheel. Even if you aren’t doing water crossings, they’re going to get water and grit and grime thrown up at them. And when there’s crud or corrosion, you won’t feel it as you will with steering head bearings. I remember when I finally did this job on the 650GS, one of the bearings was in very bad shape and I had a bugger of a time getting the pivot bolt out due to the corrosion. This is one you want to do on the recommended interval, and it’s one of the easier ones so why not? You aren’t opening up the engine, just taking the rear wheel off, unclipping all the wiring from the swingarm, then removing the pivot bolt.
Thankfully, it wasn’t that bad this time, but I still left it a little too long. There was some discolouration on the bushings, but the bearings looked fine, albeit missing some grease. I cleaned everything up as best I could using 1000 grit emery paper and repacked the bearings with waterproof grease.
It’s always a good feeling when you restore these crucial components.
Shifting Mechanism
Problematic selector arm is top left. Centralizing spring is blue, indicating it’s been upgraded.
On the last ride of the season last year, the Tiger started being reluctant to downshift. I noticed it as I pulled away from the house and came to the first stop sign. I was heading to Vermont and would have turned around, except I was leading a club ride and there were people counting on me, so I continued.
My first thought was that the clutch cable needed adjustment. It’s normal for those to stretch over time and need to be tightened. But adjustment didn’t help, and as the day continued, the problem got worse. I somehow managed to finish the day, but coming up through Smuggler’s Notch wasn’t much fun and I was happy to get home. That was the final ride of the season. I decided I’d use the remaining nice weather to do maintenance but before I could get to this job the snow arrived, so it had to wait.
I store my bike in an unheated shed, so working on it over the winter wasn’t an option. As you can imagine, my curiosity nagged at me all winter. Was it the clutch, the shifting mechanism, the gearbox? Some research online revealed that there are some known issues with the shifting mechanism on this bike. There’s a pin on the shifter spindle that holds the centralizing spring and it’s known to break. When that happens, the shift lever doesn’t return to centre, ready for the next downshift, but flops down. You can still shift the bike, but you have to lift the lever first with your foot.
That didn’t appear to be my problem because, while there was a little play in the lever, it wasn’t flopping down. But I wondered if it was starting to break. Also, there was a recall to upgrade the centralizing spring, which is known to fail, and I didn’t know if my bike had the old or new spring. I also wondered if the problem was as simple as a worn clutch.
At the first warm day, I finally got in there to see what is happening. To get to the shifting mechanism, you need to remove the clutch. That was fairly straightforward, and the plates looked good. In fact, the stack measures 42.25mm and the tolerances are 41.54 to 42.54, so I’ve only burned .29mm of my clutch over 48,000 kilometres. I’m happy about that.
I had some trouble removing the bushing and bearing but with a friend’s help, we got them and the basket out. What we noticed is that on a downshift, the shifter arm slips off the pins of the detent wheel. A close inspection of the arm revealed wear on the respective pawl.
Wear in the corner of the pawl where it engages with the detent wheel pins. This arm is under tension from a spring (behind, out of view) and it’s also possible that the spring was fatigued.
There has been a redesign on this part as well as the detent wheel that engages with it. I decided to change the whole spindle because Triumph has also redesigned the problematic pin for the centralizing spring. Here are comparisons of the crucial parts, old (on top) versus new.
Old and new selector arms. Triumph has squared the pawls.Old and new detent wheels. Strengthening webs have been added. Original pin was riveted. New pin is machined.
Dear reader, do you care? If you are a mechanical engineer or just a mechanical nerd like me, maybe you do. If you have a 1st gen Tiger 800, you should. These are the wrinkles that were ironed out sometime during production. I’m glad to have the stronger parts in my bike, and it’s shifting great again. Here in Canada, the spindle unit is under $200 and the detent wheel and selector arm come as a kit for under $100, so the hit wasn’t too bad.
Forks Overhaul
I don’t think the fork oil or seals have ever been changed on this bike. I’d never done inverted forks before. They are a little more difficult and require a seal driver. (You can’t use plumbing ABS pipe to drive the seals because the outer tube is in the way.) Figuring this would not be my last bike, I went with the adjustable kind that will work on a variety of bikes but are a little more trouble to use.
Everything came apart easily enough, once I bought a set of thin spanners. (Every job requires at least one trip to Canadian Tire.) There isn’t much room between the spacer tube and the top cap, and you have to get a wrench in there to hold the lock nut while you remove the cap. That was the only snag on the disassembly.
Laying everything out in the order it came off.
The bushings were discoloured with wear, but I didn’t want to wait for new parts so cleaned them up as best I could with fine grit emery paper. For the new seals, I decided to go with SKF because I’d read good things about them. Thanks to Triple Clamp in Toronto for stocking these. A neat trick I learnt from Tusk is, when using those tricky adjustable fork seal drivers, use safety wire to avoid driving your fingers instead of the seal. Nice!
Driving the new sealsRefilling the fork in The World’s Smallest Workshop
The only weirdness of this job was that the amount of oil listed in my manual was way off. It said 619mL for the XC and 107mm from the top of the tube, but I had to pour out about 100mL to get the correct height. Yes, I drained all the old oil, and yes, I pumped the damper rod several times to dispel all the air when adding the new. I asked my dealer about this and he said they only use the height measurement. When I tipped the old oil into a measuring beaker, it was about 1L for the two forks, so with loss, 519mL sounds about right. Anyway, fresh oil, seals, and socks will help the front end this summer.
Steering Head Bearings
This one too had never been done. You can see in the image above that there isn’t much of the factory grease left in there. For this one, I didn’t use the waterproof general lithium grease but bearing grease. The only difficult aspect of this job was avoiding paying for the Triumph tool for accessing the head-stock. Instead, I used a C-spanner and Ryan F9’s tip on using a luggage scale to get the correct torque. The initial preload once you get everything back together is 40Nm, then you back it off and tighten the bearings to 10Nm, which is a little over 7ft/lbs. My C-spanner is about a foot long with a hole at the end of the handle, so all I had to do is convert Nm to ft/lbs.
After having the forks and triple-T out, I needed to align everything again. Thankfully, Delboy’s Garage just put out a video on how to do that.
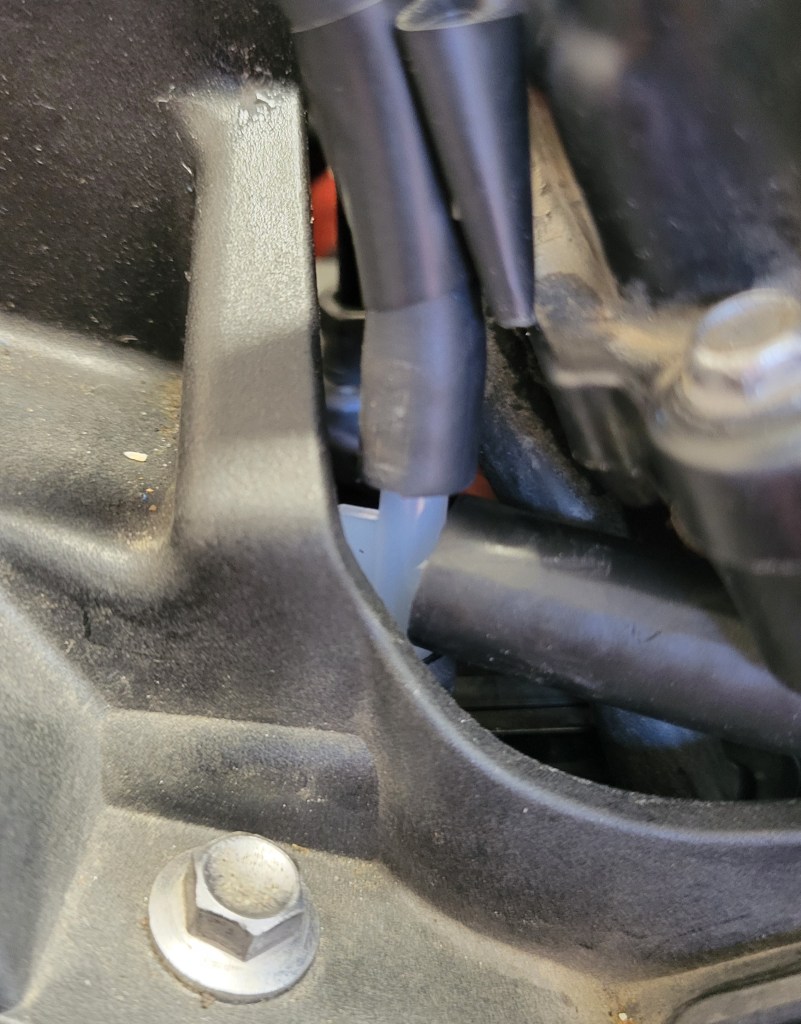
Fuel Tank Breather Tube Fix
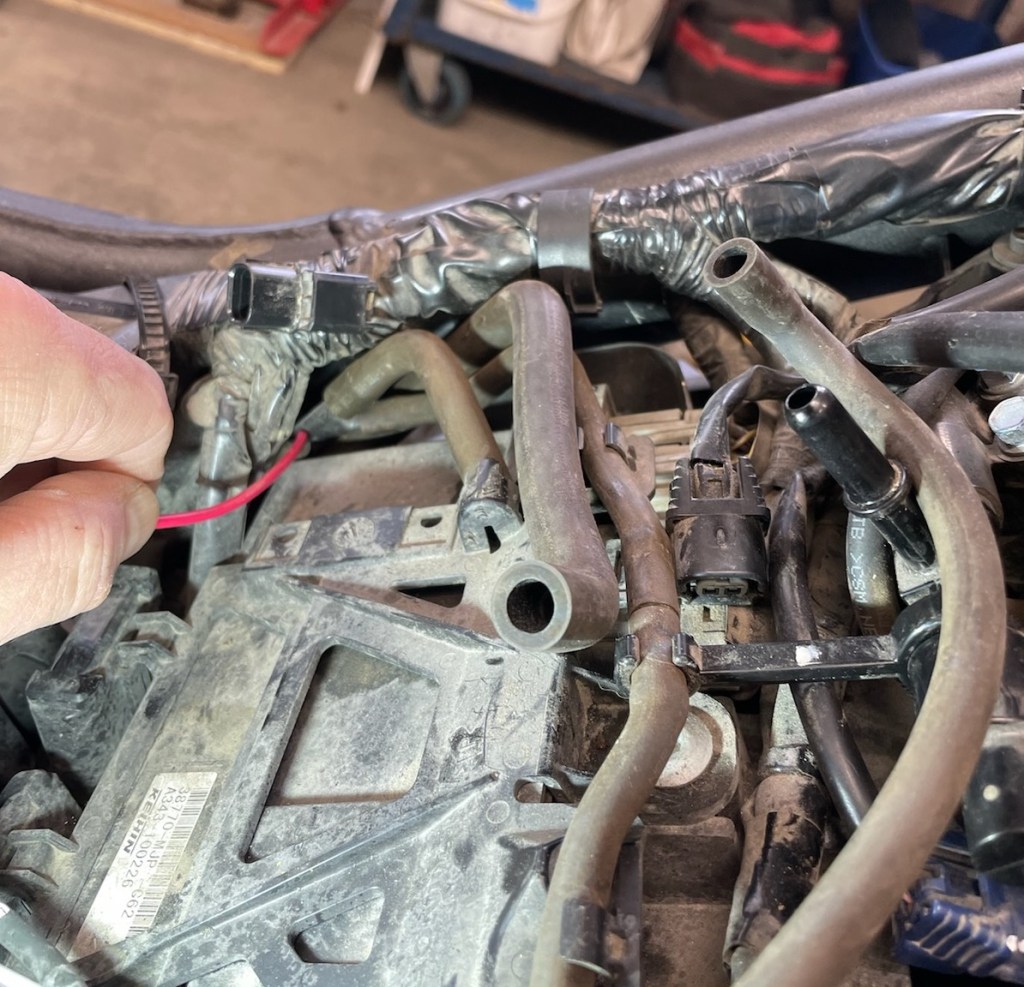
In my last post, I talked about how I ended up with about 3 litres of water in my fuel tank after a failed water crossing. In the post, I presented the theory that the water was sucked up from the tank breather hose when the tank had negative pressure. I considered rerouting the breather tube to keep it out of potential water, but my friend Mike came up with a better solution. While servicing his Africa Twin, he noticed that the tank breather on that bike has a Y-fitting with a length of hose staying high on the bike and the other draining down.
My buddy Mike’s Africa Twin. He’s pointing to the Y-joint with the piece of red wire. The short tube fits into that little cup, presumably to keep it clean. That’s the battery area.
So I picked up a set of assorted vacuum T-connectors and a length of rubber tubing at Canadian Tire and did the same on the Tiger. I cut the tank breather tube and inserted the T-connector, then added the extra tubing. I haven’t decided yet where it will terminate but for now it comes up the siderail and loops across under the fuel tank and is tucked in the other siderail. I think I will shorten it and add a loose end cap like on the AT.
Back right corner of the airbox
If you have a Tiger and want to do this mod, just be sure to cut the right hose. There are two leading out of the tank. One is the drain tube and one is the breather. The drain tube has a check valve on it so doesn’t allow water to come up. The breather tube is the larger of the two where they attach to the tank.
A Few Mods for Dirt
Fender Extender
I saw MotoBob add a front fender extender to his Triumph Tiger and thought it would be a good modification, given the dirt I plan to ride this summer. It keeps a lot of mud off the front header pipes and radiator, not to mention rain water off your pants. He used the Pyramid Plastics version, but my dealer, Montreal Moto, actually had a Triumph one in stock so I snapped it up.
Some extenders come with sticky pads, but I was advised to use silicone. I decided to make things easy for myself and remove the fender. Sounds reasonable, right? I could have done this mod just by removing the front wheel, but I decided to give myself some extra room and removed the fender. It was three bolts on each fork, so how hard can it be, right?
Little did I know that someone had used red threadlocker on the bolts, and one snapped off in the fork. Perhaps someone at Triumph can explain to me how a front fender is a permanent install?
Bolt broken in the fork foot.Yes, that’s definitely red threadlocker.
So I lost a day there. I drilled it out and was retapping it when I got distracted and broke the tap inside the old bolt. Ugh! What a mess, going from bad to worse. I bought some carboy drill bits (after some research on what the hardest, sharpest drill type is), but even a carboy bit wouldn’t touch the tap. Fortunately, my friend Mike, whom I’ve already mentioned a few times, came to my rescue. (He was the guy who refinished the bodywork of my old GS.) He has a proper workbench on a cement floor and drove the tap out with a punch, and then we could re-tap. The thread was a little loose from the abuse it had taken, but he showed me a trick to strengthen it with some 5 minute epoxy. Apply the epoxy like threadlocker but coat the bolt in WD40 so it doesn’t glue inside. Thread it in and after a few minutes remove the bolt and let the epoxy harden to the old threads. Neat! When I reinstalled the fender, I used blue threadlocker.
Lowering Footpegs
My Fastway Adventure footpegs give you the option to mount them standard or lowered. I mounted them standard so I wouldn’t have to adjust my foot levers, but with the dirt coming up, I thought I’d swap to the lowered position. Fortunately, Fastway provide a tool to use to press the pin out. Then you simply press it back in from the other side—from the top of the peg.
Out with the oldand in with the new.
Unlike the fender extender and most other jobs, this one went smoothly and I had the pegs back in again in no time. It was easy to adjust the height of my brake lever; just undo the lock nut and screw the adjuster into the master cylinder. Because I was screwing in, I didn’t even need to bleed the brake. And when I put the shift lever back on, I rotated it slightly from its previous position. This set-up lowers my pegs 8-10mm, which may not sound like much, but I suspect will be significant for knee comfort on long days and lowering centre of gravity when off-roading. The downside is that the pegs are a little closer to the road, but I don’t think I’ll be dragging them anytime soon. Or so we’ll see.
Before I reattached the brake lever.
Sidestand Extender
Another mod for the dirt. I’ve always gotten by without one of these, although it’s sometimes a pain to find a stone or stick to use instead when you are forced to stop in mud or soft grass. I went as far as to install a Touratech one on the GS once, but it lasted all of one ride. I got hung up on some rocks and when I got home I noticed I had an extender no more . . .
Needless to say, I was skeptical about buying another from Touratech, but different bike, different design. Besides, I got this one half price. One of the benefits of riding a discontinued bike is that if you keep your eye out you can sometimes snag accessories at discontinued prices. We’ll see how long this one lasts.
Now I remember what I don’t like about sidestand extenders: they interfere with the centre stand. Oh well, I’ll just have to put the sidestand down first before using the centre stand. No big deal, and maybe it will help stop my centre stand from rattling so much. Or maybe now there will be two stands rattling together. Anyway, I’m not wedded to this accessory and we’ll see how long it lasts.
Oil Filter Guard
The Outback Motortek skidplate for the Tiger 800 does not protect the oil filter. Some would say that’s a design flaw, but I suspect OM did it that way so you can change the oil without removing the guard. (They put a cutout in the guard for the sump plug.) But it does leave the oil filter a little vulnerable at the front of your engine. Triumph make a push on metal guard. It’s a simple design with indents that engage with the filter for an interference fit. Easy to remove when it’s time to change the filter, which I will do after running the bike a bit this spring. The engine’s been open for some time as I worked on everything, but with oil being so damn expensive (it costs me now over $80 for an oil change), I will just change the filter. Anything that might have strayed in will be captured in the filter.
It’s been a long haul but I think I’m ready now for another season and another 50,000K. I took the Tiger for a test ride yesterday and it’s shifting smooth again and the clutch feels great. The engine is running well, and I’m happy to be back on the road.
Here in Montreal, it’s Easter Monday and I think I can safely say we’ve had our last snowfall. Crocuses are pushing up and there are buds on the trees. Geese are returning and everywhere the signs of spring are upon us, including the sound of motorcycles back on the roads. For Canadian riders, it’s the best time of year. I wish everyone, wherever you are, a safe and enjoyable 2024 season.
Please leave below any comments you have and consider following. What mods and maintenance did you do in the off season? What are your plans for the coming season? I love hearing from readers, so drop me a line.
If wheels are your legs, then suspension is your joints. Anyone with bad knees or hips will tell you how important healthy joint function is. If you want to make the single-most significant upgrade to your bike, consider looking at the suspension. An upgrade is not cheap, but it’s often well worth the investment.
In my review of the f650GS, I reserved glowing praise for its suspension. It’s good for street riding, but not for much more, and not even for Montreal streets. Since I’ve been doing adventure riding that takes me off-road, I’ve noticed its limitations. I’d often bottom out and bash the skidplate or engine guard, the kickstand, the centre-stand. The underside of the bike was taking a beating. I also found the front to brake-dive on the street and jumping rather than riding over large rocks on the trail. Knowing new suspension is much cheaper than a new bike, I recently decided to upgrade the front and rear suspension.
Front Suspension
Ricor Intiminator Valves
The front suspension on this bike is traditional (i.e. non-inverted) damper rod forks. There’s no adjustment other than changing the weight of the oil, and I’d tried thinner and heavier oils and was underwhelmed with both. Still, if you’re looking for a cheap mod, try a heavier oil. (Stock is 10W.) I guess you could also try playing around with preload by creating new spacers, but preload wasn’t the issue with the front end for me. (I’m only 145 lbs./65 kg.)
The other option is to change the springs to either a heavier spring or a progressive spring. Someone I know who installed progressive springs was also underwhelmed with the results and is now looking into other options. I think progressive springs are a bit like handlebar risers: modifications made popular by word-of-mouth and DIY ease than by the results. (After listening to GS instructors and Chris Birch, I decided to take my risers off.)
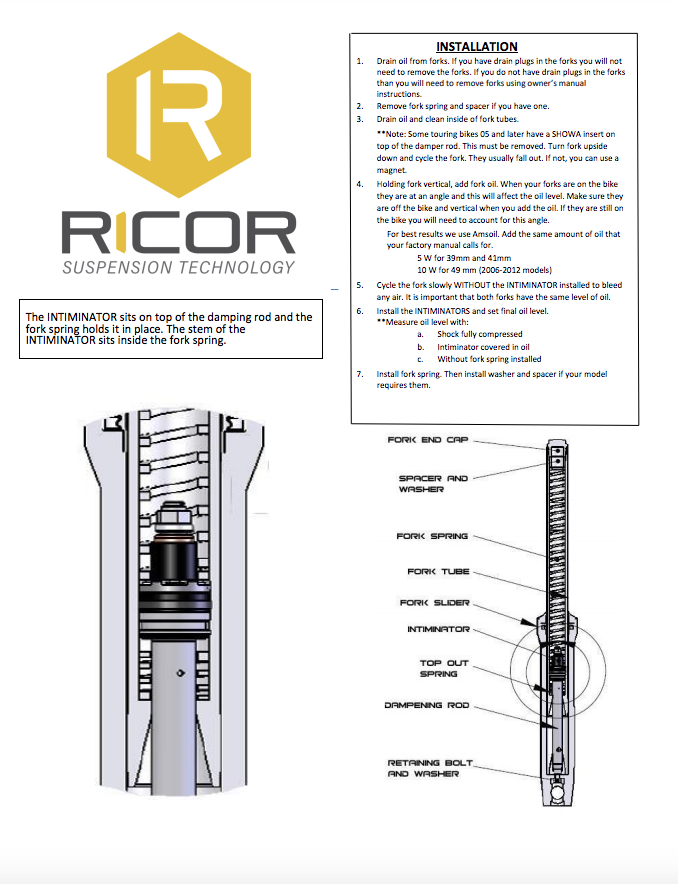
From what I’d read, the only way to improve the front significantly on this bike is to change to a valve system using either Race Tech Emulators or Ricor Intiminators. These valves essentially replace the damping rods, converting the suspension to something akin to cartridges. I say akin, because unlike cartridges, there isn’t any compression adjustment at the triple-T. Still, I was hoping to alleviate some of the brake dive and firm up the front end over potholes and rocks.
I decided to go with the Ricor Intiminators, mainly for the ease of installation. From what I’ve read, the technology is very similar. Ricor were unfortunately undergoing some restructuring and I had to wait months for my order to arrive, but it finally did last fall. (The company now has a new owner and is shipping again.) Installation was as easy as draining the oil, opening the forks, pulling out the springs, dropping the valves in, and replacing everything. Ricor suggest 5W oil, and strongly suggest Amsoil 5W oil. Little did I know that not all 5W oils have the same viscosity. Unfortunately, Amsoil is not easy to obtain in Canada, so I went with Bel-Ray.
At first, I was again underwhelmed. Ricor claims that the Intiminators can determine the difference between chassis movement (i.e. brake dive) and wheel movement (i.e. bumps and holes in the road). I imagine the former is much slower than the latter, so it seems possible from an engineering standpoint, but I still had some dive. To be fair, it might have had something to do with my braking. I basically went out on the street and hit the front brake a few times. Proper braking involves shifting your weight backwards and coordinating with the rear brake to get the bike to squat. I’ve since come to notice a difference in braking and an improvement in, if not the elimination of, brake dive.
But that is not the main reason for the upgrade. Once I got the bike up onto dirt roads, I noticed a huge difference in its handling. For once, I was taking corners in the dirt at speed, weighting the outside peg with the front end feeling planted. It’s almost like the valves work better at speed. I wonder also if the oil gets thinner as it heats, which is why Ricor suggests the thinner Amsoil. I decided from this one ride that it was time to buy a neck brace since I was now not poking along on dirt in 2nd gear.
Rear Suspension
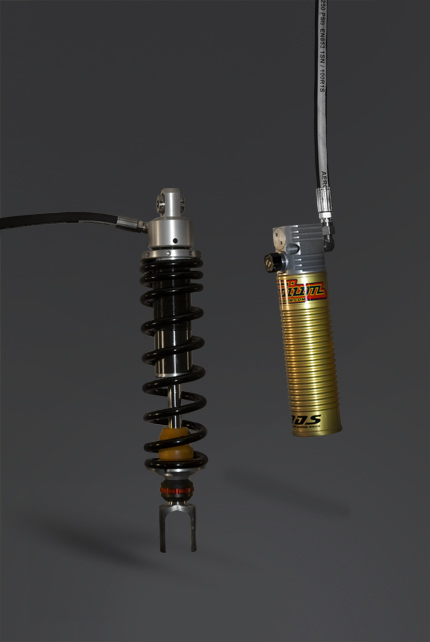
OEM rear shock
My stock rear shock had over 92K on it and had never been serviced! You can’t service the OEM shock on this bike easily. That’s because there isn’t a valve to re-pressurize it. I found someone who could tap a valve, but that plus regular service would be $450. I also needed a stiffer spring since, with all my gear, I’m under recommended SAG by about 2 centimetres, even with the preload fully wound. A new spring is $230. All totalled, I was up close to the price of a new shock, and one that is much better.
Stadium Suspensions HR1
I decided to go with Stadium Suspensions, a local manufacturer in Quebec that specializes in off-road suspensions. Going with a service instead of mail-order from one of the big manufacturers meant I could get the shock custom built. Thierry at Stadium was super helpful. He asked for me to weigh my gear, which I found was 70 lbs.! I guess that’s a lot compared to the minimalists, but that included one pannier full mostly of food and another with cooking gear, since that’s how I tour. A third large wet-dry duffle on the back and all my riding gear meant a lot of preload. One nice feature of Stadium is that they were able to incorporate my OEM preload adjuster into the new shock, which is a nice touch. No messing around under the bike with a wrench!
I went with their mid-level shock, the 740HR1. The big advantage of the HR1 over their base model (and my OEM) is the remote reservoir for the nitrogen gas. In a conventional shock with oil and nitrogen in the same compartment, when the shock is working hard all day, such as with off-roading, the oil can heat up to the point where it starts to mix with the gas and froths, creating compression fade. And because my bike shares the same frame with the Dakar version, which has a remote reservoir, there was already a cradle on my frame for easy installation.
Reservoir with compression adjustment knob and, just above, the OEM preload adjuster knob.
Yes, I have to loosen those ring clamps to change my oil filter, but that’s the price I will pay every 7,000 kilometres. It’s actually a pretty neat set-up. Tierry at Stadium had owned a 650GS so already had the designs for this shock on file.
Dialling In
I had three adjustments with this shock: preload, rebound, and compression.
Preload: There are a ton of videos online on how to set rider sag. Basically, you want to unweight the rear (using a centre-stand or pulling the bike onto its sidestand) and measure from the axle up to a fixed point. Then sit on the bike with your feet on the pegs (you might need to balance against a wall or, as I did, a fence) and measure again. Don’t forget to wear all your gear. The difference between your first and second measurement should be about 1/3 of the stroke. My bike has a 165mm stroke, so I was aiming for about 55mm. Stadium had chosen the perfect spring rate and it was exactly on the mark. Nice!
I generally leave the preload at Base unless my wife decides to come for a ride. I haven’t toured with the new shock, but I’ll be setting SAG again with all gear loaded before I head off.
Rebound & Compression: The way Stadium explain it, rebound is how easy or hard it is for the shock to extend; compression is how easy or hard it is for the shock to—duh!—compress. To my surprise, when I started playing around with these settings, I found rebound more significant.
Rebound damping adjustment on Stadium’s shocks. CW=faster; CCW=slower
Crank up the compression setting on the remote reservoir and you feel the bumps, for sure, but crank up the rebound to its hardest setting and you feel like you have no suspension. Perhaps that’s why Stadium suggests starting with the softest setting and adjusting upwards to preference. I found that at the easiest setting, the bike was bouncy. For Montreal roads and off-roading (pretty much one and the same), I’ve landed somewhere in the mid-range.
For compression, that’s a little easier. I keep it in the mid-range except for when I go off-roading. Then I make it harder (to compress), which saves some damage to my stands and engine guard and prevents the shock from bottoming.
I still had some adjustment to do on the front too. I found the shocks still a bit stiff for rocky terrain, so I mail-ordered some Amsoil 5W oil, and based on this advice from suspension guru Dave Moss, I measured using height rather than volume. I also put a little less oil in to, as he says, ease up the middle part of the stroke to adjust for my weight. Recommended height is 120mm and I went with 130. I’ve only done one day of off-roading with this set-up but the front end is getting better and better. I might try even less oil next oil change.
The season is young and there is plenty of off-roading still to come. In the weeks and months ahead, I’ll be tweaking the suspension more, including tire pressure, which is another important setting. Do I adjust every time I go off-road or, as Jimmy Lewis does, just keep it at 28 psi for road and dirt? Of course, no expense or type of suspension can make up for crappy skills, so I’ll be tweaking them too. At least now I have a bike that I feel confident to do some serious dirt riding on.
Have you ever played around with your suspension settings? Do you know what your recommended rider SAG is? If not, the RaceTech database has the info you need. Just use the Product Search feature; you’ll be surprised at how much comes up! Before you upgrade, just make sure you are getting the most out of your current system. Devoting a little time to this will result in many hours of more enjoyable and safer riding.