Remise en Forme

20190525_104322

Google translates it as “fitness.” Literally, it might be “put back in shape.” I’ve seen it translated more liberally as “Spring Refresher.” The Remise en Forme is a day of exercises to regain muscle memory of the technical elements of riding. Watching street riders, you may not easily see that riding a motorcycle is a skill, let alone athletic, but off-road riding involves a whole set of skills as well as a certain level of physical fitness. After a winter of watching Dakar reruns on the couch, it’s a good idea to remind the body by targeting specific skills with specific exercises of what it knew how to do last fall.

I belong to two clubs that offer a Remise, so I had the pleasure of refreshing myself twice, so to speak, in May—once with MotoTrail Aventure, and once with the BMW Moto Club of Quebec. I had the same BMW-certified instructor for both, and he was incredible. He has represented Canada twice in the GS Trophy contest. Say no more. He demonstrated all the exercises flawlessly without even a dab (i.e. touching a foot down), and he did it on Michelin Anakee (street) tires when we were all struggling on knobbies.

Here are some of the exercises we did, roughly in the order done:

  1. The Walk-Around. (Engines off.) Have a partner assist you by being ready to catch your bike should it begin to fall. Start by standing beside your bike and find its balance point. Now let go and move to another part of the bike. At no time should you hold the bike with more than the fingers of one hand. Move entirely around the bike, 360 degrees, releasing and catching different parts (windscreen, tail-rack, etc.), ending up back beside the bike where you started. This exercise helps remind you that all of those 500 lbs can be zero when the bike is perfectly balanced. Also to breathe when you are nervous.
  2. The Friction Point. Sit with your bike idling in first gear, clutch in. Gently ease out the lever until the bike inches slowly forward. Now stop using the rear brake while pulling in the clutch lever no more than 1/8″. Ease out again and repeat. This exercise helps you discover the friction point. Much of off-road riding occurs at the friction point with the clutch lever moving no more than 1/8″. If you pull the clutch lever in all the way when you want to slow down, you will not be ready to recover quickly enough if you need to accelerate.
  3. Circus Riding. Okay, he didn’t call this one that, but that’s what it reminded me of. We played follow the leader in a wide circle, doing what the lead rider, the instructor, did. All riding was done standing up except where indicated. He rode with one hand (throttle hand, obviously); he rode with one foot on the peg, then the other foot. Then he sat down, swung his right leg over the bike and put the right foot on the left peg and stood up again. Then he sat down, swung his legs over the seat, and stood up with his left foot on the right peg. Then he sat down and swung his left leg over the seat to straddle the bike again. Then he hopped off the bike and walked beside it a few paces. Then he hopped back on, Roy Rodgers style, like mounting a horse. All this was done at slow speed without stopping, the bikes in 1st gear. This exercise teaches you that you and the bike are independent but together you have to remain in balance. I was reminded of this exercise later in the day when we got into slippery terrain and I had to allow the bike to move around beneath me. It’s all about balance, balance, balance!
  4. Peg-Weighting. A lot of turning in off-roading is done “with the boots,” not the handlebars. You weight the peg on the side of the direction you want to turn. You have to bend your knees and stick your butt to the outside of the corner to counterbalance the bike. We slalomed through a series of cones, then looped around to start again. I was doing this okay but the assistant instructor told me to brace my outside knee against the bike and to use the knee to straighten the bike if needed. This little tip was ground-breaking for me. It gave me more control over the balance of the bike when hanging off it in tight low-speed turns. This exercise reminded us that you don’t steer in low-traction zones with the handlebars but the pegs, and you keep your weight out over the contact patch or the bike might low-side on you.
  5. Parallel Lines. A variation of the above exercise is to add a straight section where you have to ride between two lines (straps or string) about 6″ apart. This is to simulate when you have to ride between two fallen logs, or across a bridge with only 2 x 6’s running lengthwise, or along a ledge. Vision is everything. You look at your entry point but once you enter you look up at your destination. Don’t look down! Look straight ahead. This exercise teaches you how to ride along a narrow path. 
  6. The Full-Lock Turn. Place four cones about 10 meters apart in a square. You have to ride into the square and turn full lock within the cones one full circle before exiting. Again, body positioning and vision here are the keys. You have to stand up, brace your outside knee against the bike for leverage, get your butt well out to the side, and swivel your head and especially look where you want to turn. You should be looking toward the centre of your riding circle at all times except for the very end when you look toward the exit before leaving. Practice clockwise and counter-clockwise turns. It’s pretty obvious, but this exercise practices sharp turns on the trail or U-turns on single-lane gravel roads.
  7. Hill climbs and descents. The secret to both is body positioning. In one version, we had to move our weight back because it was a sandy hill and the bike needed traction to get up. In the other, it was a grassy hill and we were told to lean forward or the bike might flip going up. So it really depends on the type of terrain. For both, you coast to the top because you don’t know what is over the crest. It could be your fallen buddy or, as was the case with me in Cape Breton, a cliff! A variation is to stop halfway up the hill if your buddy in front has fallen before cresting. Then you stall the bike using the rear brake, release the clutch, let the engine hold the bike on the hill and, bit-by-bit, roll the bike back down by feathering the clutch. Don’t panic and pull in the clutch or you’ll end up on your back! Don’t forget to look behind you in case there are trees or logs to avoid. For descents, weight is always at the back and we were advised to use the rear brake.
  8. Water Crossings. Our instructor said water crossings are mostly psychological because you can’t see what you are riding over. The same principles of riding apply: look up toward your destination, feather the clutch at the friction point, and don’t squeeze the bike with your knees. The latter is important because if you hit a hidden rock the bike might be thrown sideways and you have to be ready to counterbalance.
  9. Emergency Braking. Ride about 40 km/hr into a small square of cones and brake as quickly as possible. It’s all about body positioning. Weight and butt back, arms outstretched, then stomp on rear brake, and gently squeeze the front brake lever. Contrary to what I had been taught elsewhere, this instructor said to pull in the front brake lever fully, not all at once, but gradually. Yes, the front might lock up, but with your butt back and your arms outstretched, you can “wrestle” the front end to keep the bike up and you modulate braking as needed (back off slightly when it locks). You want to be right at the point of static friction, when the tire begins to skid. Because most braking occurs with the front brake, this technique will result in faster stopping.

Finally it was time to put all these skills together on some trail riding. We played follow the leader and there was a mixture of sand, mud, rocky terrain, some rock ledges, ruts from rainfall runoff, water crossings, and single-track. It was a ton of fun! By the end of the day we were tired but ready for the season.

The take-aways for me:

  • Vision is everything. He said vision is 90% of riding. Always look to where you want to go. It sounds so obvious but when you come upon an obstacle, like even some rocky terrain, your natural reaction will be to look down at the front wheel. You must resist the urge, trust the bike will roll over anything, and look up, further down the trail.
  • Contrary to dirt-bike riding, don’t squeeze the bike with your knees. With these big bikes, you aren’t going to hold them up with your knees. Instead, bow your legs and create space between the inside of your thighs and the bike. This space allows the bike to move around beneath you as it slips and slides over low-traction terrain or is bounced over rocky terrain. Thinking of the circus act balancing practice, you will be fine if you and the bike together remain balanced over the centre-line of gravity.
  • On the same topic, body positioning is crucial. Contrary to street riding, in which you squeeze the tank with your knees and remain fairly static on the bike, off-roading requires a lot of movement on the bike. The first remise I was still feeling the effects of a pulled back and had difficulty reacting quickly enough to changing circumstances. The second I was fully mobile and did much better. Don’t be afraid to get up there on the pegs and move around—back, forth, to the sides.
  • Breathe and relax when you come to a challenging obstacle. As in all sport, tensing up is counterproductive, and breathing is the simplest way to get the body to relax.

One of the reasons I like off-roading is that it involves the development of skills and so has become yet another ambition to pursue. I love pushing myself, especially physically these days, and the Remise is a great way to brush up those skills at the start of a new season. A big thank you to Moto Trail Aventure and the BMW Club Québec, and especially the instructors who have volunteered their time and expertise.


Bears, Mines, Batteries: Cochrane, Sudbury, Mattawa

Native Carving_web

Street woodcarving in Mattawa, Ontario

After playing in the dirt around Moonbeam, I decided to head over to Cochrane to check out the Cochrane Polar Bear Habitat. It’s the world’s largest and only human care facility dedicated to polar bears. They are located on 7 hectares of natural terrain and currently have three resident polar bears. I’m not a fan of zoos but these bears can’t survive in the wild and require human care; they were all either born in captivity or orphaned. The Habitat also advocates and educates towards protecting polar bears and their natural spaces.

It was an easy ride east along Highway 11 from my campground in Moonbeam to Cochrane. I stopped at Smoothy’s in Smooth Rock Falls for gas and breakfast.

smoothy-s-restaurant

Smoothy’s Family Restaurant; Smooth Rock Falls, ON

Okay, they don’t win the award for most original name, but Smoothy’s was just what I was looking for: a classic diner where I could get an inexpensive bacon & egg breakfast with fried potatoes on the side. In the booth next to me were four retired men speaking French. In fact, pretty much all I’d heard this trip was French—in Iroquois Falls, in Moonbeam, in Kapuskasing. I’d never realized how big the Franco-Ontarian population is! A few Anglicisms had crept into their French, but I was surprised that the language and culture seems to be surviving just fine without any Bill 101 and its ridiculous sign laws or restricted access to education in English like we have in Quebec. Having said that, I must add that this past fall the new premier of Ontario decided to cut the French Commissioner position, a slap in the face of Franco-Ontarians and a sign of how vulnerable the French population is outside Quebec. Fortunately, Premier Ford reversed his decision a short time later, I don’t know whether due to pressure from Prime Minister Trudeau, public outcry, or common sense, once someone showed him the numbers and how such a decision would hurt him in the next election.

Another interesting cultural observation I had while up north was this billboard that I kept seeing.

20180726_125450

I’ve never seen anything like it around Montreal or southwestern Ontario. I’m not sure who the target population is, whether residential school survivors or men in general, but I think it’s high time we begin to discuss men’s issues, including sexual abuse.

With both bike and belly full, I pushed on to the Polar Bear Habitat in Cochrane. I arrived mid-morning and a tour had just started. “Run through to the first building and you can catch up to the group,” the lady at the entrance advised. So I did, only partway between buildings I was stopped in my tracks by the sight of two bears against the fence. They were huge! And exactly as you would expect with that distinctive long neck and pointed head, and not expect. Their fur is not so much white as golden, and their eyes and ears seem so small compared to their massive bodies, no doubt evolved to cope with blinding, blowing snow. I just stood there and watched them for a minute before heading in to catch up with the tour.

P1030294

The Habitat currently has three bears on location: Ganuk, Henry, and Inukshuk. Inukshuk, whose mother was shot when he was just four months old, is the father of Henry, bred when Inukshuk was at Zoo Sauvage in St Felicien, Quebec. Each bear has a unique personality and food favourites.

The facility is impressive, with natural and artificial areas, and a pool with a glass wall so you can see the bears swim underwater if they are in the mood. There are interactive learning stations for the kids and lots of information available on the walls and other exhibits for the studious, but really, everyone mostly just wants to look at the bears. They are magnificent!

Our guide reminded us that although they look cute and cuddly, the bears are dangerous and no one is ever alone with them on the inside of the fence which, we were told, is unbelievably more to keep people out than the bears in! They have had instances of people climbing in, I guess like the idiot videoed recently swimming nude with the sharks at Ripley’s Zoo in Toronto. Some people have the most warped sense of judgment when playing Truth or Dare after a few beers.

When the bears decided to head down to the natural pond, disappearing into the trees, I decided to step back in time a hundred years and headed over to Heritage Village. (Visitors to the Polar Bear Habitat also have access to Heritage Village and a snowmobile museum.) The village looks authentic and has been used for film sets. It includes a general store, butcher’s shop, doctor’s office, blacksmith’s shop, fire station, schoolhouse, and trapper’s cabin.

P1030303

No rollerball razors here. You can almost smell the lather and tonic.

While not the impetus of my visit, the Heritage Museum was interesting. It’s one thing to learn about history from a textbook or historical movie and another to see the physical artifacts of another era and another way of life. The buildings have been authentically decorated to assist the imagination in conjuring an ordinary day in the life of early 20th-Century citizens. When I returned to the bears, one of them was being fed strawberries through the fence.

P1030305

Staff feed the bear while children watch on.

Before leaving, I wandered into the snowmobile museum. I imagine Cochrane has quite the snowmobile culture during the winter months, and it’s a good idea to preserve some of these machines here for posterity. Each is labelled with year, model, and owner name.

P1030316

Each represents the cutting-edge technology of its day.

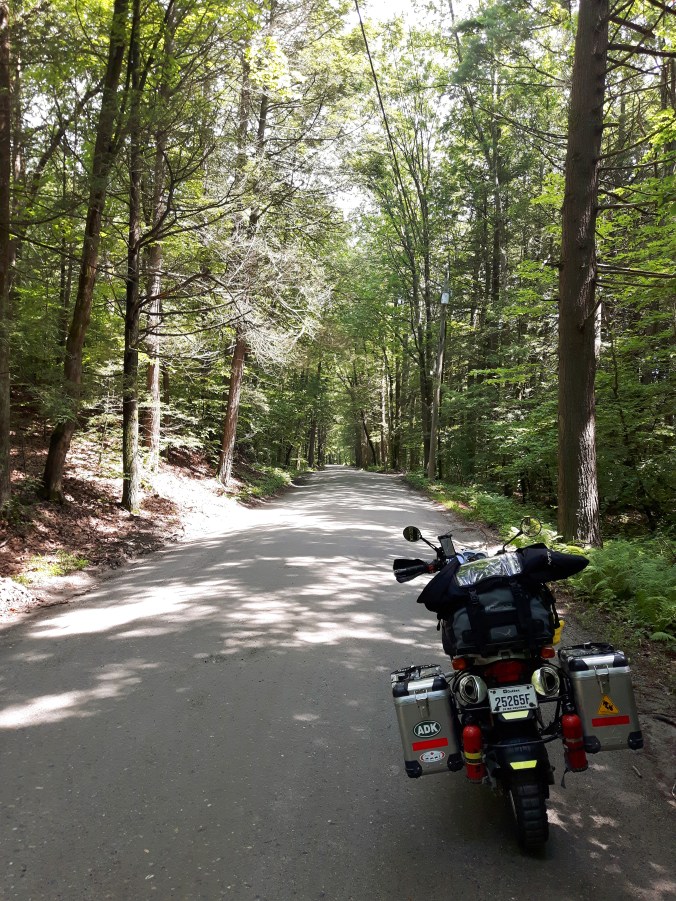
I started back toward camp but this time, as I passed through Smooth Rock Falls, I saw a sign for Lookout Road. Assuming it led to its namesake, I pulled off and headed up a dirt road; it was the adventure bug again. At the fork in the road, I went left and the road slowly deteriorated into a trail.

Smooth Rock Trail1_web

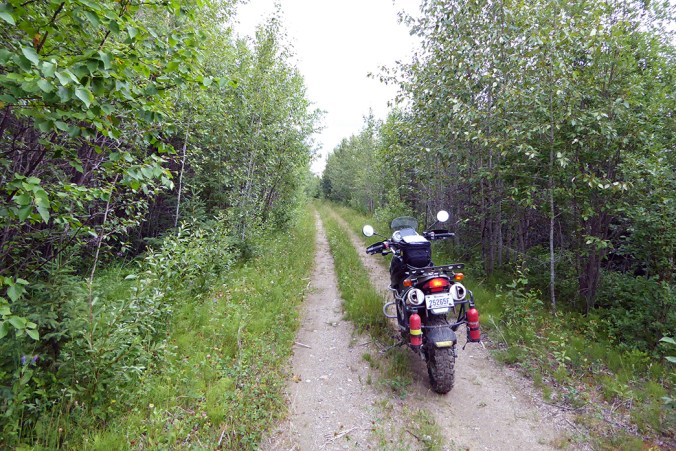
Another promising trail to follow. Would it lead to the lookout?

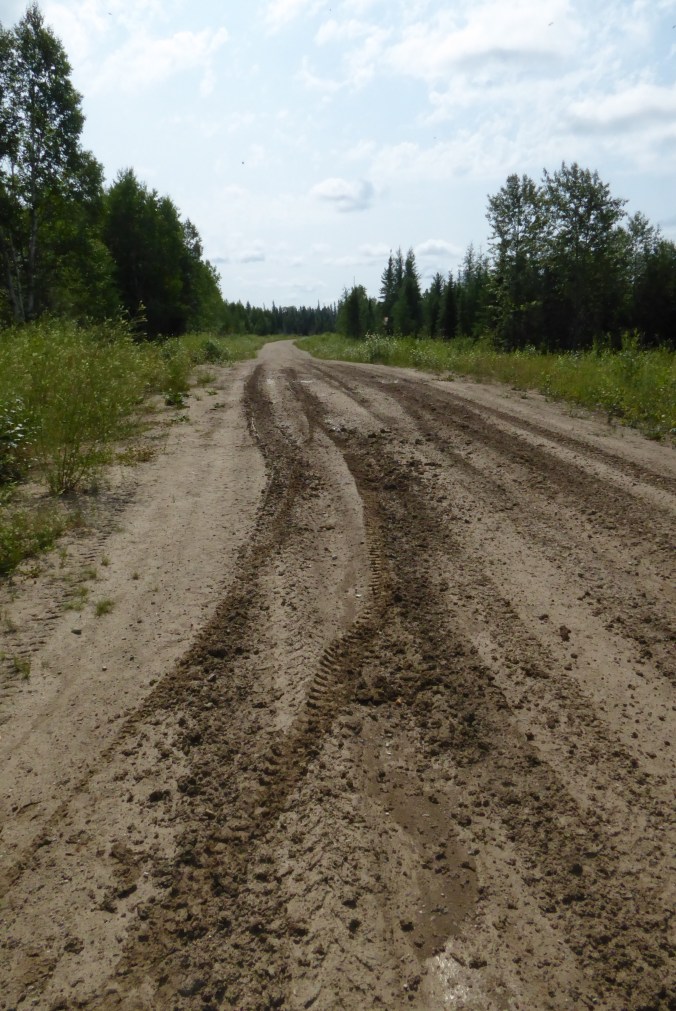
I was on my own and without a Spot device, so venturing along an unknown trail deeper into the bush was both exciting and unnerving. My worst fear was that I might find myself in a situation from which I couldn’t get back to the road, kind of like what almost happened when I had my off on the Lumberjack Trail, but hey, Lyndon Poskitt and many others are adventuring around the world solo so I figured I’d venture a little further along this trail. There were some muddy sections and some hills but my curiosity pulled me deeper, farther away from the road. The trail opened up into a meadow at one point, and then descended again into the trees, leading to this muddy puddle blocking the way.

Smooth Rock Trail2_web

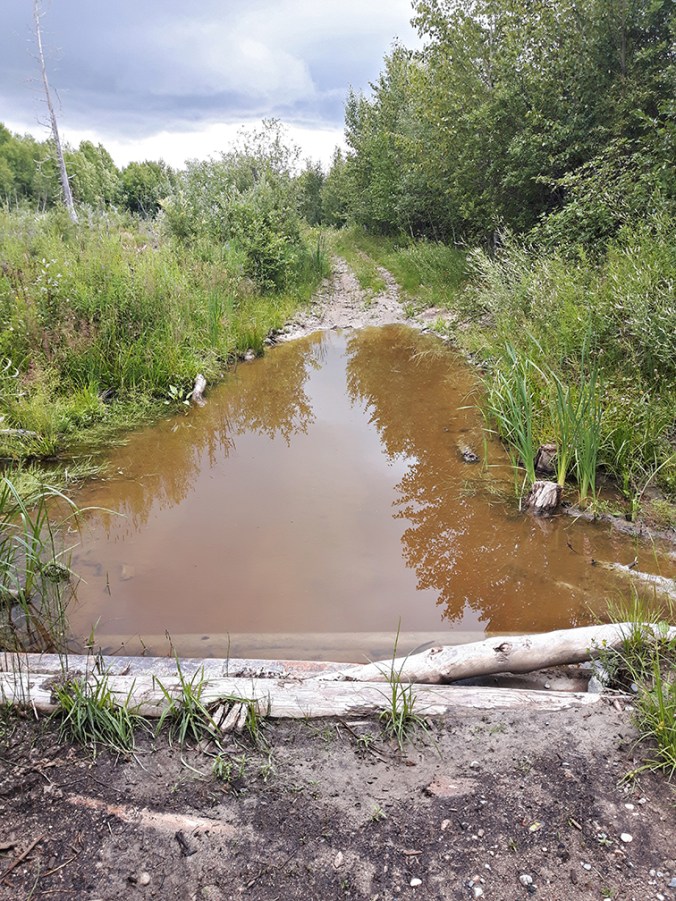
End of the line for this solo rider.

I wasn’t so much worried about going down those logs into the water as getting back. If I hadn’t been on my own, I would have gone for it, but since discretion is the better part of valour, I decided to turn back here.

Once I got back to the Y in the road, I realized that the lookout was just a hundred yards further along to the right. Doh!

Smooth Rock Lookout_web

The view was worth every misdirected inch to reach it.

The next day I started home. I had about 1000 km to cover in two days. I took the 11 east to the 655 south, which took me into Timmons. Traffic through Timmons was stop and go but there was no time to stop because I was trying to reach Dynamic Earth before it closed. After my experience in the coal mine at Springfield, NS, I wanted to go down into another, and Dynamic Earth offers a tour into the nickel mine there.

A little jog along the 101 at Timmons and soon I was on the 144 south. The 144 is another of Ontario’s great roads to ride. It’s a two-lane highway that cuts through precambrian rock as it descends down toward Sudbury. There’s a mixture of straight sections but the real fun is with the large sweepers. The highway is immaculately maintained with no pot-holes or tar snakes to worry you, and surrounding scenery is pure bush, so enjoy but keep your eye out for wildlife.

I stopped at the Tim’s just outside of Sudbury. It had been raining and again my phone was not charging. I gave it a quick charge at Tim’s, but I had to keep it short if I was going to catch a tour. I didn’t want to do the tour the next morning since I had a long way still to reach my home in Montreal. As I pulled out of Tim’s and cracked the throttle, the bike lurched and the tachometer suddenly read twice what the bike was revving. It was up in the red! I’d only seen this once before and didn’t know what it meant but did what I had done that first time: I hit the kill switch, let the ECU sort itself out, and restarted. Everything was fine and I got to the mine in time to catch the last tour of the day.

P1030390

Big Nickel at Dynamic Earth

We were given hardhats and descended 7 stories underground where the temperature is about 13C (55F). The tour takes about 1 hour and 15 minutes and shows visitors what mining was like from the earliest days at the turn of the century to today.

P1030350

In the footsteps of Sudbury’s miners.

The young guide was knowledgeable and informative, and the tour was animated with video installations and mock explosions. I could see how technology has evolved over the century to create a safer and more efficient work environment. Canada also has evolved over the century and now its economy is more diversified than before, but the country is renowned for its natural resources. It was opened by the fur trade, with forestry and mining the other big resources that followed. I’m glad I experienced this important part of Canadian history while I was at one of the country’s largest mines. The Sudbury mine has over 5,000 kilometres of tunnels; placed end to end, you could drive from Sudbury to Vancouver underground!

When we returned above, it was late in the afternoon and I was tired from the race down from Moonbeam. Although Dynamic Earth has a lot more to offer than the mine, I decided that was enough for one day and headed to a campground I’d found online. While en route my bike did that lurching tachometer thing again, and then my phone finally died. Fortunately, I’d packed a car GPS as a backup and it got me there.

The next morning I left Sudbury and headed east along the 17, the Trans Canada Highway, into North Bay. I decided that the 533, although out of my way, was just too good to pass up, so I turned north onto the 63. As I did, I saw a woman rider by the side of the road on her phone. Naturally, I stopped to see if she needed some help. The chain had come off her Kawasaki 650 Ninja. She was trying to reach the local garage but no one there was answering. She told me her male friend did all the maintenance on the bike for her and she didn’t have a clue how to tighten the chain. I’m always surprised that some riders, male or female, don’t know how to do the basics. It just seems that you would always be so vulnerable, but then again, I guess the vast majority of drivers don’t know even how to jump-start a car, so perhaps I shouldn’t be surprised.

I tightened everything up for her and headed on my way, not knowing that soon I’d be in the same situation. As I was enjoying the 533 east, the bike surged and the tach jumped to double again. This time, rather than resetting the ECU with the kill switch, as I’d done before, I decided just to let the bike run as is; I knew the engine wasn’t revving that high—the tachometer was giving a false reading—so I kept going. The 533 is the twistiest piece of road I’ve ever ridden and a lot of fun, but I soon decided to take it easy since the bike was surging and lurching more and I couldn’t trust it. As I came down into Mattawa it stalled. I restarted it and drove another hundred yards and then it died again. As I rode the main strip in Mattawa, it died on me several more times and then I couldn’t restart it so I coasted in to a spot at the side of the road beside an entrance. As I did, I noticed a BMW 1200GS on the other side of the entrance, so we were the BMW bookends of this particular drive.

No sooner had I removed my top bag and dug out my tools than I heard a voice say “You’re missing a cylinder.” It was the owner of the 1200 and he introduced himself as John. He hadn’t seen me limp into town so I explained the situation. Being an ADV rider himself, he naturally said I could crash at his place in North Bay if needed and use his tools to fix the bike. He thought it might be the regulator. I thought it was a plugged fuel filter. I stripped the bike of the plastics and pulled the cover off the fuel supply, cleaned the filter and put everything back. The bike started and idled okay. Only before setting off, I had the voice of the Jack Nicholson character in the movie Bucket List in my head, “Never pass up a bathroom,” so I killed the engine and took care of business. When I returned to the bike, it wouldn’t start. Dead battery. Completely dead. Things were going from bad to worse.

I asked John for a push to bump start the bike. We must have been a sight heading up the main drag, me on the bike, he pushing from the back. The bike started but I couldn’t keep it running. As soon as the revs dropped to idle it died. Then we couldn’t start it at all. Fortunately my spot was still vacant so I coasted back, stripped the bike again, and removed the battery. John suggested I take it to the garage on the corner and get a quick charge on it.

20180728_131236

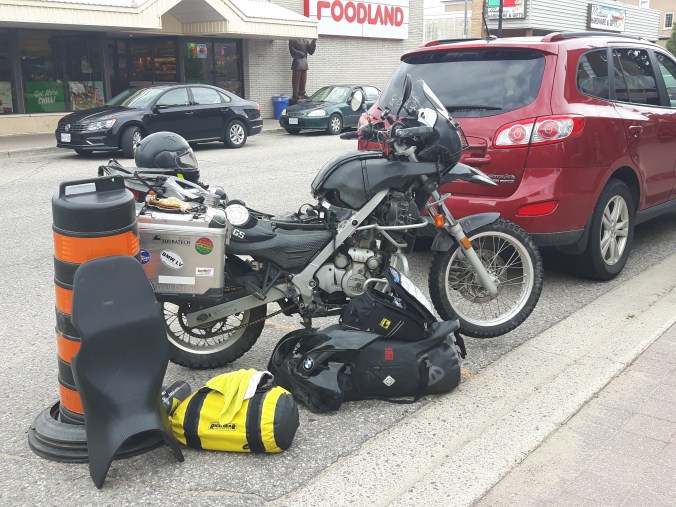
Curb-side maintenance on Bigby.

Now I had an hour to kill so I grabbed some poutine from the local chip stand and watched the lumberjack races. It was Voyageur Days in Mattawa.

20180728_112555

Audience participation at Voyageur Days

I wandered up to the local Tim’s and, while walking back, saw John as he was heading back to North Bay. He repeated his offer if I couldn’t solve my problems.

When I got to the garage, the owner-mechanic was gone.

“He went to the fights,” the young lady running the gas bar said.

“The what?”

“The fights. There are fights tonight.”

I was trying to imagine what kind of fights would be in Mattawa but eventually just helped myself to my battery, which was still on the charger. It was $10 for the charge.

I got back to my bike and installed the battery, replaced all the plastics and loaded the bike again. Now was the moment of truth. I turned the key and hit the starter: the bike made a grunt. Hmm . . . I guess I’m staying in North Bay tonight. Then I hit the starter again and it fired! It idled!

I know now what the problem was. I had been charging my phone off the battery throughout the trip, sometimes even when the bike wasn’t running because I needed it. I should have known that the battery is only for starting the bike, not a portable power supply. All that charging had boiled three of the cells dry. The morning of my problems, it was cold and I had the phone charging and the hand warmers on high. The charging system couldn’t keep up and the battery got further drained. When the battery dies, the instrument panel starts doing crazy things and the ECU acts up. The single source of my problems—the surging, the weird tach readings, the eventual non-starting—was a weak battery.

I now finally started heading home. At that time, I still wasn’t sure if the regulator was acting up and if the battery would drain while riding to Montreal. I kept a constant speed and didn’t ask much of the bike. I stopped only twice. Both times I kept the bike running because I wasn’t sure it would start again. I even kept the bike idling while filling it. Who’s going to stop me?

Just outside of Ottawa, I nipped into a convenience store to use the bathroom. When I came back outside, a brown liquid was pouring from underneath the bike. Problems on top of problems! My first thought was oil leak. I dipped my fingers into the puddle; it smelt like gasoline. Perhaps I overfilled it? Did it have something to do with not turning off the bike while filling? I wasn’t sure but now had extra incentive to get home. Fortunately, when I straightened the bike up off the side stand, the flow of brown liquid stopped. If I could keep the bike relatively upright, I could get home. I’ve never had such a stressful ride!

Again, I now know what was happening. Earlier in the summer, I’d had the bike on its side for the better part of a day. Oil had drained into the air box and the brownish liquid draining from beneath the bike was from the drain tube. I’m still not sure why it smelled like gas or why it was only draining now, but it was not coming from the engine.  It was draining from the air box.

I pressed onward, ever closer to home, keeping an eye on my instrument panel, half-expecting the oil light to come on. Each kilometre, I thought, was one less kilometre my wife would have to travel with a trailer to pick me and Bigby up. I was hoping to keep a steady speed all the way, but as luck would have it, the major highway passing through Ottawa was closed! It was stop and go traffic for miles as we were rerouted through downtown Ottawa, adding hours onto my trip. What a day!

Once back on the highway, it was smooth-riding. As I approached the border into Quebec, I could see lightening flashes in the distance ahead. Riding into a thunderstorm seemed the perfect climax to a stressful day, but thankfully it opened up just as I pulled into my driveway. My guardian angel had gotten me home again—and not a moment too soon.

Riding an old bike has its disadvantages, for sure, but I have to admit that the problems of the day were more my fault than the bike’s. I depleted the battery by using it to charge my phone, and I forgot to clean the airbox after the bike had been on its side. In the end, I was super lucky that Bigby conked out where he did, in Mattawa, with a mechanic on duty and John for support and advice, not on the 533 where there isn’t even cell service.

Each time I tour, I learn a little more about the bike and about riding. I’m building my knowledge in lower-risk places close to help. And each year I venture a little further off the asphalt. I’m already planning next year’s tour that will take me deeper into the bush and into more challenging terrain. Who knows where I might end up? I don’t know where I’m headed but I almost always enjoy the ride.

The Lumberjack Trail

20180728_112555

Voyageur Days. Mattawa, ON

What’s your ideal ride? For some, it’s a winding road like Tail of the Dragon; for others, it’s a single-track or ATV trail cutting through dense forest. Mine is some combination of both—a winding dirt road with some technical sections that challenge, like hill-climbs, mud, even the occasional water crossing. That’s what I was looking for when I decided to do some off-roading in Northern Ontario this summer.

I enjoyed looping Georgian Bay with my wife, and I enjoyed the rest stop in Kipawa, Quebec, at a cottage. I enjoyed the ride up to Moonbeam, albeit in the rain. But what I had really been looking forward to is a full day in the dirt, and this was the day I could finally do it.

The violent rainstorm of the night before had subsided by the time I crawled out of my tent. After my breakfast of champions, porridge, I geared up and headed to the park gate. I figured the attendant would be familiar with the area and able to direct me to the trailhead of The Lumberjack Trail, a 26 km. loop from Moonbeam to Kapuskasing I’d found online at an interactive trip planner.

Lumberjack Trail

Lumberjack Kapuskasing-Moonbeam Loop

I rode down to the gate, pulled a U-turn and parked. When I entered the kiosk, the young lady was staring into her phone. Our conversation went something like this:

Me: “Good morning. Do you know where I could pick up The Lumberjack Trail?”

Teenaged attendant: (looks up from phone) “The what?”

Me: “The Lumberjack Trail. It’s an off-road trail that goes from here to Kapuskasing. I saw it online.”

Teenaged attendant: (goes back to phone) “Ok Google, what’s The Lumberjack Trail?”

Me: “You don’t know it?”

Attendant: “There’s a lot of trails around here. Basically it’s the only thing to do. Me and my friends go on them on the weekends.”

Me: “Oh, so you ride off-road too?”

Attendant: “No we go in cars. Anything.”

Me: “Well, it’s supposed to go right past here.”

Attendant: “There’s a really pretty one. It’s a . . . a pépinière. Oh, how do you call it in English? Ok Google . . .”

Me: “A nursery.”

Attendant: “Yes. There are a lot of pine trees. But I don’t know how to find it. Try the Tourist Information.”

So off I rode, back to the flying saucer, pondering whether I should ask for directions to the Lumberjack Trail, the Pépinière Trail, the Nursery Trail, or a pine grove?

Once there, I was quickly directed to the trailhead. It turns out that you follow Nursery Road and it takes you straight there.

Nursury Trailhead

This looked promising

A short ways in, the trail became sandy and I found the pine trees.

Pepiniere Trail_web

The Nursery Trail

It was open and easy, but with sand and some small hills to make it a Goldilocks level of difficulty. Unfortunately, it ended too soon. I arrived at a T-junction to a gravel road. Knowing that left leads back to the main road, I turned right and found myself on an open, flat, fairly straight dirt road. Silt Road

The surroundings were pretty enough, but the riding was not very challenging. I was a bit disappointed. It was too easy. It’s actually hard to find a trail with just the right amount of challenge for your particular skill level, and where the Nursery Trail had at least some sand, this road was dry and hard-packed. I was bombing along in third gear, not even standing, thinking “This is too easy” when I hit a section still wet from the rainstorm the previous night. Everything suddenly went sideways—literally. A truck or larger vehicle of some kind had come through before me and left tire grooves. I started to lose the back end, went sideways, got cross-rutted, whiskey throttled towards the trees, and went down high-side, hard. It was my hardest fall yet.

My first thought as I lay on the ground was, “Well, the gear worked.” I had invested earlier in the season in some excellent protection specifically for off-roading. My Knox Venture Shirt, Forcefield Limb Tubes, and Klim D30 hip pads all did their job. I got up without even a bruise. My second thought was for the bike. If there was something broken, it was going to be difficult to get it out. I noticed that the folding levers I had also invested in had done their job. The clutch lever was folded up, saving the lever from breaking off. I lifted the bike and took a look. Nothing was broken or cracked; the crash bars had done their job too. There were some new scratches on the windscreen and front cowling near the headlamp, but nothing more. Oh well, new honour badges, I thought.

My concern now was getting the bike back on the road. I was lucky: if I’d gone a few feet further I might have lost it into a ditch and then would have needed a winch to get it out.

P1030223

Once I lifted the bike, I realized it was going to be difficult to get it back onto the road.

The front end was partially into the ditch and it would take some rocking and cursing to get it back a few feet to where I could carefully walk it back onto the road, making sure the front tire didn’t slide down.

I looked back at my skid marks and played amateur accident inspector.

P1030222

You can see where it all went wrong.

I tried to ride on but the silty dirt, when wet, is like glue and gums up the tires instantly. It was like riding on ball bearings, or rather, trying to ride on ball bearings.

P1030224

Slow-going in the wet silt

The ride now certainly wasn’t too easy. I basically had to do the Harley waddle, foot by foot, hoping it would get drier. I tried riding along the edge of the road in the long grass, thinking the grass would provide some grip, but the problem then was that I couldn’t see what I was riding over or where the ditch was. I dropped the bike a second time and began to wonder how I was going to get out of there. Would it be like this all the way to Kapuskasing?!

Then I had an idea: I knew that in sand you put your weight to the back to unweight the front tire. This helps prevent the front from washing out, which is when you go down. Maybe the same technique applied to all low-traction terrain, including mud. I tried and it worked! The front tire didn’t wash out as easily, even, to my surprise, climbed up out of some small ruts when needed. I had stumbled upon a new off-road skill.

When the road dried out, I was able to sit down, but kept my butt well back, over the rear tire. It all suddenly made sense why those Dakar riders always sit so far back. Now I was able to go at a better pace. The rest of the road wasn’t as wet as that section and, although open and straight, turned out to be just challenging enough. I stopped a few times when I saw some interesting paw prints.

Bear Prints_web

Bear prints. I also saw wolf and hare tracks.

When I felt I was past the worst of it, I stopped for lunch and took in the surrounding wetlands.

Lumberjack Wetlands_web

Wetlands north of René Brunelle Provincial Park

I popped out in Kapuskasing next to the Shell station on Highway 11. Although there was a sense of incompletion in only doing one half of the loop, I decided that was enough excitement for one day and headed into town to find the LCBO and something to enjoy back at camp. I wanted to explore the town a bit and was glad I did. Kapuskasing has an iconic ring of Canadiana to it.

I had the impression that it was bigger than it is, but there isn’t much in these parts that is big. These one-industry towns in the north are built on mining or forestry and are pretty remote. I rode through the town centre, which is a roundabout, and landed at the train station, the heart of all Canadian towns.

P1030264Surrounding the station were archival photos of the town and area, and I discovered that Kapuskasing had been the site of an internment camp during WWI. Primarily Ukrainian immigrants were shamefully sent there to work in a government-run experimental farm studying the viability of farming on clay. Later in the war it was a POW camp.

Kap plaque_F

A plaque outside the train station commemorates the Kapuskasing Internment Camp, 1914-1920

I love Canada and am a proud Canadian, but every nation has its dirty little secrets hidden in untaught history classes. Currently in Quebec, some teachers have expressed serious concern that the role of minorities is overlooked in the current history curriculum. I believe that a little less Upper and Lower Canada and the harmonious relationship with Indigenous Peoples, and a little more on the Indian Residential Schools (IRS), the internment camps of law-abiding citizens during both world wars, and the not-so-quiet actions of the FLQ in the 70’s would go a long way toward real truth and reconciliation among its diverse peoples.

I left the station and rode to the City Hall, then parked and walked out to a gazebo overlooking the river and mill. I came across this plaque about the Garden City and Model Town, and it occurred to me how much promise and hope there must have been in Kapuskasing at one time.

Garden City

Maybe Kapuskasing is iconic. It could be symbolic of how the country seemed when Europeans began settling here—pristine, pure, wild—like the blank page awaiting our best intentions. But intentions are just a start. The real work happens after the first draft, when we see all our mistakes and how we can make it so much better.

Blemishes or Character Marks?

“I want a poem I can grow old in,” writes Eavan Boland at the start of her essay “The Politics of Eroticism.” She goes on to explain that she wants a poetry in which she is subjected to the effects of time, not an object frozen in time. You might not think that’s very erotic, but that’s not her point. Her point is that she wants poetry that celebrates real women, creatures of time, not illusory women, sprung from the imaginations of male writers.

Why am I thinking of this now? Because my mistress has a wrinkle and I’m not sure whether I want her to get cosmetic surgery. I’m speaking of my bike, of course. Last year, as a result of a few offs in mud, one of the side panels got scratched. This was before I bought my upper crash bars. Now that I’m about to install them, I thought maybe I’d do a little bodywork first to make her good as new. I posted a query on my forum requesting tips. I’ve done bodywork on an old car with aluminum panels before but never worked with plastic. Someone replied with a lot of information for me, but someone else wrote “I kind of like my ‘character marks’  . . . makes it look like I actually use my bike in places other than Tim’s or Buckie’s.” That got me thinking. Are scratches blemishes or “character marks?”

I know a club member who sold his bike because it had a scratch and got a new one. Why he didn’t just get the scratch fixed I don’t know. Perhaps he was ready for a change anyway. But for some riders, the bike’s pristine appearance is an important part of the experience of riding. They spend hours polishing it on weekends, prepping for the club ride. I’m thinking also of the Americade parade I witnessed en route to an off-road rally last June, when all the Harley’s were lined up at the side of the road on display. I get it: the aesthetics of machines. I’ll be one of the first to admit that each bike has a personality, and a good engineer will take into consideration form and function.

On the other hand, aside from “character marks,” I’ve heard scratches referred to as “honour badges.” What’s so honourable about dropping your bike, you ask? I guess, the theory goes, that if you aren’t dropping it once in a while, you aren’t riding it hard enough. You aren’t pushing your limits. There’s growing derision for folks who buy a big 1200GS with luggage, maybe spend $2,000 on a Klim Badlands suit, but never venture off the asphalt. Posers. I’m not knocking anyone who doesn’t want to ride off-road, just those who don’t but buy an off-road bike and gear. And if you’re going to go off road, you’re going to drop the bike. Maybe not if you’re only doing dirt roads, but once you get into mud or trail riding, sooner or later, some rut or rock or lapse of concentration is going to get the better of you. And your bike. There’s just no avoiding it indefinitely.

So why not embrace it? If you ride around fearing a little mishap that might blemish your Precious, you’re not going to have much fun. And you did buy the bike to have fun, right? To ride it, take it places you can’t take other bikes, challenge yourself with a rocky hill climb or water crossing, try some single-track, where tree branches or underbrush might jut out onto the trail, slide the back end around a corner, and yes, show off your mud-splatter and scratches at the local coffee shop.

It’s the first beautiful day of the year here in Montreal. Hard to believe we had freezing rain a week ago. It feels like the unofficial start of the season. Enjoy your ride, whatever kind of ride you do.


The BMW f650GS. It’s not just a starter bike.

P1000195

2006 BMW f650 GS twin spark. 

The BMW thumper is an iconic bike with a huge following for good reason. 

I’ve been reluctant to do a bike review of Bigby. For one, I still consider myself a novice. In fact, aside from a few bikes at my training school, Bigby is the only bike I’ve ever ridden, so I don’t have much to compare it to. Doing a review, I thought, would inevitably lead to the faulty comparison, a logical fallacy I warn my students to avoid. (i.e. “Gets your clothes cleaner!” Ugh, cleaner than what?) Second, I’m still learning about the bike. Although I’ve owned it for almost three years, I’m still finding my way around the engine and mechanics and still discovering its potential. Passing judgment now would be like bailing out of a relationship after the second date. It would be, in the literal sense of the word, prejudice.

So why have I decided to do it? Well, after watching a lot of reviews online, I’ve come to realize that most are not very good, so the bar is set pretty low. They are usually more product descriptions than reviews, and Ryan at Fort Nine has blown the whistle on the nepotism of corporate reviews, how they are always positive because the big bike companies offer a lot of treats to the reviewers, like paid vacations in exotic locations. And those reviewers ride the bike for, what, a day, a couple of days, max, so at least I can say that after three years with Bigby, I know more about this bike than they ever will. So with my concerns made explicit, let’s jump in.

* * *

The three things I like the most about the f650GS are three things I noticed within the first five minutes of riding it: ergonomics, suspension, and balance. Okay maybe you don’t need to have ridden a bike for long before you discover its essence. Let’s look at each in turn and then move on to other stuff.

Ergonomics: At the school, we’d learnt on cruisers—Suzuki Boulevards and Honda Shadows. The ergonomics of the GS are very different. Being a dual-sport bike, it’s capable of going off road, and you need the pegs beneath you in order to stand. This placement also results in your weight being distributed evenly between the seat and pegs, with knees bent at roughly 90 degrees. It’s the ideal sitting position and how every office chair should be set up, thus making the GS also a very capable touring bike. The dual-sport, according to its name, involves compromise, but there’s no compromise when it comes to ergonomics: the GS provides the perfect sitting position, and the capability to stand when you leave the asphalt.

The other thing I like about the ergonomics is that you can flat foot this bike. The standard seat height is 30.9 inches, so super low. This is confidence inspiring once you take it off road; I know I can easily dab a foot if needed. In fact, since I am rather long-legged, the seat was a bit too low; my knees were bent more than 90 degrees and I felt a bit cramped after several hours in the saddle. So when I upgraded my seat (more on this later), I went for the high version to allow a bit more room, and that has made all the difference. If you are long-limbed, you might want to look at the Dakar version, which has a 34.3 inch seat height, or swap the saddle for a taller one. Despite these issues in my lower half, I haven’t had to add bar risers, and when I stand, the grips fall perfectly to where I need them, maintaining my standing posture.

Suspension: As I rode off on my first ride, the second thing I noticed was the suspension. This bike is smoooth, at least compared to those cruisers. And what better place to test a bike’s suspension than Montreal roads! Of course it makes sense that a dual-sport bike would have very capable suspension; it’s designed to be able to handle some pretty bumpy terrain. But just before I went for my riding test, I hired a private instructor for a class. He rode behind me and commented on things he saw. Now here is someone who has a lot of experience with bikes and has seen a wide variety from behind. Ironically, the first thing he remarked when we first stopped had nothing to do with my riding but how impressed he was with the rear suspension of my bike. “I wish you could see what I see from behind,” he said. “It’s amazing!”

In fact, I’ve wondered if the suspension is a little mushy. I’ve only bottomed out a few times while off-roading, and the front end dives a bit under hard braking. I’ve considered upgrading the suspension, but frankly, at only 140 lbs, I’m actually underweight for this bike. Front suspension travel is 170 mm and rear is 165 mm.  Since ideal SAG is roughly 30% of total travel, SAG for the 650GS is 49.5 mm.. Even with the pre-load completely backed off, all of my 140 lbs is putting a little more than 45 mm on the suspension. Which brings me to another plus of this bike: the pre-load adjuster. Okay, it’s not electronically controlled like the new Beemer’s, but the ability to adjust with the turn of a knob when you are two-up or have gear on the back is a nice feature.

Balance: The thing I like most about the 650GS is its balance. This is accomplished mainly due to the gas tank being under the seat instead of high on the bike where it normally is. Where this is most noticeable is in how the bike corners. At the school, we were taught to countersteer to initiate a turn and to accelerate at the end to straighten up, and this was necessary with those cruisers. But I quickly discovered that on the GS you can manage an entire sweeping curve simply by leaning in and out. It’s hard to describe, but the bike feels like it straightens up itself with the subtlest weight shift.

The balance also shows when riding at slow speed, like in parking lots or technical sections off road. I’ll challenge anyone to a slow race any day! The bike is easy to move around by hand and to turn in tight spaces. With a little practice, I was riding figure-eights full lock. You can add all the accessories you like to a bike, but getting the balance right is something that happens at the design stage. BMW got it right on this one, which is why I was surprised to hear that they’ve moved the tank to the traditional location in the hump on the 2018 750s and 850s.

* * *

The engine is a Rotax, 652 cc single-cylinder, water-cooled, DOHC with twin spark plugs and four valves. It provides 50 HP @ 6,500 rpm and 44 lb/ft torque @ 5000 rpm. What these numbers mean is that it’s not the gutsiest engine. I’m up for a slow race but I won’t be challenging anyone to a drag soon. When I did my research, I kept hearing how this bike is a good beginner bike. There’s not a lot of power to manage, and you don’t have to worry about losing the back end by getting on the throttle too hard. On the other hand, it’s got lots of torque down low in the first two gears for hill climbs off road, and still some roll on in 5th gear at 120 km/hr. I’ve never maxed it out, but I’ve had it up to 140 km/hr and that’s fast enough for my purposes. And since we’re talking about gearing, 3rd and 4th are wide enough to enable me to navigate a twisty piece of road pretty much in one gear, depending on the type of road: roll off going into a corner, roll on coming out.

Single-cylinder engines have their advantages and disadvantages. One advantage is this wide gearing. My dad often talks about how he loved this aspect of his 350 Matchless. In heavy traffic, you can stay in 2nd and just ease the clutch back out when traffic picks up again. He once road his brother’s parallel twin and said it was horrible in stop-and-go traffic; you had to work twice as hard to prevent the engine from bogging. I suspect it’s this same quality that allows you to maintain your gear through a twisty section of road with slight variations in speed.

Another advantage of singles, I’ve recently discovered in this article in Cycle World, is that they offer a kind of traction control. As Kevin Cameron argues, “no other design produces such forgiving power delivery under conditions of compromised traction without elaborate software.” This is due to the millisecond duration of the exhaust stroke with big-bore engines, when there is relatively little power delivered to the tire, allowing it to regain traction if it begins to break loose. It’s like anti-lock brakes, the theory goes, but in reverse. Compare that to the constant power delivery of multi-cylinder engines, which makes managing power and traction more challenging.

A disadvantage of single-cylinders is the vibration. The Rotax engine is about a smooth as a single comes, I’ve heard, but it can still make your throttle hand go numb, especially if it’s cold, so you might want to invest in a throttle assist or throttle lock. I have the Kaoko and it works great. Unfortunately, the Rox Anti-Vibration Risers don’t fit my particular bike due to the configuration of the triple-clamp, but then I’ve heard those can make the steering mushy, which can be unnerving when riding off road. And it might be my imagination, but it seems that there are less vibrations when using the BMW oil. It certainly seems that the engine runs quieter and smoother, perhaps not surprising given that BMW design and test the oil specifically for their engines. Speaking of oil, the Rotax engines do not burn oil. Ever. Don’t believe me, go ask the inmates at The Chain Gang, a user forum devoted to the BMW 650s.

On the other hand, it’s a major pain in the ass to do an oil change on this bike. Because the engine uses a dry sump system, there’s an oil tank on the left side of the hump where a gas tank normally would be (an airbox is on the right side), so draining the oil involves removing the left body panel and draining that holding tank, plus draining the pan by removing the sump plug at the very bottom of the engine. If you have a bash plate, as I do, you have to remove that too, which, if it’s attached to the crash cage . . . and so on, until you’ve stripped the bike halfway down. Or you can drill a hole in your bash plate as I did, which makes that job a lot easier. You’re still going to get some oil on the plate, and you’re going to get some on the engine when you remove the oil filter due to its recessed placement, so just have plenty of shop towels on hand.

My 2006 650GS does not have rider modes and sophisticated electronics. It doesn’t even have anti-lock brakes. At first I was concerned about this and it was almost a deal-breaker for this newbie. But I spoke to a few experienced riders and they all agreed: better to learn how to control traction and perform emergency braking using proper technique than rely on electronics. Since I’m rather a purist in most things, I understand that. If you learn to emergency brake by grabbing a handful of brake lever and letting ABS do its thing, you aren’t going to develop the feel needed to control sliding in off-road situations. And not having all that sophisticated electronics makes the bike easier to maintain.

The 650GS is fuel-injected so there is an ECU. A 911 diagnostic code reader is available to help you troubleshoot the electronics, but it’s expensive. One advantage of fuel injected bikes is that there is no choke to deal with, and the ECU adjusts the fuel-air mixture according to altitude, meaning you can literally scale any mountain without having to change the jets of a carburetor or risk running your engine hot. The downside is that the throttle can be a little choppy so easy on the roll-off.

Two areas where the 650GS is lacking are the saddle and the windscreen. The saddle is hard and slopes downward, so you always feel like the boys are jammed up against the airbox. If you plan on using your GS for long day trips, you’ll want to upgrade the saddle. There are many aftermarket models available, including BMW’s own Comfort Seat, but I decided to go with Seat Concepts which, for about $250 CAF, they will send you the foam and cover and you reupholster it yourself using your original seat pan. I’ve done a blog on this job so won’t repeat myself here.

One issue with this era GS is the windscreen. The OEM screen is so small it barely covers the instrument dash. There are many aftermarket screens available, but finding the right one is a difficult matter of trial and error. The windscreen issues on this bike are well documented, and if you have sadistic leanings, just search at f650.com for aftermarket windscreens, sit back, and enjoy. The reading is almost as entertaining as a good oil thread. In my own experience, the bike came with a 19″ National Cycle touring windscreen, which was a bit high for off roading and was directing loud air buffeting directly onto my helmet. I swapped it for a 15″ but that too was loud, so I added a wind deflector and that solved the buffeting but I thought ruined the bike’s aesthetic, so I ultimately landed on a 12″ sport screen by National Cycle that protects my torso but keeps my helmet in clean air. The problem is the shape of the front cowling that the screen screws into. It angles the screen too much directly toward the rider’s helmet, instead of the recent bikes that have the screen more upright. The quietest screen on the aftermarket is the Madstad screen. It has an adjustable bracket that attaches to the cowling, allowing you to adjust the angle of the screen. It also has that crucial gap at the bottom of the screen, preventing a low pressure area that causes the buffeting developing behind the screen. Unfortunately, it’s a little pricey, but the real deal-breaker for me is that Madstad use acrylic, and acrylic screens don’t stand up to the abuse of off-road riding. National Cycle screens are polycarbonate.

Aesthetics: I love the aesthetics of this bike! Even ugly babies are adored by their parents, but sometimes I’ll look at a more modern luxury touring bike with the engine completely covered in plastic and I’m glad my bike has its guts hanging out like a proper bike. And I like that it has spoked wheels, which are stronger for off roading and have a more traditional look. Someone once said to me, “I love your old-fashioned bike.” Hmm . . . I hadn’t thought of it as old-fashioned but didn’t mind the comment. There definitely is a raw, real motorcycle quality to the bike, yet has refinements like heated grips and the quality control and reliability you’d expect from BMW. It is the ultimate hybrid dual-sport: part dirt bike, part luxury tourer.

In conclusion: The f650GS is a confidence-inspiring little bike that is perfect for not only beginners but also anyone who prefers a smaller, lighter bike. There’s a movement these days toward smaller bikes, with many people looking at the big adventure bikes with derision for their impracticality off road. I say it really depends on the type of riding you want to do and where you plan to take the bike. Due to its size and weight, the 650GS can go some places that the larger bikes can’t, but the cost is in vibration and rpms at speed on a highway. If you’ve got large areas to traverse but want the capacity to go on dirt roads when needed, then yeah, go for the big 1200GS that is so popular. But if you’ve got time and want to explore deeper into those remote areas, then the 650GS is an excellent choice. I plan on keeping mine as long as possible.

* * *

Pros:

Ergonomics for dirt and touring; smooth suspension; very well balanced; reliable Rotax engine; sufficient hp and torque for light off-roading; fuel injected intake has automatic temperature and altitude adjustment; classic aesthetics

Cons:

Cost (upfront and maintenance; even parts are expensive for DIYs); saddle is hard and uncomfortable; windscreen is useless, hard to find a good aftermarket replacement; engine can be vibey; only 5 gears

* * *

Modifications:

With the help of my son, I’ve created two walkaround videos describing the modifications I’ve done to the bike for dirt riding and street riding. 


Walkaround Mods for Dirt
Walkaround Mods for Street

How’d I do with my first review? Please comment and click the Follow button if you liked this post.

The Mother of Invention

Last fall while practising some off road skills, I broke my radiator. I was working on power slides using two cones and riding hard in a figure eight. In a power slide, you brake slide into the corner, then at the apex crack the throttle, break the rear end loose, and slide the back end around as you accelerate out of the corner. In one attempt, I must have angled the bike too much or not cracked the throttle enough (you’re aiming for the right combination of both) because the bike just plopped down on its side. It was already at a steep angle and didn’t fall far, and onto sand, no less, so I didn’t think much of it. But a few minutes later the temperature light came on and the bike overheated. At over $600 for a new radiator and no used ones available on eBay, I decided to put the bike into storage early and deal with it in the spring.

This gave me a whole winter to think about what happened. Was it just bad luck? I decided to buy some upper crash bars to protect the faring and radiator in the future. I have lower crash bars and even some makeshift ones that I’ve had welded onto those, extending out past the pegs and which I thought would be wide enough to protect the upper part of the bike in a fall. But this happened on sand, not asphalt, so they simply sunk into the sand and didn’t stop the impact on the radiator. Ironically, if the bike had fallen on asphalt, I’d be $600 richer. So yeah, bad luck. But I also got to thinking about the Dakar riders and how they dump their bikes all the time on sand and don’t end up with busted radiators. What saves their rads on impact and not mine?

Two winters ago, I was considering a trip to Blanc Sablan, QC, which would have required riding the Trans-Labrador Highway. It’s 1,500 kilometres of gravel road, and without cell service (only satellite phones placed periodically along the highway) and logging trucks barreling past you, it’s imprudent to be without a radiator guard. One errant stone thrown or kicked up into the fragile fins of the rad and you are stranded in the middle of . . . not nowhere, but Labrador, and that’s not good. So I  installed a radiator guard.

From the beginning, I wasn’t entirely happy with it. For one, it required removal of the OEM (Original Equipment Manufacturer) shrouds to install. One look at the shrouds and you can see they’re designed to funnel air into the radiator as well as offer some protection from flying stones. In addition to concerns about adequate cooling, the guards (there are two, one for each side) are also a little flimsy. They are thin aluminum, designed to be light, but because the body panels snap into grommets on the guards (or, originally, the shrouds), they serve another important purpose in supporting the structural integrity of the bike.

Looking at the guard that came off my bike, I could see that it had buckled upon impact.

And this is after some initial straightening. My guess is that the body panel bent the guard and the weight of the bike torqued the radiator. (The leak is in a bottom corner.) It might even be that the guard was shoved into the radiator upon impact because some of the fins are damaged. The OEM shrouds, although plastic, are stronger and might have prevented the damage. Ironically, it’s quite possible that my radiator guard led to my radiator breaking! The lesson here is beware of altering OEM parts on your bike. Sometimes those German engineers know what they are doing. And these bikes, all bikes today, are thoroughly tested before going on the market. Swap out OEM parts for aftermarket ones with prudence!

So I decided to go back to using the OEM shrouds. I wasn’t completely happy because my new radiator would still be vulnerable. The only other major manufacturer of guards for my bike also requires that you remove the shrouds. I therefore had no choice but to try making my own, some that would fit inside the openings of the shrouds.

When I was a kid and was working on my bicycle (or some other project) and needed something very specific, I’d just walk around in my parents’ basement until I found it. I’d have a vague idea in mind of what I needed, and since my parents’ basement was filled with stuff of all kinds, it was just a matter of time before something that would do just the trick presented itself. Walking through a home renovation warehouse is a similar experience. You don’t know exactly where to find what you envisage or even what section it might be in, but keep walking. In my case, I found my new radiator guards in the eavestroughing section.

I started with some aluminium grill that goes in your gutters to keep leaves out. It was cheap and perfect width and even pre-painted black. Most importantly, the openings were the right size—not so big as to let small stones through but big enough to allow sufficient airflow. It was also strong enough to withstand the shake, rattle, and (unfortunately) roll of off-roading. stretched aluminum

Then I carefully measured the openings of the shrouds. Measuring
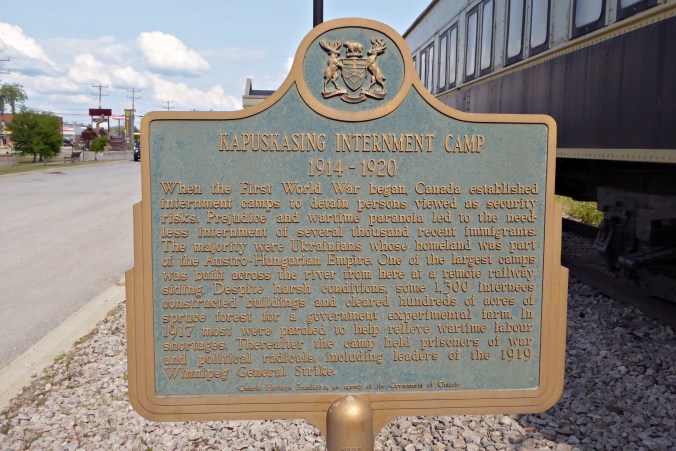
I used some cardboard and created templates that I could fit into the openings. They were basically squares but with the edges folded about 1/4″. I would use those edges to fix the grill to the shroud, but more on that later. I had to cut the corners so when folded they became like a box (or half a box). One opening on each side was a little tricky because one side of the square is not straight but has a jog. Carefully measuring and fiddling is necessary, but better to do this with cardboard before cutting into your grill.templates

When I had the four templates, I held each up to the grill and cut using tin-snips. CuttingThis is a little messy and you have to vacuum carefully afterwards to collect all the sharp bits of discarded metal. I then held the template against the cut metal and used my Workmate, my vice, and some blunt-nosed pliers to fold and shape the guards.Folding I offered each into its opening and tweaked. FittingThis requires patience, but if you follow your templates as a guide, which you know fit well, you’ll eventually get there. Use the tin-snips or pointed-nose pliers to trim off or bend in sharp edges that can scrape the plastic as you fit them. If you do scratch the plastic a bit, use some Back to Black or Armour All to lessen the visibility of the scratch.

Finally, I wrapped each edge with electrical tape to give it a finished look and prevent the sharp edges from scratching with vibration. TapingFortunately, those clever German engineers had the foresight to drill two holes in the opposite side from the mounting points, probably with something like this in mind. When the guards are done, you can fix them into the shrouds using the mounting screws on the inside and either zip ties or 1/2″ 10-24 machine screws and washers on the outside. I decided to go with the screws just to be sure everything stays put.

Here’s the finished product. I’m happy that I’ll get the cooling effect of the OEM shrouds plus protection for my new (expensive!) rad.Finished covers

These guards are particular to my bike and unless you have a 650GS you’re going to be facing a different situation. Maybe there is a good guard or any other add-on for your bike on the market. But if there isn’t, or if you’re not entirely happy with the product or the price, don’t overlook the option of making it yourself. With a little ingenuity, time, and patience, you can sometimes do better and save yourself some money in the process.

Montreal Moto Show 2018

GoldWing_Header

It’s no coincidence that the Montreal Moto Show falls at the end of February. The sky has been overcast for months, there’s still a mound of snow 8’ high on your front lawn (and dirty, brownish-grey snow everywhere else) and, despite your magical thinking, wearing your spring jacket without gloves is not bringing any warmer weather. To add insult to injury, potholes begin to emerge on the still half-frozen streets, making driving treacherous. In short, if you’re a motorcyclist, the February blues still have a good grip on you, and any light at the end of the winter tunnel comes from the LED Christmas lights you still haven’t taken down.

So just walking around a showroom with our moto-buddies is therapeutic. It gets you over the hump and into March, which is really just a month away from the month when we can start to get our bikes out. Some people go to the show with chequebook in hand, ready to buy a bike, and the ample salespeople who circulate around the bikes know this. One guy at Honda I spoke with said, when I expressed an interest in the Africa Twin, that he could knock $500 off the price this weekend only. That’s $500 I could put towards the divorce lawyer, I replied, if I came home with a new bike. But it’s still nice to dream, touch the bikes, heck, sit on them and imagine what you would do if you had an extra $13,000 floating around.

This year I went looking for gear, having still to get some body armor to complete my off-road ensemble. But I had in mind also the possibility that my son might be in the market sometime in the not-too-distant future. He’s talked about doing the course this summer, and the Quebec government is dropping the stupid regulation for learners to ride accompanied, so in theory he could be on the road this summer. That’s a thought that brings mixed feelings for me, as any parent can imagine. I’m trying to steer him away from the street and onto the dirt, at least for now. There are so many crappy drivers in Quebec, especially downtown Montreal, where he lives, that unless you have a lot of experience with defensive driving, you’re going inevitably to have an accident, and better to have it in a cage than on a bike. The first time someone drifts into your lane, or starts backing into you, or cuts you off, or turns left in front of you, you’re going to be surprised and incredulous and angry and quite possibly injured, God-forbid seriously. So my preference, if I have any say in the matter, is that he ride off-road with me and on-road in a car. But I digress. We are at the Moto Show considering which bike to get.

He’s always been attracted to naked bikes. Yeah, they’re nice, fun, practical, fast. But they can’t go to Purdue Bay, and an adventure bike is not much different from a naked, right? Both have reduced fairings; both have a small windscreen; both have an upright position; both come in a starter 650cc size; both look really cool to attract the chicks, which is important when you’re 23. Oh yeah, and both get good mileage, because you want that when you’re two-up on a student budget. But first dad gets to look at his dream bike, the Africa Twin. AfricaTwin1I’ve always said I love my little thumper, but if it’s done one thing for me it’s to get the off-road hook sunk deep. My first two years of riding have been a slow gravitation toward off-roading simply because the challenge and possibilities are endless. It’s also pretty exhilarating when you slide out the back end going around a corner on a gravel road, or charge up a rocky hill climb, or feel the bike slide around beneath you through some mud. The Africa Twin is the off-roader’s adventure bike. I sat on the Triumph Tiger 1200 and you know what? I wouldn’t want to be taking that beast off-road. Tiger_1200I imagine the BMW 1200 is the same. There’s just no room for error with all the weight. And don’t try to tell me you don’t feel the weight because it’s so nicely balanced. The first time you and the bike get kicked sideways off a large rock that rolls away from under you, you’ll feel the weight, all 580 lbs. of it as you lift it up. The Africa Twin, on the other hand, is 507 lbs., a full 73 lbs. lighter thanks to it’s smaller 999cc engine—more than enough to get you to the Timmies of your choice. But where the Africa Twin really shows its off-road colours is with the wheel size: 21” front and 18” rear. Compare that to 19” front and 17” rear in the R1200GSA and you know why the ground clearance is 9.8” compared to 8.5”. As far as I’m concerned, the 12000GSA is the bike for long adventures in remote areas, but I wouldn’t want to take it anywhere more remote than a dirt road. The 800GS is the true BMW adventure bike.f800GS

But back to the Africa Twin for a moment. The graphics on it will attract a few chicks to dad, too. While I’m intrigued by the dual-clutch system and have heard it significantly improves your ability (since you don’t have to think about gearing and can devote you’re entire attention to other stuff), once I sat on it and tried to imagine that left lever as anything but a clutch lever, I knew I could never do it. Besides, I’ve read, as good as the dual-clutch system is, it falters in certain scenarios. And then there’s the traditional argument that half the fun is controlling the power transmission from the engine. I still prefer to drive the snot out of my wife’s old manual Corolla than cruise in my less-old automatic Saturn.

While we were at Honda, we checked out the 250 Rally. 250RallyOnly 250cc., you say? This easily does 120 km/hr. on the highway and tops out at 140, but if you’re riding a 250 you probably aren’t riding the highway anyway. Only as much as necessary. You can put a tail rack on this baby, some soft panniers, and hit the Trans-Am Trail, or The Great Trail in Canada, for that matter. 250Rally_backThis little bike is a dirt-bike on steroids, capable of adventure too if you’re not in a hurry. And at only 235 lbs., it would be a fun and safe starter bike. The other option at Honda is the “adventure styled” CB500X. CB500XWith cast wheels and a lowish ground clearance, this is clearly a street bike. But with the Rally-Raid Products additions, including larger, spoked wheels and a new rear shock with an extra 2” of travel and adjustable damping, you can create a kind of “Africa Twin Lite.” The final option if you’re interested in a small displacement adventure bike from Honda is the XR650L. I’ve just discovered this bike online at Cycle World, but unfortunately they didn’t have any at the show.

Three other bikes they didn’t have, much to my disappointment, where the new BMW 750GS, the 850GS, and the new for 2018 Royal Enfield Himalayan. The new Beamers get an extra 50cc, the old 800 clearly feeling the market pinch of the Africa Twin. They’ve both been completely redesigned with the chain on the other side and a repositioning of the gas tank, although one of the things I love about my 650GS is the low centre of gravity with the tank under the seat. The new models move it to the traditional location in the hump. I guess they needed the room down low for that extra 50cc. I also didn’t see the 310GS, which would have been a contender. Come on BMW; get your sh*t together! The 310 has been out for over a year and the GS was supposed to follow a few months later. But then again, here in Canada, we always get treated second to our big brother south of the 49th parallel.

What did impress me at BMW is the R nineT. I remember the first time I saw one in the showroom on my way to the parts counter. It literally stopped me in my tracks. I’ve never been much interested in poser bikes, but if I were going to allow myself one, this would be it. BMW nailed the styling on this bike, especially the Scrambler with the gunmetal tank and brown leather saddle. RnineT_ScramblerBut then the silver, brushed metal tank is pretty cool too, harkening back to those old Norton tanks. RnineT_pureOr the one with black and gold highlights. RnineTBut my favourite, if we are posing, is the Racer with the retro colours and bubble cockpit. This would definitely turn some heads.


The cafe racer craze is still alive and well, according to BMW. Speaking of poser bikes, don’t get me started on the Triumph Bobber. BobberIt tries too hard. The whole secret of a poser bike is getting one that looks great but not too great, if you know what I mean. It’s a sign of desperation. Perhaps that’s why I’ve never been drawn to Harley Davidson, and you’ll notice there are no photos here of them. The only photos I took at the Harley display was of the entire display, complete with rock music, large-screen video, lots of leather, and Harley chicks in skimpy skirts. They are clearly selling a lifestyle. It’s a sight to behold. But if I were forced to chose another bike, less practical than my adventure bike, but that looks great, I’d be more inclined to go with something like the Triumph T100 or the Street Twin. Classic, classy, and modern, all in one package. Triumph_T100Triumph should be applauded for bringing back these classic bikes but seamlessly incorporating all the benefits of modern technology. And they get it right with the analog display, round headlight, and fork gaiters.

Next we headed over to Kawasaki and looked at the iconic KLR. If there’s one bike that epitomizes the starter adventure market it’s the KLR. Having said that, I’ll add that Bill Dutcher, founder of Americade and 50-year veteran of riding, was on a KLR when he lead our group at the Dirt Daze Rally last June. Okay, he’d geared it up, but still found it plenty capable for his needs, and he is no slow-poke, as I discovered. Gabriel sat on the KLR and immediately realized why it has been so popular over many years. KLRThe ergonomics are perfect and the seat is wide and comfy. Unlike BMW, Kawasaki have designed their way out of the comfort saddle aftermarket, to their credit. They know their clientele. Then he looked at the price: a little over $7,000. Compare that to the “comparable” 750GS at almost $11,000. That’s about $4,000 more, a lot of money when you are a student. Okay, the 310R, wherever it is, is $6,450, but has half the power and cast rather than spoke wheels. I’d take the KLR any day, but God-forbid not that ugly Camo version. What were they thinking? Are we in Maine? The only serious consideration with the KLR is the charging system, which is weak. So put some of that leftover 4G’s into a relay and be cognizant of how many accessories you add.

While there, we had to cruise past the H2R because, well, it’s the H2R.


I’m not going to own this beast in this lifetime, not if I want to live a little longer, but one sure can marvel at the aesthetics of speed. Speaking of which, then we wandered back over to BMW to compare the track-only HP4. HP4Designed by a small, very specialized team, the bike is BMW’s pure-bred racer, and here was one of only 750 made. No wonder we were not allowed to sit on it. Back down on earth, we looped back around to Honda to look at the new Gold Wing.


The Gold Wing has been the, well, gold-standard superslab touring bike for a long time, but some of the guys in my club have said Honda has become complacent and the market has dwindled. The 2018 model is a massive redesign and meant to address that. But Honda wanted to get this right, so it’s been working on this for over four years instead of the usual two and a half year timeframe for new motorcycles at Honda. This is a slimmer, trimmer, lighter, and faster Gold Wing with a radically new front suspension and optional 7-speed DCT tranny. Don’t ask me about the new suspension because, even after reading about it in the latest Cycle World, I still can’t visualize it. All I know is that it involves an A-frame that pivots outward instead of the telescopic forks that compress downward. Apparently it’s silky smooth, even smoother, if that is possible, than a “normal” luxury touring bike. It also apparently prevents the front diving in braking that is found with telescopic suspension; instead, the front wheel travels perfectly up and down over bumps.

The engine and the rider have moved forward about an inch and a half, and since the rider is now closer to the fairing, the fairing can be smaller. According to Honda, the new fairing produces 11 percent less drag, which is significant because from what I know about the Gold Wing, its liability is that it’s a parachute in high winds. A buddy of mine got hit with a cross wind on his and was pushed all the way across the road onto the opposite shoulder. In fact, if there hadn’t by chance been a lookout there to pull off to, he would have been in trouble. His guardian angel was looking out for him that day. And less drag means more fuel efficiency, a full 20% better. Transmission is tweaked with a higher top-gear ratio enabling 2,500 rpm at 75 mph. By comparison, my thumper hits 5,500 rpm at that speed, or over twice the rpm’s. Of course I’m comparing apples and oranges, but it’s clear that the new Gold Wing is meant to traverse large distances comfortably. To Honda’s credit, the engine isn’t bigger, which bucks the trend. Why do all upgrades have to involve more power? They focused instead on rideability, producing a luxury tourer that, according to reviews, is flickable and fun. And yes, borrowing from it’s adventure bike market, Honda has offered a 7-speed dual-clutch option for a true luxury experience.

Finally, we headed over to the custom bikes. Here are a few favourites. customs

There was also an R90, beautifully restored. I love these old bikes and can see myself one day doing some restoration, although I have a lot to learn first.R90

And then there was this thing which, although not my cup of tea (see above re. trying too hard), I have to admit was pretty impressive in its craftsmanship.


We also checked out the Slingshot and a Timbersled, or Timbersled-inspired accessory.


Canadian winters are long, and it sure would be fun to be able to ride through those months. I don’t know if I would bother while living in Montreal. I’d have to trailer the bike to the mountains. But I can see perhaps getting one of these when I retire to the BC interior at the base of The Rockies. Yeah, dirt bike in the summer, Timbersled in the winter. No more February blues.

What bike are you excited about this year? What would you get if you traded up?

The season is just around the corner and I’ll be posting again more frequently, so click Follow if you’re interested in motorcycles, off-roading, adventure touring, gear, and other riding-related stuff.

Setting Goals

GOAL-SETTING

It’s that time of the year again, when the bike goes under the cover for the winter. For me, this moment is like New Year’s Eve,  the end of one period of time and the start of another. I’m talking about the motorcycling season here in Canada but it’s comparable to, perhaps for bikers more significant than, the calendar year. And so I find myself reflecting back on the season, assessing whether I achieved my goals, and setting new ones for 2018.

Do you set goals for your riding? For some, it might be simply to get out more. For others (or the delusional), it might be to win the Men’s Senior TT, the Paris-Dakar rally, or MotoGP. A goal can be a particular destination or the decision to be a better rider, correcting some bad habits that have crept into your riding. If you ride recreationally in a club, a successful season might be determined by the number of new friends you have, or how much money you’ve raised for certain charities. And sometimes the goals can be physical, like trading up your bike or getting some needed gear or accessories.

I’m a very goal-oriented person, not just with my riding but with pretty much everything I do. I’m not obsessed with achieving my goals to the point of taking the fun out of recreation, and I’d hate to be judged as taking myself too seriously. But I hate doing things half-assed, and I like to have a clear idea of where I’m going. Goals help me with both. They push me to do a particular skill to the best of my ability and they help prevent me from directing my time and energy aimlessly.

Much of what I’ve learned about goal-setting comes from the field of sports psychology, but it’s applicable to any activity, including career goals. If you’re new to goal setting, here’s a primer on setting effective goals. We use the acronym SMART.

Specific: Make sure your goals are clearly defined. Don’t just say “I’d like to get out on the bike more,” but “I’d like to ride at least once a week.” While “I’d like to improve my riding” is an admirable goal, “I’m going to complete this specific advanced skills course” is a more effective one. Make your destination specific and you’ll avoid aimless riding.

Measurable: How will you know if you’ve achieved your goal? If you can’t measure your success, you’ll never know if you’ve achieved it. This goes hand-in-hand with having specific rather than vague goals. You need a clear target to know if you’ve hit it. More importantly, you need to know how close you are to achieving it. Some people say the M stands for Motivational because having a measurable goal helps you stay motivated. Improving my fitness is not a measurable goal; running 5 K in under 25 minutes is.

Achievable: You want your goals to challenge you but be within your reach. You’re not going to go from beginner to expert in one year, from a learner’s permit to the Paris-Dakar in one season. If your goals are too easy, you’ll get an inflated ego and over-confident, and if they’re too hard, you’ll lose your motivation. This is perhaps the most difficult part of goal-setting because it requires you to be honest with yourself about your current abilities and your potential.

Reasonable: Even if a goal is achievable, it doesn’t necessarily follow that it’s reasonable. I could quit my job tomorrow and ride to Tierra del Fuego if I wanted to, but it wouldn’t be the best thing for my finances or my marriage. Setting reasonable goals means considering not only capability but also common sense. My wife is very understanding and supportive of my endeavours, but finances and summer vacation time are limited, so I have to be reasonable about the commitments I make. A reasonable goal is one that fits in nicely with the rest of your life.

Time-Related: You have to set deadlines for when you’re supposed to have achieved your goals. As with defining your goals, be clear and specific—not “sometime in the near future” but “by the end of next season.” And you should have long-term, midterm, and short-term goals. For your long-term goals, think big. (Hey, dreaming is free!) You’ve got lots of time to achieve them. Midterm goals should be directly related to achieving the long-term goals, and similarly with short-term goals. You’re creating the stepping stones that will get you to your ultimate dream, breaking what seems now like an overwhelming goal down into manageable and achievable ones. Midterm goals keep you on course and motivated; short-term goals help you act today toward that ultimate prize. And while all this might seem a bit fixated on that final destination, keep in mind that, like riding, it’s the journey that matters most, not the arrival. Enjoy the process, or should I say progress?

Some books also talk about the importance of making your goals public. “The more people who are aware of your goals, the more people who will be there to support you and hold you accountable along the way” (Sports Psychology for Dummies 11). So . . . here are my goals for the 2017 and 2018 seasons.

In 2017, I decided to focus on developing off-road skills that would enable me to ride to some places not accessible otherwise. Toward that end, I had gear to buy, accessories to add, and courses to complete.

Here were my goals for 2017:

  • To buy off-road gear. This meant boots, pants, jacket, and helmet. I achieved this goal, and thank God it’s done because my pocketbook and marriage would not survive another season of expenses like this one.
  • To make my bike off-road ready. I added some crash bars, lowered the windscreen, added off-road pegs, and changed to a 50/50 tire when the back tire was finished.
  • To take a full-day class at S.M.A.R.T. Riding Adventures in Barrie. I accomplished that. I also took a 2-hour beginner class with Jimmy Lewis as bonus. These two activities did more toward improving my riding than anything else I did this summer.
  • To do a long solo tour. As you know if you’ve been following these blogs, I accomplished this with my ride to Cape Breton. My original goal of Blanc-Sablon was not reasonable, and I’m glad I changed it to something where the predominant surface is asphalt and help is relatively near in case of an emergency.
  • To do a lot of off-roading practice. I did some, but I broke my radiator and cut my season short by about a month. I’d say that goal was not accomplished but, overall, I had a successful season.

My goals for 2018:

  • To finish making my bike off-road ready. I have some upper crash bars (currently in the mail from Poland) to add and will swap the Tourance front tire with a matching K60 Scout.
  • To join an off-road club named Moto Trail Aventure, the largest off-road club in Quebec, and participate in as many of their rallies as possible. (This will have the added benefit of improving my French since it seems this club, unlike the WIMC, is predominantly French.)
  • To buy an annual membership to FQMHR (Fédération Québécoise des Motos Hors Route), which gains me access to a large network of trails. I’ll be doing most of my riding on these trails to gain the practice missed this summer. The idea is to reinforce what I learned this summer and develop muscle memory.
  • To participate in the 2018 La Classique, an off-road rally held each spring here in Quebec. I’ll probably start with the beginner rally.
  • To return to DirtDaze Adventure Bike Rally at Lake Luzerne, NY.
  • To lead at least one or two rides again with my street club. I already have one destination in mind—a large collection of vintage bikes in Maine.
  • And another solo tour. I’ve discovered I love solo touring. I loved every minute of my tour through NS this summer and would love to repeat again next summer. But somewhere new. I very well may be going back to the Maritimes in a car with my wife next summer, so I’m not sure what I’ll be able to afford to do on the bike, but I can’t imagine a summer without some kind of a trip. It really depends on how things shape up. Like I said, most of my riding next summer will be on Quebec trails, so whatever trip I take will be a bonus. Stay tuned.

My long-term goals? Okay, since we’re on the topic, I have a few big ones, all tours.

  • To ride across Canada. This has been a goal of mine since I was a teenager. Once I hit the west coast, I could go north to Deadhorse or south down the Pacific Coast Highway to Baja, then across to New Orleans and up through the Blue Ridge Mountains.
  • Another destination is South America. I’m not sure if I’d ride through Mexico because I’ve heard it’s very dangerous or ship my bike partway.
  • Okay, and since we’re dreaming big, I’d love to do some riding in Africa. These big trips might have to wait for my retirement, but all the off-road riding I’m doing now is toward being able to handle these terrains.

So what are your goals for next year? Make them public and bring yourself a step closer to realizing them.

I’ll be going into my usual winter hiatus with the blogs, but will post when inspiration strikes.

My Favourite Motovlogs

I didn’t know what a vlog was before I started riding. As a writer, I was more interested in blogs, and YouTube was a place where you could see your dear friend’s child act in the school play, a compilation of the sexiest ice-bucket challenges, or the footy game you missed last weekend (if you were willing to follow the sketchy link). Then GoPro entered the market and it changed everything. Suddenly you could get a rider’s-eye view in HD with sound that didn’t seem like the guy was riding underwater, or through Hurricane Katrina, or both. Companies also woke up to the idea of advertising for free under the guise of providing product reviews, and a generation of unemployed video editors found work. The video blog, or vlog, was born.

Perhaps I’m already thinking of those long winter months when the bike is up on a jack in the shed with a 40 watt bulb pointed at it. If you’re like me, product reviews midwinter is like a balm to a wind-chapped itch to ride, and a helmet-cam is the closest thing there is to throwing a leg over said motorcycle stored in the shed. I spend a lot of time during the winter on YouTube, learning stuff, buying stuff, or planning on buying stuff once spring hits. In prep for those regrettably not too distant months ahead, here are my favourite motorcycle vlogs and YouTube channels. Enjoy!

Because I subscribe to the free (i.e. cheap) version of WordPress, I can’t embed videos. You’ll have to click on each hyperlink to have a sample vlog open in a separate tab.

Weekly Rides With Rueben was my entrance into not only vlogging but also motorcyling in general. Before I even had my full licence, I went searching one day for tips for newbies, and after a few scattered hits, I stumbled upon Reuben’s vlogs. Reuben (I don’t know his last name) worked for Competition Accessories in North Carolina, and they decided his vlogs would be a good way to generate traffic to the store, I guess. A new video was uploaded every Wednesday and together they were, as he says at the beginning of each video, “a random collection of motorcycle adventures, life on two wheels, and product reviews.” If that sounds eerily familiar, I guess Reuben’s videos heavily influenced my thinking about this blog. Topics covered included riding in the rain, riding at night, avoiding obstacles, and preparing for fall riding, for examples. Then his store started partnering with a nearby dealership and he started doing bike reviews. Reuben also did product reviews from the store in front of the camera, but I think he was more comfortable behind the camera. He never seemed at a loss for words, and was articulate and knowledgeable. I learnt a lot from Reuben over his 74 posts. The posts abruptly stopped without notice because, as rumour has it, the store was bought out. A new guy from another location took over, but it was never the same. Hope you’re doing well, Reuben!

The ancient Roman poet Horace wrote that poetry should both “delight and instruct.” The same could be said for a good vlog, so while I might find it “delightful” to watch Rosie Gabrielle ride through Oman or Ottawa, if I want to learn how to ride, I go where the experienced riders are. Sorry Rosie! Zack and Ari, co-editors at Motorcyclist Magazine, have been riding together for a long time! (Like, since childhood.) They are good riders. In fact, I’ve watched Ari break a track record on a KTM 390, and Zack is no slouch either. Just watch his MC Commute, where he rides a different bike to work each day and gives a review en route. Their show On Two Wheels (again, a rip off from yours truly) is a lot of fun with their humour keeping things light but rarely stupid, and always the bikes are front and centre. One of my favourite episodes is the one on the BMW GS, yeah, the bike that opened up the adventure touring market and spawned my f650GS. But even more than On Two Wheels, I love MC Garage, where Ari walks us through some simple maintenance of our bikes. I have a lot of respect for people who are both good riders and good mechanics. I’ve used some of Ari’s tips to fix not only my bike but also my car. I think Horace would agree that instruction for a hungry audience is also a delight.

If Ari and Zack are good riders, Lyndon Poskitt is a great rider! How great? Dakar great. Podium finisher in Baja great. And he knows his way around a bike too. In fact, he built his bike from the frame up. In Races to Places, Lyndon travels around the world, stopping at various rally races like the Mongolian Rally, The Baja Rally, and of course the Dakar, to try his luck and skill. His key sponsor, Adventure Spec, put together the vlogs of his adventures. Production quality is high, which is especially impressive since Lyndon does all his own filming. I’ve done enough adventure riding to know that when times get tough, the last thing you want to do is stop for a photo (or cutaway, or take 20 minutes to set up a 20 second shot), but Lyndon is committed loyally to his project and followers. I’ve also learnt a lot about different countries vicariously from Lyndon. I’ve followed him across eastern Europe, down into Asia, and now over to Australia. I’ve really been enjoying this series, now starting its 7th season. I’m trying to savour them because I’m almost entirely caught up and will soon have to wait for each new episode.

If you are more into street riding, or rather street racing, you want to check out Lockk9 TT Racing’s channel. Nobody does video editing as well as this guy. I can’t get enough of this video: great editing, great music, not bad riding. It’s a shot of adrenaline on a cold mid-winter morning to get you out the door and to your job.

For product reviews, I go to two sources: Fort Nine and Revzilla. I love Fort Nine because the reviews are thorough and I know that whatever RyanF9 talks about I can get from this Canadian-based online store without the hassle of cross-border issues. I bought my 50/50 tire based on his rave review of the K60 Scout (i.e. “I’m not even going to say this is my favourite pick of the video because the K60 is my favourite tire on the motorcycling market right now”). He’s knowledgeable and funny, and tells it like he sees it, which is not always the case with product reviews. Usually they end up being positive, pointing out only the merits of a certain product. In fact, many so-called “reviews” are really just product descriptions, with very little if any evaluative comments thrown in. Ryan also does pretty good vlogs. In his vlog about how to legally ride off road in Canada (his split infinitive, not mine), I found out about Chemin Scotch north of Hawksbury, and checked it out, and had a blast. In a recent vlog, he talks about having a degree in Art History (Art History!) which really is evidence that what you study in school doesn’t have to be what you do in life. And no one does bike reviews like Fort Nine. They are creative works of art. Apparently Ryan writes the scripts and some guy named Steve handles the editing. Just check out this review for example, in rhyme, of the new BMW 310R. I’m so old I can’t say exactly what he’s parodying, but I think it’s hip hop videos. In another, he says he’s heading back west to BC to start a new chapter with Fort Nine. I hope that includes more vlogs.

For more in-depth product reviews, I go to Revzilla. I don’t know what Anthony drinks in the mornings but I know I want some. A 19′ review of the Klim Badlands jacket? Really? He strips that bad boy down inside and out. Meanwhile, world population has increased by 4,750 by the time he’s done. It’s thorough! How much do Klim pay him to represent their product? How long does it take him to learn all the details of that jacket? Because of the currency conversion and cross border brokerage (motorcycle gear is duty-free, however), Revzilla is not always the cheapest option for me, but I never buy a product without checking out the Revzilla review and user reviews there. Thanks guys! And just to show my appreciation, sometimes I do buy there and have it shipped to Burlington and ride down to pick it up. I especially like their Gear Guides, where they compare a number of select products in the same review. You can salivate all winter long, and drop Christmas hints to loved ones by sharing, or create a wish list of your own for when you’re stinking rich.

I’ve saved the best for last, but I’m going to cheat because it’s not even a vlog. It’s a podcast, but I’m including it because I’ve probably learnt more about the adventure touring experience from Adventure Rider Radio than from any other single source. Yeah, the show caters to adventure riders, but host Jim Martin is always careful not to exclude other types of riders and riding, and much of the information is relevant to motorcycling in general. I’ve learnt everything from the esoteric (e.g. the nitty gritty of motorcycle chains) to the mundane (how to prepare tasty meals in camp, or first aid). One of my favourite things to do during the winter is run a hot bath and listen to ARR on my iPad while I soak away the chills. I’m always keen to learn new skills, especially if it’s from the comfort of a hot bath, and one of my favourite segments is the rider skills segment with Bret Tkacs of PSSOR. The show functions on a donation and sponsor basis and it’s pretty impressive that Jim and his wife churn out a show every week. I’ve been meaning to send a token of my appreciation, and will, because while the show is obviously a labour of love, these kinds of shows don’t survive if not supported by those who enjoy and profit from them.

There are a few others I cruise past from time to time, but I’ll stop there. Drop a comment about your favourite motovlog or channel and I’ll check it out. Or let me know what you think of some of these. Happy fall riding, while it lasts.


Taking the High Road

Quarry

After riding the Cabot Trail, my plan was to stay in the area and explore a network of trails in the interior. My instructor, Emily, at S.M.A.R.T. Riding Adventures in Barrie had lived in Cape Breton for a few years and told me about them. Highland Road is a dirt road that joins the Cabot Trail near Wreck Cove and cuts across the island toward Cheticamp, opening up into a network of trails. There’s no one around for miles and there are no speed limits, little signage, and no asphalt. It’s an off-roader’s paradise.

But such riding should not be done alone. Fortunately, I spotted a 1200GS at the campground and struck up a conversation with the owner, Yannick. He is from Sherbrooke and was travelling with his wife and daughter with the bike in the back of their pick-up. It was a stroke of good luck! I don’t know whose second-language was worse but we managed. He decided to change his plans to ride the Cabot Trail that day in order to ride with me instead. His wife and daughter took a boat cruise in a tall-ship that was in port and Yannick and I headed off into the bush.

It took some sleuthing to find Highland Road and when we did, it was closed at the entrance due to some construction. Yannick used his Garmin Montana, an off-roading GPS that shows trails and topographical maps, to find a way around the construction and soon we were blasting along a gravel road . . . until we hit deep gravel. I almost lost the bike! We decided to stop and let air out of our tires. Looking up at the mountain before me and thinking of the recent near-accident, I have to admit, I was a little nervous about the riding ahead. But Yannick reminded me of a few basics that proved to be extremely helpful:

  • Don’t hesitate. If you hesitate and brake, you fall.
  • Braking off-road is opposite to on-road. Instead of 80/20 front/rear, it’s more like 20/80.

Once we headed off again, I immediately noticed a huge difference with the lower tire pressure. I no longer felt like I was riding on ball-bearings. The back end was squirmy, but the front held its line. I also found myself drawing on my training at S.M.A.R.T. earlier in the summer: peg-weighting to turn; squeeze the tank with your thighs; counterbalance on turns; feather the clutch (2 fingers) to regulate speed. But above all, I kept reminding myself of the rear braking lest muscle memory get the better of me.

By the time we made our first stop I was feeling more confident. Credit to Yannick for letting me go first and determine the pace. He took a lot of dust and stones for that! We discovered the reservoir for the area. There were some signs of warning, but thankfully everywhere was accessible. The network of trails was ours to explore.

Reservoir

We decided to take a side road that we thought led back to the reservoir; we were looking for a nice lunch spot. But the road narrowed and narrowed, and got gnarlier and gnarlier, until it was a single-track ATV trail that challenged even our GS’s. I was going super slow over these huge rocks and bumps, feathering the clutch in first gear, but I still hit the skid plate several times on large rocks that jutted from the earth. It led to a rocky hill climb that took us to the precipice of a quarry. This is why the instructors at S.M.A.R.T. had said you coast to the top of a hill: you don’t know what’s on the other side. In this case, it was a 100-foot drop!

We had found our lunch spot and photo-op.

Bigbea and meYannick

After lunch we had 37 kilometres of dirt road to cover to complete the loop back to the Cabot Trail. We were cruising at 80 km/hr but in the straights sometimes hit 100. The Metezler Tourances, which Yannick had too, were fine for this sort of riding. My confidence was growing but I reminded myself not to get over-confident and make a mistake. In some of the curves, at 60 km/hr., I swear the back end was sliding out. I was getting the hang of this! Then to make sure I didn’t get too cocky, Yannick blasted by me on his 1200GS, spitting stones and leaving me literally in his dust.

Still, I was doing what I’d been preparing to do for the past year and what had been my ultimate goal for this tour: off-roading in Cape Breton. The winter reading, the training with Jimmy Lewis at Dirt Daze, the full-day course with S.M.A.R.T., the practice at a local sand pit and, not insignificantly, the investment in off-road gear, all culminated in this day of off-roading. It was even more exciting than the Cabot Trail and I wrote that evening in my journal that this trip just gets better and better.

GSsBreak

Next up, the Marine Drive to Peggy’s Cove.