5 Drills to Improve Your ADV Skills

Improve your street and off-road skills with these simple drills. No dirt needed.

The first instruction in off-road skills I received came from none other than Jimmy Lewis, the Dakar podium finisher in the 90’s who now runs an off-road school in his home state of Nevada. He was visiting the Dirt Daze Rally in NY and offering little 3 hour clinics to ADV riders. He began by stating that the coaching at his school focuses on two things: balance and traction. I think the traction skills come a little later, maybe in intermediate classes—how to find and break traction when needed. But I learnt a lot about balance, throttle, and clutch control from that short clinic, and I’ve added to it with some instruction at SMART Riding Adventures, Clinton Smout’s school in Barrie, Ontario, and a couple of Spring Refresher days with GS instructors at some clubs here in Quebec.

I’ve cobbled together five drills that I try to practice when I have an hour or so to spare. I recently heard Chris Birch say in an interview on Adventure Rider Radio that really what you learn at his weekend courses are exercises that everyone should then go out and practice after the weekend. No one is going to learn how to ride off road well in a weekend, but if you practice, like in any sport, you’ll improve.

These are five exercises I do to improve my skills.

Static Balance

Everything starts with balance, and the best exercise to dial in the neutral point when the bike is in perfect balance is static balance. Jimmy had us attempting this without any assistance and it was hard. No one could really balance for more than a second or two. I think the better way to do it is how the dirt bike guys do it, full lock and your front brake on. You can also move the tire side to side a bit to dig a little rut into the dirt for support. Alternatively, you can lower your front tire pressure or get the bike on a hill pointed down so the front suspension is compressed a bit, which makes it easier.

Okay, it’s not an asphalt but you can do it at the top of your driveway on the grass if your partner doesn’t mind the groove permanently dug into the lawn.

Touch and Go

This one I got from Brett Tkacs’ video on his asphalt drills. It teaches fine braking, clutch, throttle control, and balance. You simply come to a complete stop at each obstacle and touch it with your foot or hand. You can use anything available such as parking blocks, lamp standards, garbage cans, etc. All these drills are simple but not easy. This one is a particular challenge for me on the Tiger.

Sorry about the crappy framing at the beginning.

Figure 8

This one teaches counterbalancing in tight turns both seated and standing. It’s important be able to turn both ways so the figure 8 ensures this. Just place two markers about 6 meters apart as your centre-point of each turn. (A tennis ball cut in half works best.)

For seated turns, you want to shift your butt off the seat—the one cheek sneak—to shift your weight. It’s not enough to move your upper body; you have to move your hips, where most of your weight is, even if you are diminutive like me.

For standing turns, I concentrate on gripping the bike with my legs. For a left turn, for example, I hold myself from falling off the bike when leaning by planting my left calf and thigh against the engine and my right knee against the other side, just under the tank. Using leverage in this way, I’m “locked in.”

For both seated and standing turns, vision is crucial. You want to put your chin on your shoulder and look to where you want to be, the next cone, not the one you are turning around. Keep your revs up so you have power on hand should you feel the bike falling and can clutch out without stalling. The goal is full-lock turns both ways.
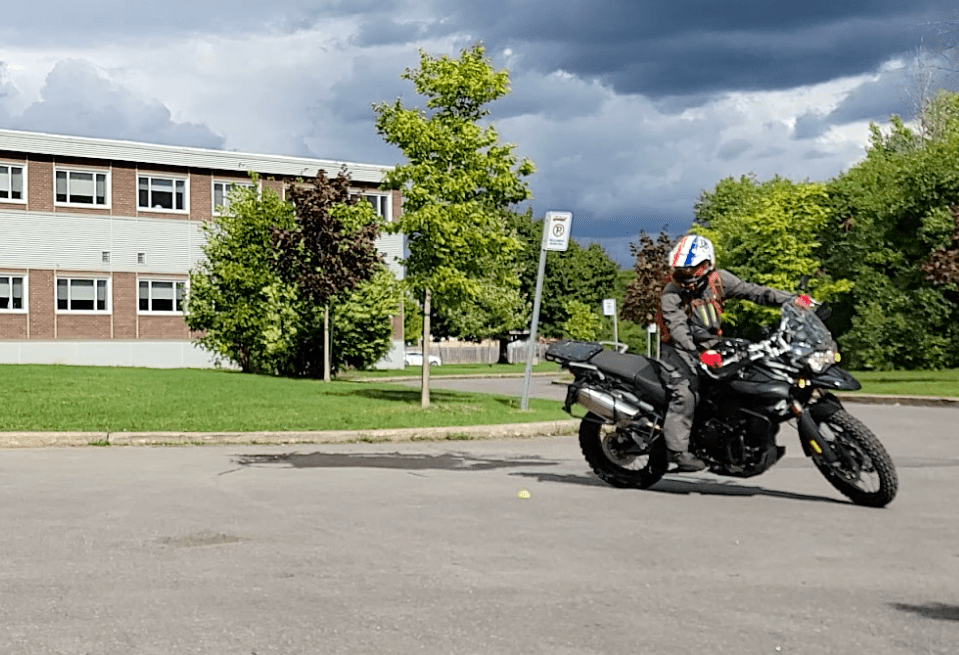
Circus Act

This exercise teaches you to move independently of the bike but stay in balance. Begin by standing and riding with one hand, both sides, then lifting a leg off each peg. Once you’re comfortable doing that, swing a leg over your seat and sit side-saddle long enough to place the opposite foot on the peg, so put the right leg on the left peg, and stand up. Then sit back down side-saddle, get your left foot back on the left foot-peg, swing both legs over so you are sitting side-saddle the other way and put your left foot on the ride foot-peg. You’ll find the bike wants to tip to the side all your weight is on so be ready and compensate by tipping the bike away from you. As long as both you and the bike together are in balance, you won’t fall.

I find this exercise helpful for when you get into sand and mud and rocks and the bike starts moving around underneath you. Your muscle memory will remember and you’ll shift your weight to the opposite side to compensate. Off-road riding requires a lot of movement side-to-side with your upper body to compensate when the bike becomes unbalanced.

Finally, I get back to normal seating and then dismount the bike while it’s still rolling. (This teaches clutch and throttle control again.) Walk beside the bike for a few meters then put your left foot on the left foot-peg and do a rolling mount. You’ll have to transfer you weight quickly over the centre line of the bike to avoid it falling toward you. It’s a bit of a step of faith (not quite a leap) so commit and keep the revs up and the bike rolling. Do the same on the other side. The rolling mount is good practice for fine clutch, throttle, and balance, but can be handy in some situations on the trail.

Friction Point Practice

Find a hill or incline (a loading ramp will do) and point your bike uphill. Slowly roll the bike up and back using only the throttle and clutch, no brakes. Try holding the bike stationary for a few seconds only using the throttle and clutch, then roll back and stop the roll, again, only using the throttle and clutch.

I learnt this skill from the IRC Tire guy and he says it teaches you to break the habit of trying to hold the bike on an unsuccessful hill climb with the front brake. Instead, you have to develop muscle memory to use the engine to brake when rolling back on a hill. It also dials you into the friction point of your clutch and helps develop traction on hill climbs. You don’t want to spin the rear tire and lose traction.

All these drills look simple and easy but they are far from easy. I like them though for their simplicity, allowing you to practice them anytime you have a few minutes or even at the start of each ride.

I’m no expert, so feel free to offer advice in the comments section; I won’t be offended. I’m always eager to learn.

Do you have some exercises you do regularly? Drop them in the comments section too. I’ve kept this to 5 so they can be done quickly, but I know there are a ton of excellent exercises out there, so pass on your favourite(s).

The 2025 Season Begins

Photo credit://Sentier Trans-Québec Trail

Preparing for my most ambitious ADV tour yet.

“April is the cruelest month,” T. S. Eliot wrote as the opening line of his iconic poem “The Wasteland” (1922). Clearly, he had never experienced a Canadian March. As I write this on March 25th, we are 10 days into the new riding season, yet no one is riding. It’s 2C (36F) and the sky is a slab of grey slate pissing cold rain that turns to ice in patches on the treacherous sidewalks. Brown, dirty snow still sits at the sides of the roads and in patches on lawns, slowly melting over weeks to expose winter garbage and dog shit lying underneath, and the grass, when it finally pokes through, isn’t really grass but mud and last year’s soggy, decaying leaves. Eliot’s poem captures postwar disillusionment and his nervous disorder, but it might equally describe the mood of Canadian bikers in late March.

Nevertheless, we continue to plan and prepare for the season to come in a kind of blind faith. Yesterday I did a practice pack of my gear. I’m trying a new gear set-up and have the ambitious plan of eliminating my tank bag, tail duffle bag, and hydration knapsack. I want to ride this year without the extra weight either on the bike or my back. To do that, I had to be as ruthless as Ezra Pound was to Eliot’s manuscript.

Gear

I replaced my tent and mattress with a hammock and bug net. I’ll be touring midsummer so I’m going without a hammock underquilt. I also swapped my MSR Dragonfly stove and 2L Billy pot for an Odoland isobutane stove and pot, but I’ve added to my kit a Bushbox twig stove. I’m not sure which will become my primary stove, but the idea is to use the twig stove when dry wood is readily available and the isobutane when it’s not. And as a back-up to the back-up, just for its simplicity and ease, I’ve also picked up a Trangia alcohol burner. This fits nicely inside the Bushbox and can burn isopropyl alcohol, available at any pharmacy. Can you tell I’m nervous about giving up my Dragonfly?

My camping mates will be happy to know that I finally retired my toy hardware store hatchet and bought a Gränsfors Bruk Wildlife Hatchet. I don’t know why I suffered as long as I did. I’ll be using this around camp to prepare firewood and split firewood into twigs for the Bushbox. I’ll be travelling solo so edited out of my kit the second plate, cup, and cutlery, resulting in my cookware now being considerably smaller and lighter.

When I did The Timber Trail at the very end of last season, I found my Wolfman Expedition tank bag too big and heavy, making the Tiger more top-heavy at slow speed than it already is. It also worked better on the 650GS with the fuel cap on the side of the bike and not under the bag. It would have been possible to move the essentials to my hydration knapsack, but I want to eliminate it too. Water is heavy and the knapsack restricts airflow through a jacket. Mine also interferes with my neck brace. (If it goes under the brace, the brace sits too high; if it goes over the brace, the brace digs into my shoulders from the extra weight.) Instead, I’m going to try a fanny bag with only a few essentials from the tank bag: aux port to USB adapter, some electrical cords, a Leatherman Wave, tire pressure gauge, 8mm socket and micro-ratchet for my pre-load adjuster, and my monocular. I think fanny bags are nerdy, especially if worn in the front (i.e. the scrotum bag), and I wouldn’t be caught dead in one anywhere but on the trail, but one might be the answer to staying cool and unencumbered on the bike. If they find me dead somewhere on a trail this summer, at least my reasons for wearing one are now known.

As for water, since I won’t be needing to bring a fuel bottle for the Dragonfly stove, my bottle holster is free. I’ve moved it from the back of a pannier to the front left side and will try the Simple Modern Insulated Tumbler with Straw and Lid for sips when I can. It’s only 28 mL so I’ll also be carrying an MSR 4L Dromedary to refill it as needed. Marilyn and I took the latter through Newfoundland but never used it much, so I was ready to retire it from my kit, but I’ll be doing some pretty remote riding midsummer so will strap the Dromedary onto the bike along with a 1G Giant Loop Armdillo bag to extend my range to around 400 km (~250 miles).

Giant Loop Armadillo Bag

After the practice pack last night, I can confidently say that almost everything fits into my Enduristan Monsoon Evo bags. I’ve added two Enduristan Fender Bags onto my panniers, into each fits perfectly a 10×10 Aquafest Safari Tarp. (I’ll be taking two—one for over the hammock, one for shelter.) My tools and tubes, as always, will go in two Giant Loop Possible Pouches that I strap to the crash bars at the front of the bike. I say “almost” because I will still have to have a small Enduristan tail bag on the rack at the back for my rain jacket, windbreaker, and down vest—my layering system to deal with temperature changes. I can live with that.

Finally, I’ve added to my gear to prepare for the risks of off-roading. I have a Knox compression suit and recently purchased the chest protector upgrade that doesn’t come standard with the shirt.

I swapped out Level 1 armour for Level 2. I also recently replaced my ageing Arai Signet-Q helmet with a Contour-X. I know, I know: why didn’t I get an XD-5 or similar adventure helmet? Well, I already have an adventure helmet, the LS2 Pioneer, and this will be my touring helmet. The peak causes wind noise and I was looking for the most comfortable, quietest, safest helmet on the market, and the Contour-X fits me like a glove.

Route

I’m sorry, my American friends, but I’ve decided that I can’t do this summer my planned ride of The Blue Ridge Parkway south and the BDR’s coming back. This will be the 3rd time I’ve postponed this ride, and I don’t do it lightly. I was looking forward to exploring the Appalachian Mountains and challenging myself on the MABDR and especially NEBDR, but after much deliberation, I’ve decided to join my fellow Canadians and stay north of the border this summer, that is, the “artificially drawn border.”

What makes this decision especially difficult is that I have always found Americans extremely friendly and helpful, and I recognize the difference between Americans and their government. But lately we Canadians have been hearing of visitors having their phones confiscated at the border and searched, and some Canadians detained, and even some anti-Canadian sentiment from certain states that shall remain unnamed, so I don’t feel entirely safe to visit while tensions are this high. I’ll be travelling solo in remote regions so am especially vulnerable. It’s really unfortunate that it’s come to this and I hope our good relationship can be restored quickly so I can complete that bucket list ride.

Instead, I’ve decided to do some of the Trans Quebec Trail. This is a system of trails throughout Quebec. Initially I was going to do a section of the TCAT (Trans Canada Adventure Trail) called The Forest that runs from Baie Comeau, Quebec, to Kenora, Ontario, but that gps track isn’t always kept up to date. My Calabogie Misadventure ride a few years ago was largely a result of the track not being kept current; my riding buddy and I didn’t know that a bridge was out and were forced back out onto a gnarly hydro line. The big benefit of the TQT is that there is an accompanying app that is user-submitted; if there’s a problem on the track, one can immediately report it with the press of a button. The app also shows campgrounds, gas, groceries, attractions and more, so I feel I can ride with a lot less stress and simply explore, as I like to do, finding the essentials when needed. Thanks to Marc Chartrand and his team for putting this route and app together.

I plan to pick up the track south of Montreal and follow it east to Rimouski and beyond, perhaps into the Gaspé interior. Then I’ll cross the St. Lawrence River (uh, by ferry) from Matane to Baie Comeau and come back by the north shore, up through northern Quebec with some of the most remote riding I’ve ever done. It loops over Lac Saint Jean, where Marilyn and I visited last fall, but on dirt roads this time. Apparently about 90% of the route is dirt and gravel. You can see the entire trail and photos at the STQT Facebook page. I don’t know how long this will take me and I don’t have a definite schedule, but that’s the kind of adventure riding I like. With the app and riding solo, I can play it by ear and simply explore at my own pace. Teachers’ benefits.

Training

To prepare for the off-road element of this tour, I’ve decided to do some more instruction this summer. When I got my licence in 2016, I did some classes to get a Level 1 foundation, but it’s been several years since and I’m ready to improve on those skills. I’m going to look into the Level 2 class with Académie Ridaventure. Their Level 2 class covers such things as water crossings, clearing obstacles (logs, large rocks), and brake slides. I think it’s always good to develop your skills, and I feel I’ve plateaued recently.

I hope to do a semi-private Level 2 class.

“Ah spring!”

There’s another poem I know about spring. Unlike Eliot’s 434-line masterpiece, this one contains two words: “Ah spring!” I know it by heart. It’s been a brutal winter with record snowfall in Montreal and frigid temperatures for months. No January thaw this year. But we’ve finally arrived at the cusp of spring and the riding season.

If there’s one positive of the off-season, it’s the opportunity to “reculer pour mieux sauter,” as D.H. Lawrence said, step back to jump forward. It’s a time to dream and plan for adventures to come. I’m ready; the bike is ready. It may not be the cross-country tour I did in 2021, but in many ways it feels like this tour will be my most ambitious and the one I’ve been working towards since I began riding in 2015. It’s the kind of ADV remote touring I wanted to do on the cross-Canada tour but didn’t have the time. I discovered then that this country is so large that you have to explore it one province at a time, and I guess I’ll start with the one I’ve called home now for 35 years.

What are your plans for the season? What changes have you made to your bike and kit to prepare? Drop a comment below. Whether you are an armchair adventurer or a seasoned traveller, despite what Nature presents us today, it really is a special time of year. Keep the faith, my motorcycle friends: we’re almost there.

Decarbon Your Top End

I used Seafoam to reduce the carbon build-up on my intake valves.

Last year when I had my trouble in the bush, I noticed a significant amount of carbon build-up inside the throttle bodies of my Triumph Tiger 800XC. My buddy and I were troubleshooting why the bike wouldn’t start, and we thought there might be water in the engine. Peering down into the throttle bodies, we could see something glistening inside. Was it water? We even dipped down there twisted pieces of paper to see if they came up wet. But in the end, with the use of a camera, we determined that what was sparkling was carbon.

This was mildly alarming. My BMW 650GS had absolutely no carbon build-up, and I hadn’t noticed it earlier when working on the Tiger. It prompted me to do my overdue valve adjustment, and as some of you know, all my exhaust valves were tight. I don’t know if that led to the carbon build-up, or how normal such build-up is in an engine. I’d heard of the Seafoam heat soak treatment and, being a little housebound at the moment and looking for a project with the bike, I decided to give it a try.

Preparation

Needless to say, the first thing you have to do is get down to the throttle bodies. For me, that means removing a lot of body panels, lifting the gas tank, and removing the airbox cover. You’ll need to keep all sensors plugged in or you’ll elicit an error code in the ECU, so that might involve unscrewing the sensor rather than unplugging it. If you have any vacuum hoses off, you’ll need to plug them with something of similar diameter.

All set to go with the fuel tank propped up with a piece of wood.

If you haven’t already done so, you’ll need to buy two cans of Seafoam—one of the SF-16 Motor Treatment and one of the SS-14 Cleaner and Lube Spray. (The latter comes with a tube applicator.)

Now you are ready to start the process.

Application

Start by adding the full can of Motor Treatment into your fuel tank.

Start your bike and let it warm up to operating temperature. I waited until I heard my fan kick in so I knew it was good and hot.

Bring your engine up an extra 1000 rpm beyond its normal idle and start spraying the Seafoam Top Engine Cleaner into the throttle bodies. You might need a helper to do this or, as I did, you could use a throttle lock to hold the engine just above idle. For a car, you would insert the tube where the air intake boot attaches to the throttle body, but because my bike doesn’t have a boot, I sprayed directly into each throttle body, alternating every 15-20 seconds and trying to spray an even amount into each. It’s normal to hear the rpm drop slightly as you spray, and you will see a plume of white smoke come out the exhaust. Be sure to do this in a well ventilated area!

Hold the tube down inside each horn and spray equal amounts until the can is done.

When the can is completely empty, turn off the bike and let the Seafoam heat soak for 10-15 minutes. Then restart your engine and give it a few good revs. You should see some white smoke still come out. When you get the bike all buttoned up again, go for a “spirited” ride (i.e. give it the ol’ Italian tune-up). The motor treatment you put in the tank will continue to remove loosened carbon and clean the injectors.

Conclusion

So by now you must be wondering if it did anything. Here are some before and after shots using my scope.

Is it my wishful thinking or do some of those valves look better after than before? Cylinder 2 for some reason had less carbon build-up to begin with so didn’t have much improvement, but there seems to be some reduction on the valves in cylinders 1 and 3, and definitely cleaner walls. And with the motor treatment in the fuel, hopefully there will be more reduction during the coming rides.

I dunno. It was worth a try, and harmless. According to the company, Seafoam is a petroleum based product and will not harm your engine. I’m not comfortable putting it in the crankcase because then you are thinning the oil, but this top-end treatment seems innocuous.

While I was down there, I lifted the airbox and resynchronized my throttle bodies, which I had done prior to my valve adjustment and Seafoam treatment but now needed a tweak. I also reset the ECU adaptations following all this.

The three cylinder pressures are listed on the left dial. Pressure is less after decarboning, which is to be expected.

I also had the opportunity to check my K & N air filter and was happy to see it’s completely clean; the Unifilter prefilter I installed seems to be doing its job. I took the Unifilter out and gave it a clean and relube.

A clean bill of health

With the bike all back together, the Michelin Anakee Wild tires and the new lower windscreen on, the bike is ready for some dirt. Doggie is making good progress on his rehab so I’m holding some hope I’ll be able to get away for a short tour before it’s back to work.

Legal disclaimer: Any mechanical advice I provide here is offered merely as a description of what I did and a suggestion of what you may do with your bike. I am not a licensed mechanic. Any work done on your bike is at your own risk. The instructions above follow those provided by Seafoam.

20-20


Kevin_cropHindsight may be 20-20 but nobody can predict the future. This Covid-19 has thrown us all for a loop, and we still don’t know how the story will end. It’s hard to make plans for the summer when everything is so up in the air, but I am a Gen-Xer. We grew up with the threat of nuclear war hanging over our heads and still managed to make it to school each day, even hold a few tentative plans for the near future. A little pandemic isn’t going to stop me planning the riding season set to begin.

mushroom

Obviously, much of this is pending how the pandemic plays out, so I’ve made some educated guesses. The regions are starting to open now and the stores and schools will be in a few weeks. It looks like we will be starting to loosen social distancing restrictions in the near future, although I think everyone is going to be wary of close proximity in confined spaces for some time to come.

For that reason, I think most of my riding this summer will be either solo or with a few riding buddies, cognizant of minimizing contact and risk. I’m okay with that. Riding is already a pretty solitary activity even when shared. I love solo touring, but as I said in my last post, I love club riding too. Here are my tentative plans for this summer amid this weird year so far.

Touring

The first little tour I’m going to do is down into Vermont and New Hampshire for a few nights once the border re-opens. Last year I rode the Puppy Dog Route on my own in June and it was just the thing to recenter after being stretched out of shape by 100 students, each wanting a piece of me. This year I will try the Hamster Ride, which is the same sort of thing as Puppy Dog but in New Hampshire instead of Vermont. It’s a series of dirt roads traversing a good part of the state up to the Canadian Border. I love dirt roads, state parks, the White Mountains, the Green Mountains, and the secondary highways of the northeastern states. I think Bigby and I will attempt Mount Washington while passing nearby, but I won’t be putting any “This bike climbed Mount Washington” sticker on my pannier. That’s boasting. Besides, it makes you question the reliability of any vehicle that feels the need to advertise the accomplishment.

MtWashington

Photo Credit: Ted Dillard

I don’t have any other small tours planned, but Marilyn and I will be doing some day trips together. To beat cabin fever, we’ve done a few rides along the river these past few weeks. We go in the late afternoon and it’s a slow, easy ride west as the sun sparkles off the water. Marilyn says she thinks she’s caught the motorcycle bug. The other day while doing some routine maintenance on the bike, I noticed my rear brake pads were finished, so I’m waiting on new pads to arrive in the mail. Now she’s asking, “When are those pads arriving because I want to go for another ride?” Finally, she might be getting the appeal, and as long as we don’t get caught in a rainstorm, I think I’ll be able to cultivate that interest into a simmering passion. We will pack day lunches and head off on our own small adventures.

But The Big One, the tour I’m most looking forward to, is the cross-country one I’ve wanted to do since I was 19. I thought it might be this summer, but then our dog got sick, so it was put on hold; then sadly our dog died, so the possibility was back on; but then Covid hit, so now I’m not sure. But all going well, I’ll be heading across Canada sometime in July. I’ll head up toward Ottawa on Highway 417 which turns into the 17 after Ottawa, then I’ll just keep going, westward, through Chalk River, Mattawa, North Bay, Sudbury, Thunder Bay, and just keep going, as far as Bigby will take me. I’ve never driven across the country, so this is going to be a real discovery for me of the country I grew up in and call home.

Priest Carving copy

Mattawa, ON., Gateway to the West

The plan is to meet Marilyn somewhere out west (she will fly) and we’ll visit her sister-in-law in Washington State. I may be tempted to ride a portion of Highway 101, the Pacific Coast Highway, while I’m close, and that’s why I want to do this in July, although the heat will be worst then; I want to have the flexibility that no fixed deadline provides, and I have to be back to work in August. Then I’m going to come back through The United States, checking out their national parks. I’ve never seen the midwest, or The Grand Canyon, or Yosemite, or much of The States to be honest. So I’ll be discovering that country too, camping all along the way.

I’m considering doing some of this on dirt, either some BDR sections (Backcountry Discovery Routes) or a part of the TAT (Trans America Trail). There’s a lot to plan, but now that my work is done, I have the time to start.

Club Riding

I won’t be going on any tours with the club like I did last year, but I’ll do some day rides in the Montreal area. These are easy rides of 350 km/day or so into the surrounding regions with a few forays across the border. See my last post on the benefits of club riding. This year will be muted by social distancing, but motorcyclists are used to managing risk.

I’ve decided to lead a couple of dirt rides for the club. We are primarily an asphalt club but there are now a few members with ADV or ADV-styled bikes and even some cruisers who aren’t afraid of dirt. Often on club rides, I’d see an interesting dirt road leading off into the woods and I’d be dying to go exploring. I’m betting there are a few others who feel the same. Ideally, I’d like to offer these as an optional portion of a larger club ride, with a plan to meet the group for lunch. I’m going to call these 50/50 rides (50% road, 50% dirt). With my new Cardo PacTalk comm unit, club riding will be a whole new experience for me this year.

Group_ride_1web

Off-Roading

I cannot tell a lie. What I am most looking forward to this season is developing my off-road skills. It’s been a few years now since I took some beginner courses to get me started and I’m ready to take my skills to the next level. I’ve purchased Chris Birch’s Say No to Slow set of instructional videos on Vimeo and have been watching them while I wait for the brake pads to arrive. I can’t wait to get out there and try some of what Chris is saying.

Why pay for something that is free on YouTube, you ask? In a previous post, I listed some of my favourite online teaching channels, and I still think those are excellent resources. But Chris goes into a lot more detail than most of those, and more importantly, he covers the boring fundamentals that those channels can’t afford or choose not to cover, and that’s what I need. Yeah, everybody wants to learn how to wheelie and drift (but not at the same time!), but I’m more interested in things like bike set-up, foot placement, body positioning, and cornering in the dirt, which are covered in the video series. I was surprised that the entire set of 12 videos is under $50 Canadian. I don’t have any affiliation with the production team. I just know good pedagogy when I see it and what I need now most is guided self-practice.

There is a sandpit just over the border in Ontario I practice at, and a network of trails and Class 4 roads not much further starting in Hawkesbury. My bike has a new rear shock—one capable of some serious dirt—and Ricor Intiminator valves in the front forks,  so the suspension has just been upgraded to dirt-worthy. It’s got good crash protection, as do I with my new Leatt STX neck brace. We’re ready.

stx_front_web_zoom_1

The STX is for street and adventure riding. The wider scapula wings do not conflict with your back protector and you do not need integrated body armour.

Are you ready? It’s been a crappy spring for weather but the double-digits are just around the corner. Is your bike ready? I’ll be writing an article for my new paying gig, Riders Plus, on how to get started maintaining your bike. So get your tools out and let’s change the coolant, the brake fluid, the oil, check your tire pressures, and get ready for a new season. It is the best of times, it is the worst of times. Riding makes everything a whole lot better, especially when shared in the company of friends. If you want to escape the bad news for a day or more, there’s nothing quite like a fast motorcycle to help you do it.

Bike2020

Bigby, ready for the 2020 season.

Remise en Forme

20190525_104322

Google translates it as “fitness.” Literally, it might be “put back in shape.” I’ve seen it translated more liberally as “Spring Refresher.” The Remise en Forme is a day of exercises to regain muscle memory of the technical elements of riding. Watching street riders, you may not easily see that riding a motorcycle is a skill, let alone athletic, but off-road riding involves a whole set of skills as well as a certain level of physical fitness. After a winter of watching Dakar reruns on the couch, it’s a good idea to remind the body by targeting specific skills with specific exercises of what it knew how to do last fall.

I belong to two clubs that offer a Remise, so I had the pleasure of refreshing myself twice, so to speak, in May—once with MotoTrail Aventure, and once with the BMW Moto Club of Quebec. I had the same BMW-certified instructor for both, and he was incredible. He has represented Canada twice in the GS Trophy contest. Say no more. He demonstrated all the exercises flawlessly without even a dab (i.e. touching a foot down), and he did it on Michelin Anakee (street) tires when we were all struggling on knobbies.

Here are some of the exercises we did, roughly in the order done:

  1. The Walk-Around. (Engines off.) Have a partner assist you by being ready to catch your bike should it begin to fall. Start by standing beside your bike and find its balance point. Now let go and move to another part of the bike. At no time should you hold the bike with more than the fingers of one hand. Move entirely around the bike, 360 degrees, releasing and catching different parts (windscreen, tail-rack, etc.), ending up back beside the bike where you started. This exercise helps remind you that all of those 500 lbs can be zero when the bike is perfectly balanced. Also to breathe when you are nervous.
  2. The Friction Point. Sit with your bike idling in first gear, clutch in. Gently ease out the lever until the bike inches slowly forward. Now stop using the rear brake while pulling in the clutch lever no more than 1/8″. Ease out again and repeat. This exercise helps you discover the friction point. Much of off-road riding occurs at the friction point with the clutch lever moving no more than 1/8″. If you pull the clutch lever in all the way when you want to slow down, you will not be ready to recover quickly enough if you need to accelerate.
  3. Circus Riding. Okay, he didn’t call this one that, but that’s what it reminded me of. We played follow the leader in a wide circle, doing what the lead rider, the instructor, did. All riding was done standing up except where indicated. He rode with one hand (throttle hand, obviously); he rode with one foot on the peg, then the other foot. Then he sat down, swung his right leg over the bike and put the right foot on the left peg and stood up again. Then he sat down, swung his legs over the seat, and stood up with his left foot on the right peg. Then he sat down and swung his left leg over the seat to straddle the bike again. Then he hopped off the bike and walked beside it a few paces. Then he hopped back on, Roy Rodgers style, like mounting a horse. All this was done at slow speed without stopping, the bikes in 1st gear. This exercise teaches you that you and the bike are independent but together you have to remain in balance. I was reminded of this exercise later in the day when we got into slippery terrain and I had to allow the bike to move around beneath me. It’s all about balance, balance, balance!
  4. Peg-Weighting. A lot of turning in off-roading is done “with the boots,” not the handlebars. You weight the peg on the side of the direction you want to turn. You have to bend your knees and stick your butt to the outside of the corner to counterbalance the bike. We slalomed through a series of cones, then looped around to start again. I was doing this okay but the assistant instructor told me to brace my outside knee against the bike and to use the knee to straighten the bike if needed. This little tip was ground-breaking for me. It gave me more control over the balance of the bike when hanging off it in tight low-speed turns. This exercise reminded us that you don’t steer in low-traction zones with the handlebars but the pegs, and you keep your weight out over the contact patch or the bike might low-side on you.
  5. Parallel Lines. A variation of the above exercise is to add a straight section where you have to ride between two lines (straps or string) about 6″ apart. This is to simulate when you have to ride between two fallen logs, or across a bridge with only 2 x 6’s running lengthwise, or along a ledge. Vision is everything. You look at your entry point but once you enter you look up at your destination. Don’t look down! Look straight ahead. This exercise teaches you how to ride along a narrow path. 
  6. The Full-Lock Turn. Place four cones about 10 meters apart in a square. You have to ride into the square and turn full lock within the cones one full circle before exiting. Again, body positioning and vision here are the keys. You have to stand up, brace your outside knee against the bike for leverage, get your butt well out to the side, and swivel your head and especially look where you want to turn. You should be looking toward the centre of your riding circle at all times except for the very end when you look toward the exit before leaving. Practice clockwise and counter-clockwise turns. It’s pretty obvious, but this exercise practices sharp turns on the trail or U-turns on single-lane gravel roads.
  7. Hill climbs and descents. The secret to both is body positioning. In one version, we had to move our weight back because it was a sandy hill and the bike needed traction to get up. In the other, it was a grassy hill and we were told to lean forward or the bike might flip going up. So it really depends on the type of terrain. For both, you coast to the top because you don’t know what is over the crest. It could be your fallen buddy or, as was the case with me in Cape Breton, a cliff! A variation is to stop halfway up the hill if your buddy in front has fallen before cresting. Then you stall the bike using the rear brake, release the clutch, let the engine hold the bike on the hill and, bit-by-bit, roll the bike back down by feathering the clutch. Don’t panic and pull in the clutch or you’ll end up on your back! Don’t forget to look behind you in case there are trees or logs to avoid. For descents, weight is always at the back and we were advised to use the rear brake.
  8. Water Crossings. Our instructor said water crossings are mostly psychological because you can’t see what you are riding over. The same principles of riding apply: look up toward your destination, feather the clutch at the friction point, and don’t squeeze the bike with your knees. The latter is important because if you hit a hidden rock the bike might be thrown sideways and you have to be ready to counterbalance.
  9. Emergency Braking. Ride about 40 km/hr into a small square of cones and brake as quickly as possible. It’s all about body positioning. Weight and butt back, arms outstretched, then stomp on rear brake, and gently squeeze the front brake lever. Contrary to what I had been taught elsewhere, this instructor said to pull in the front brake lever fully, not all at once, but gradually. Yes, the front might lock up, but with your butt back and your arms outstretched, you can “wrestle” the front end to keep the bike up and you modulate braking as needed (back off slightly when it locks). You want to be right at the point of static friction, when the tire begins to skid. Because most braking occurs with the front brake, this technique will result in faster stopping.

Finally it was time to put all these skills together on some trail riding. We played follow the leader and there was a mixture of sand, mud, rocky terrain, some rock ledges, ruts from rainfall runoff, water crossings, and single-track. It was a ton of fun! By the end of the day we were tired but ready for the season.

The take-aways for me:

  • Vision is everything. He said vision is 90% of riding. Always look to where you want to go. It sounds so obvious but when you come upon an obstacle, like even some rocky terrain, your natural reaction will be to look down at the front wheel. You must resist the urge, trust the bike will roll over anything, and look up, further down the trail.
  • Contrary to dirt-bike riding, don’t squeeze the bike with your knees. With these big bikes, you aren’t going to hold them up with your knees. Instead, bow your legs and create space between the inside of your thighs and the bike. This space allows the bike to move around beneath you as it slips and slides over low-traction terrain or is bounced over rocky terrain. Thinking of the circus act balancing practice, you will be fine if you and the bike together remain balanced over the centre-line of gravity.
  • On the same topic, body positioning is crucial. Contrary to street riding, in which you squeeze the tank with your knees and remain fairly static on the bike, off-roading requires a lot of movement on the bike. The first remise I was still feeling the effects of a pulled back and had difficulty reacting quickly enough to changing circumstances. The second I was fully mobile and did much better. Don’t be afraid to get up there on the pegs and move around—back, forth, to the sides.
  • Breathe and relax when you come to a challenging obstacle. As in all sport, tensing up is counterproductive, and breathing is the simplest way to get the body to relax.

One of the reasons I like off-roading is that it involves the development of skills and so has become yet another ambition to pursue. I love pushing myself, especially physically these days, and the Remise is a great way to brush up those skills at the start of a new season. A big thank you to Moto Trail Aventure and the BMW Club Québec, and especially the instructors who have volunteered their time and expertise.